#posture

The Rotator Cuff

A few years ago, I took my then three year old daughter skiing for the first time. It was exhilarating! I held her between my legs as we swooshed down the hill, both of us giggling the whole way down. On the second run she wanted to try by herself, so I went a bit ahead to catch her. Down she comes and I grab her with my left arm, feeling a crunch and a bit of a snap in my shoulder as I did. Uh oh, I thought - did I just feel that? My shoulder was sore but we skied another run, had some celebratory hot chocolate and went home.

The next morning, I couldn’t lift my arm without intense pain. Washing my hair was next to impossible. It was agony. I knew I had damaged my rotator cuff and it was time to get to work.

What is the rotator cuff?

AdobeStock_160639002.jpeg

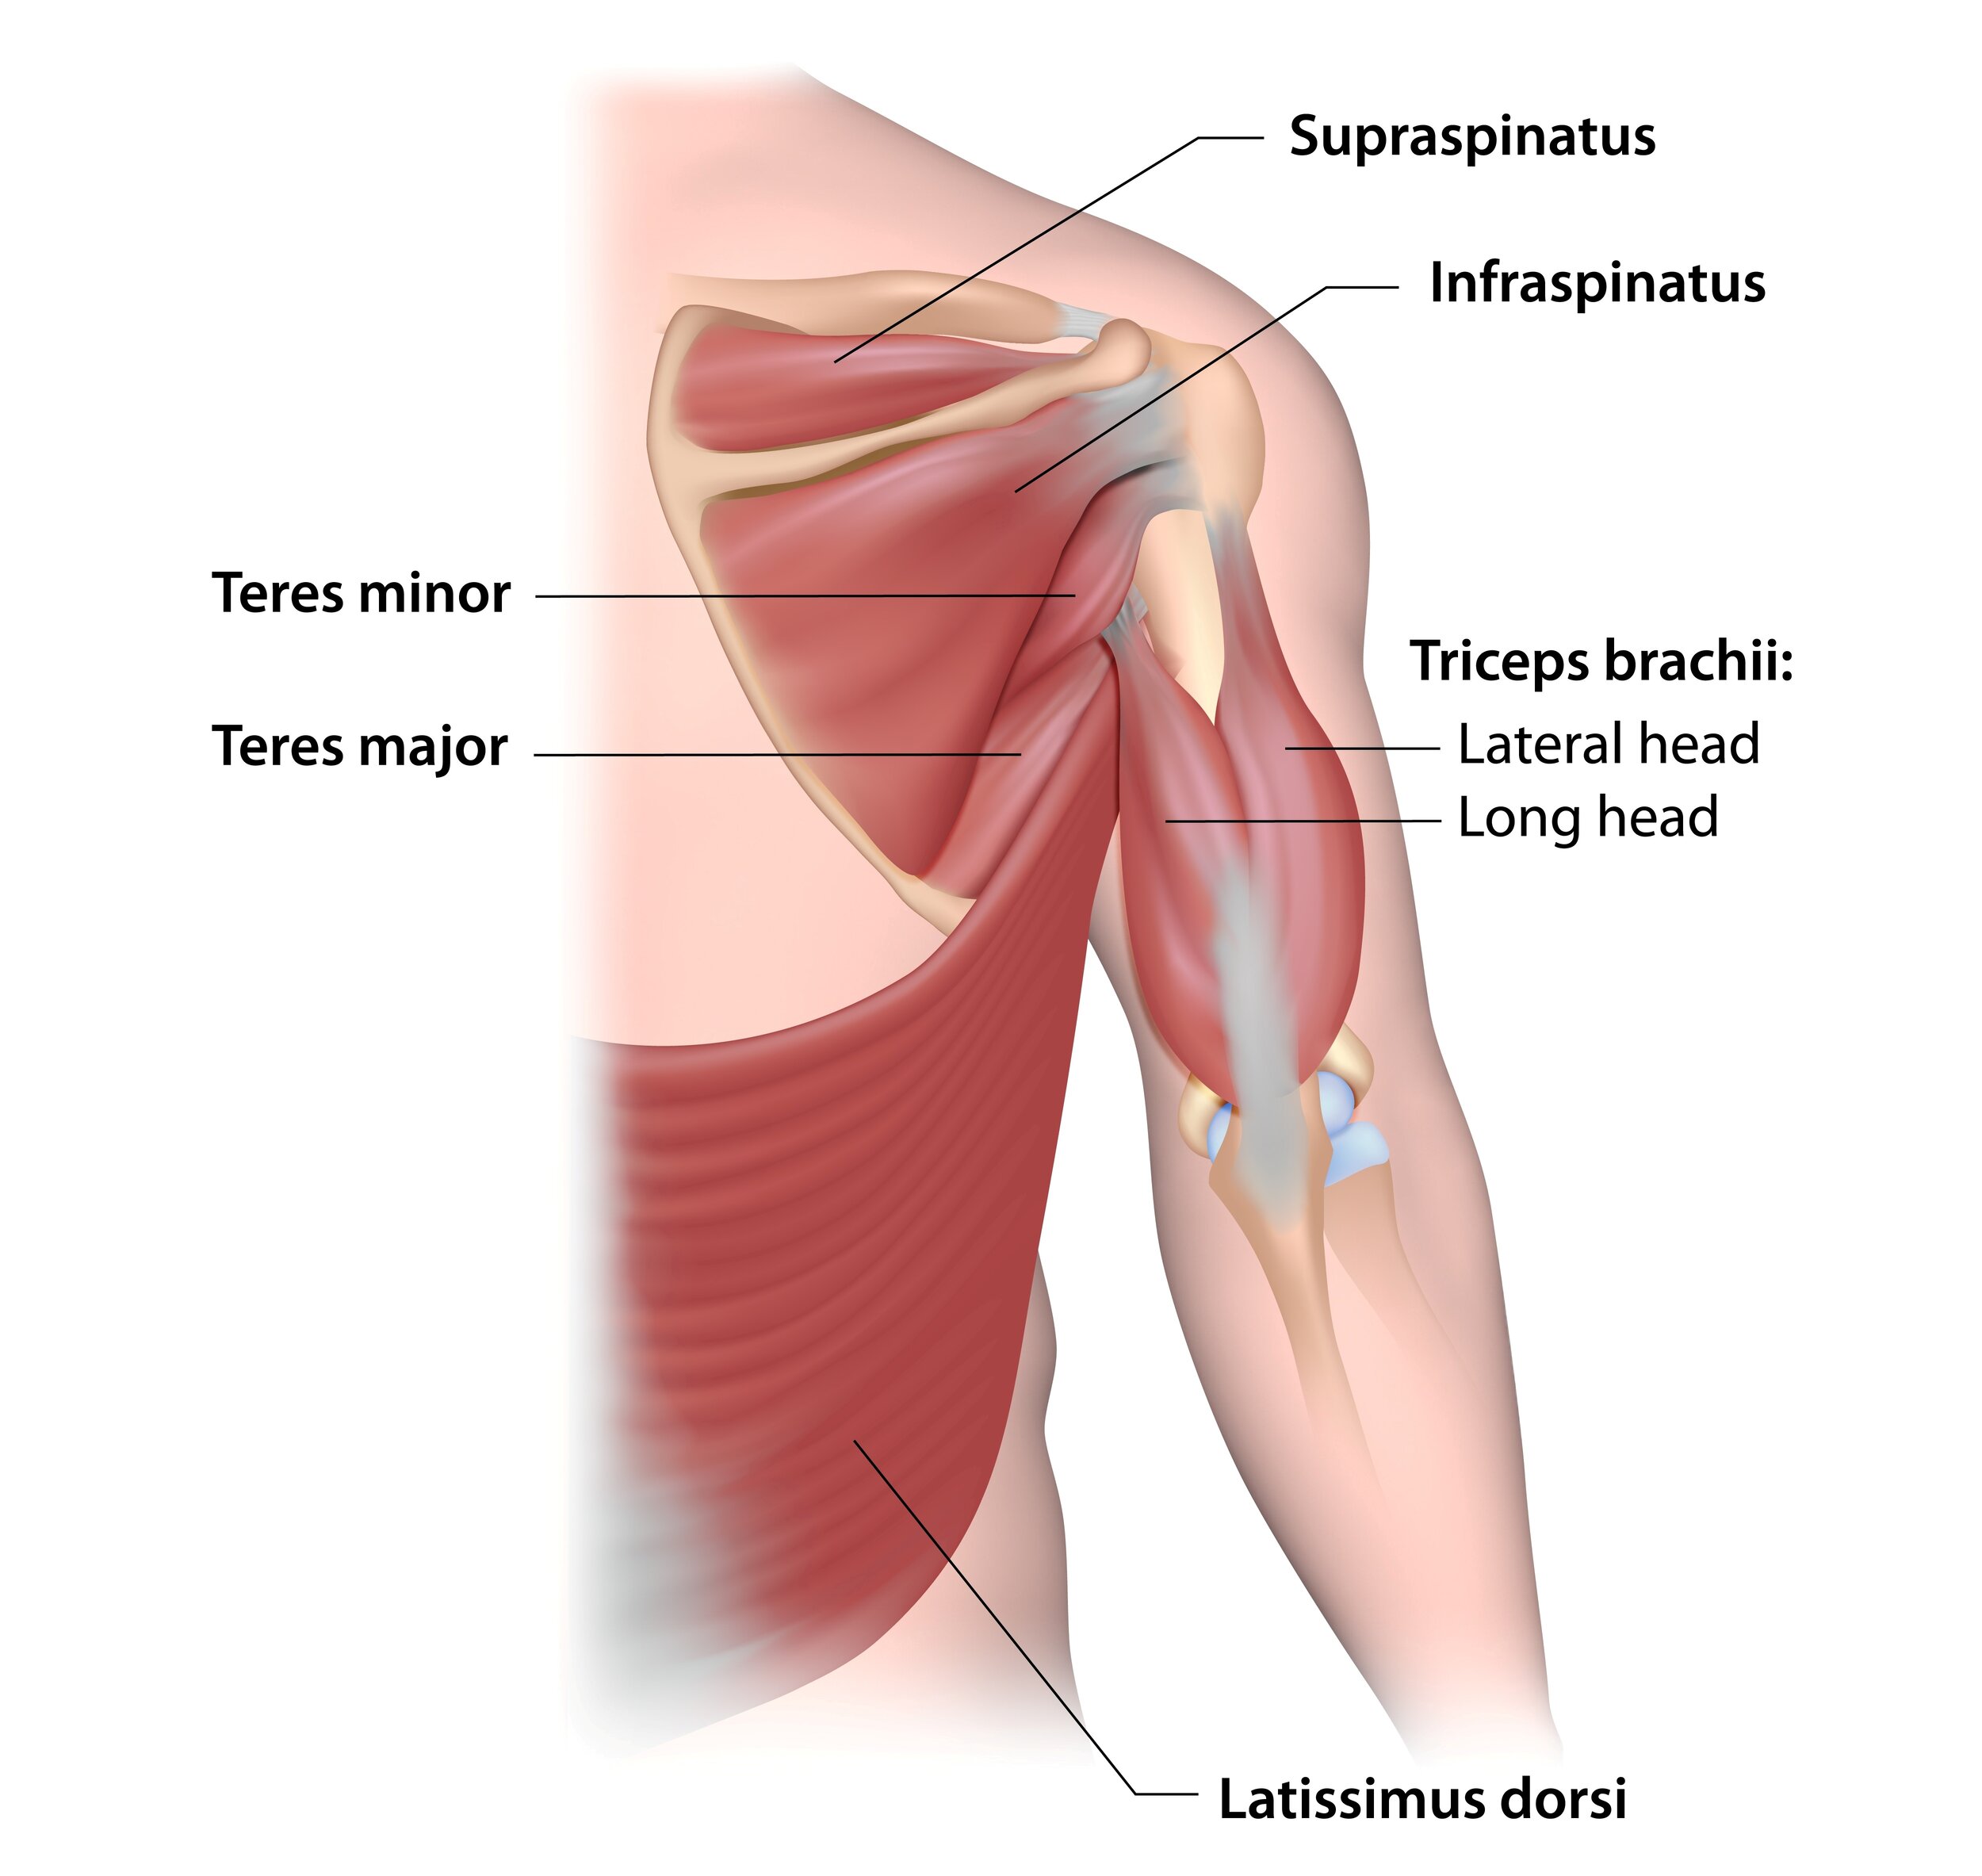
The rotator cuff is a group of 4 muscles - the supraspinatus, infraspinatus, Teres minor and subscapularis (not pictured - lives on the underside of the shoulder blade) - that attach the humerus (aka the upper arm bone) to the scapula (aka the shoulder blade). These muscles aren’t big - the supraspinatus is roughly as thick as my thumb! For the amount of work these muscles do, they certainly aren’t as beefy as you would think.

What does the rotator cuff do?

The rotator cuff has 4 main jobs:

  1. Supports the shoulder capsule - have you ever eaten chicken wings and noticed the white little nubbin that connects the bones? That, dear reader, is a capsule! A capsule surrounds every movable joint in your body, protecting it and making sure the synovial fluid (aka the lubricating fluid) greases those hinges, so to speak. The rotator cuff surrounds and helps support the shoulder capsule, giving it more structural integrity as the shoulder moves through its incredible range of movement.

  2. Keeps the shoulder in its socket - if you look at the bones of the shoulder and strip away everything else, it looks like a really big golf ball on a golf tee. The rotator cuff acts like bungee cords attaching that golf ball down to the tee - a few springs to help guide the shoulder to where it should be.

  3. Moves the shoulder - this is where the “rotator cuff” gets its name from: it rotates the shoulder! These four muscles are key to lifting your arm up to your side and getting your hand to reach up behind your head and your back. If you’ve ever had issues with your rotator cuff, you’ll know things like putting on deodorant, putting on a jacket or reaching for your seat belt in the car are particularly problematic.

  4. Fine tunes the shoulder movements - not only do these muscles move the shoulder but they also act to smooth and fine tune movements. Think of when you’re reaching for that glass of wine - you want your movements to be as smooth and accurate as possible. Your rotator cuff is one reason for your successful wine grab!

How do you injure your rotator cuff?

AdobeStock_200284683.jpg

There are two main ways people injure their rotator cuffs:

  1. Overuse and repetitive strain - anyone who uses their shoulders a lot, especially with overhead movements, are susceptible to rotator cuff strains. Baseball players, electricians, carpenters and hair stylists are perfect examples of people who often have their arms up and aggravate their shoulders over time.

  2. Acute strain - this is just like my story above. It may be your dog pulling unexpectedly on their leash or your toddler jumping into your arms when you weren’t quite expecting them to jump.

Once it’s injured, how do you fix it?

There are two main keys to shoulder rehabilitation:

  1. Posture - posture is key to shoulder health. Remember that the rotator cuff muscles attach the shoulder blade to the humerus. When someone sits with rounded shoulders, their shoulder blades sit further away from their spine and at more of an angle. This means the humerus sits more forward in the socket and puts the rotator cuff muscles in a disadvantageous position - they have to work a lot harder to function. Over time, this leads to degradation of the rotator cuff. When you have proper posture, your shoulder blades are much more likely to sit back where they should, allowing your rotator cuff to work properly.

  2. Strength - this is key to everything, isn’t it? For your rotator cuff to be working, it needs to be strong. But it’s just not the rotator cuff, it’s everything else that interacts with the shoulder - rhomboids, traps, lats, biceps, triceps, I could go on! - as well as everything that’s involved with posture. That. Is. A. Lot. And while it can seem overwhelming, that’s where we as physiotherapists come in. This is where we guide you on what to do and when, with how much weight and when you can move on to harder things.

For more information on rotator cuff rehabilitation, check out Physio-Pedia’s page on the rotator cuff.

AdobeStock_265616407.jpeg

Shoulders are dynamic - they have a huge range of movement and we use them all day. When pain sets in, it can often feel like they will never get better. But with a proper assessment, we can figure out why your shoulder is hurting, get to the source of the problem and do something about it.

If you would like to have one of our therapists look at your shoulder - or anything else! - give us a call at (778) 630-8800 or email us at clinic@ladnervillagephysio.com.

Ergonomics: The At Home Edition

Canva - Mother and Kid Typing on a Laptop.jpg

So you’ve found yourself working from home all of a sudden. Kids are underfoot, you don’t have a proper office or even a desk to claim for yourself and the online video meetings seem to be endless. Chances are, you’ve had to improvise. Maybe you’ve been waking up, staying in your PJs, and curling up in bed with your laptop. Or maybe you find yourself sitting cross legged on the couch, laptop down on the coffee table.

I saw an article recently compiling “unglamourous” photos of people’s at home workstations. There were photos of people balancing their laptops on recycling bins, using ironing boards in their bathrooms – there are definitely some very creative people out there. This may have all been fine for the first couple of days, but now that it’s been a few weeks, I’m guessing you’ve probably started noticing some new aches and pains that only seem to appear after a day working from home. Is your neck starting to throb? Low back feeling angry?

Canva - Woman Sitting On the Floor Using Laptop.jpg

The good news is, that doesn’t have to be your new reality! And no, you don’t need to order the fanciest ergonomic chair, or that automatic sit-stand desk! The great news is that even if you don’t have access to a desk at all, there are simple ways that you can make your own ergonomic work station at home, using things you probably already own!

Why Is An Ergonomic Set Up So Important?

Let’s start by quickly reviewing why an ergonomic set up is important at all. You’ve probably already noticed that your body doesn’t react well to sitting cross legged with your body hunched over, neck curled down while you work on your laptop for 5 hours. But why is that?

First of all, our bodies were not designed to be in any one static posture for hours on end, so even if you are in a so-called “perfect ergonomic set up” it is still very important that you change your position and take moving breaks regularly. But when we are in a prolonged poor posture, the effects are worsened as some muscles remain in a shortened position while others are overly stretched. Therefore, we want to remain in a relatively neutral position. (For more information, check out our previous blog on the physics behind ergonomics.)

How do you do that? Focus on these three things:

  1. Screen Height: The top line of your screen should be just around eye level or slightly below and within arm’s reach so that your neck can remain in a neutral position rather than constantly looking down or craning forward. If you don’t have an external monitor you can adjust, you can stack books under your laptop or monitor until you attain the correct height. Don’t have a ton of books? You could use an upside down laundry hamper, tupperware, shoe boxes, old boardgames - the options are endless!

  2. Keyboard and Mouse: If you are using a laptop, the keyboard height may now be too high for your wrists/arms. This is where getting an external keyboard and mouse can be so pivotal. While external monitors are often quite pricey, an affordable keyboard and mouse are much easier to find. You can now set up the keyboard and mouse in a way that your wrists are not curled up or down, with your elbow bent at around 90-100 degrees by your side, and arms supported. The position of your keyboard/mouse should also be close enough to you that you are not having to reach to use them.

  3. Chair Set Up: If you’re going to be sitting, you want your hips and knees to be bent to around 100-120 degrees, with your feet supported – no dangling feet! Find a box, books, anything that can support your feet while maintaining a height that will allow the above set up to happen. You can also use a rolled up towel or small cushion to support your lower back, and maintain your natural lumbar curve.

Change Your Position Frequently

So now that you know the basics of how to set up your work station ergonomically, you can change it up, while maintaining the essentials. This is important as the best posture is a changing posture. This means you can stand or walk on the spot while working, while maintaining all of the above elements. And if you don’t want to have to keep adjusting your work station, take short but frequent stretch breaks (every 30 minutes or so). Get up and do a quick lap of your room, move your neck, do a few lunges.

Some Big No-Nos

  • Clutter: If there’s a lot of clutter under your work area, there won’t be any space for your legs and feet to sit comfortably. If there’s a lot of clutter around your work area, you’ll be constantly reaching over things to get to what you need, resulting in unnecessary repetitive strain. Place what you need close by, and remove what you don’t need.

  • Poor Lighting: Glare, or light reflected off of your work surfaces into your eyes, can be not only irritating, but can also result in more aches and pains if you end up in a poor posture trying to avoid the glare, or leaning to see your work better. To avoid this, position yourself so that you are either sitting beside or parallel to the window, and between lights in your room. If you have overhead lighting, make sure your screen is at a right angle to the work surface.

Canva - Flat Lay Photography of Laptop Beside Yellow Flower Arrangement.jpg

And there you have it - easy and simple ways you can make working from home way easier on your body. And most importantly...don’t forget to keep moving! Check out our blog on fun ways you can keep moving while in quarantine.

Looking for some individualized tips to tweak your own at home workstation? We are here for you! Book online, email us at clinic@ladnervillagephysio.com or call us at (778) 630-8800.


RESOURCE LINKS:

1. WorkSafeBC [Internet]. Worksafebc.com. 2018 [cited 7 April 2020]. Available from: https://www.worksafebc.com/en/resources/health-safety/books-guides/how-to-make-your-computer-workstation-fit-you?lang=en&origin=s&returnurl=https%3A%2F%2Fwww.worksafebc.com%2Fen%2Fforms-resources%23q%3Dcomputer%2520workstation%26sort%3Drelevancy

2. Office Ergonomics: Practical solutions for a safer workplace [Internet]. Lni.wa.gov. 1995 [cited 7 April 2020]. Available from: https://www.lni.wa.gov/IPUB/417-133-000.pdf

How to Avoid Common Gardening Injuries

Gardening season is here! And if you’re like me you have launched yourself outside with enthusiasm and gusto. There is so much to love about gardening. The fresh air, it’s relaxing (sometimes), and can be a very rewarding activity. But gardening can also be very physically demanding work and if you aren’t careful you might end up with an injury that could have been prevented.

Below are some tips to help you avoid the most common gardening-related aches and pains that we see!

  1. PACING: If your normal activity level is walking the dog for 20 minutes around the block would you suddenly wake up one day and decide to run a marathon? Probably not. If you did you would probably survive the ordeal but your body certainly would not be happy with you. The same goes for gardening. If you are generally sedentary and don’t do a lot of full body exercise, then keeping your arms overhead for four hours while you trim the hedge all in one day because “you just want to get it over with” is probably not the best idea for your shoulders. Instead try to do the more intense activities for shorter periods of time and try to spread them out throughout the day or over a few different days with easier activities interspersed.

  2. YOUR LOW BACK: Repetitive bending and twisting is tough on any back, but if you have a history of back problems (especially disc problems) then you really may trigger some pain. Be careful with your lifting posture and use proper techniques (wide stance, back in neutral, lift with your legs, you know the drill). For lifting and carrying keep the load as close to the center of your body as possible.  Maybe try sitting on a low stool when working in a garden bed instead of being on your hands and knees. If your back starts to feel sore take a break. Better yet, if you notice you have been hunched for a while get up, walk around and maybe give your back a chance to arch a bit before the ache even sets in. 

  3. YOUR SHOULDERS: The reaching, the grabbing, the digging, the pulling, the pruning, the supporting of body weight while on hands and knees…. it’s almost a perfect storm. Once again, unless this is something you do regularly, shoulders can struggle with a sudden increase in heavy activity. Specifically, shoulders tend to dislike overhead activities, reaching, and twisting. The more repetitively you do these things or the more prolonged the activity, the more likely you could end up with rotator cuff impingement (pinching) or tendinopathy (overuse injury). Again, pacing and rest breaks are your friends. Also, if you must prune the hedge get on a ladder so there is less overhead work, and move that ladder frequently to avoid unnecessary reaching. 

Please note that a little bit of muscle stiffness the day after gardening is completely normal and can be a good thing. It means you worked your muscles hard enough that they will become stronger. If you experience this soreness it is probably a good idea to take a rest day in order to give yourself some recovery time. Pushing through sharp pain is not recommended.

We hope these tips have been helpful for you. If you have any questions or would like to book an assessment  you can give us a call at the clinic 778-630-8800 or access us online at ladnervillagephysio.com.

Happy gardening!

Your Head is a Bowling Ball

FREEZE!

As you read this, what position are you in? Are you slouching? Did you fix your posture once you realized I had brought your attention to it? I hope so because POSTURE MATTERS!! Poor posture can lead to unnecessarily high loads through your joints and muscles which can CAUSE INJURIES over time. Think about holding a bowling ball close to your chest. Now think about holding a bowling ball at arm’s length. It’s easier to hold the bowling ball closer to you, it’s just physics. Now think of that bowling ball as your head. And your poor neck is represented by your arms. Every time your head shifts forward by just one tiny inch you are loading up extra work onto your neck muscles. Maybe you don’t realize you’re doing it because, you know, it’s just so you can read the fine print on your phone or computer screen, or maybe you haven’t gotten around to getting new glasses yet, or maybe you enjoy the “chin poke” look, but every little indiscretion adds up over time to a lot of extra work for your joints and muscles. FYI, they don’t like that.

Head forward posture pic.png

I struggle as I write this to think of a joint that isn’t affected by poor posture. Neck injuries, rotator cuff injuries, wrist injuries, you name it. I personally have even injured my big toe from poor posture (I went through a phase where I decided it was easier to sit with my feet in “tippy toe” position rather than change the height of my chair. I’m not proud of it, but I feel like full disclosure is necessary). Basically, if you sit in the wrong position for a long enough time, something is going to start hurting. So… let’s avoid that shall we? Below is a quick overview of proper workstation setup and three tips for better workstation posture.

ergonomic-workstations-21.gif

My Top 3 Desk Posture Tips!

TRex.png

1. BE A T-REX

If you suddenly woke up one day as a T-rex (yes, the dinosaur) you should still be able to do your job. That means if you are sitting up straight and “glue” your elbows to your side, everything that you need to use on a regular basis at your desk (keyboard, mouse, phone, etc.) should still be within your reach radius. As soon as you start reaching further or twisting your body or elevating your arms/shoulders in order to complete a task you are increasing the workload on your body.

2. CAN YOU SEE YOUR SCREEN PROPERLY???

This is important. Do you have reading glasses? Do you actually use them? Is your screen close enough to you? Is the font big enough? Is it the correct height? Again, head = bowling ball. Do your neck muscles a favour and make head position a priority.

overhead.jpg

3. BACKREST

Most people tell me they have a nice ergonomic office chair. My next question is, do you actually use said awesome ergonomic chair? Or, do you sit on the edge of your chair and lean on the desk. Please use the backrest. The backrest is there to help you stay upright, supported, and relaxed. Maintaining a proper lumbar lordosis (curve in your low back) rather than a big “C” shaped slouch is a major factor to overall posture.

4. A BONUS

Shoulders should be down, back, and relaxed. It’s not military posture we are going after, but if you continue to slouch you narrow the space for your muscles and tendons to maneuver. This can lead to impingement syndrome, which is no fun at all to get rid of.

 Images from: https://shpare.com/greatest-25-ergonomic-desk-setup-images/