Prolapse Part 2: I Have a Prolapse! Now What?

OK, so you have prolapse. What do you do about it?

Treatment for prolapse depends on a few different factors including (but not limited to):

  • Which structure(s) is/are prolapsed? (Anterior wall, posterior wall, uterus?)

  • What is the extent (grade) of the prolapse?  (I covered the grading in my previous blog, but for a brief refresher Grade 1 = mild, Grade 2= moderate, grade 3 = large).

  • How much is it bothering you? (Depending on the type of prolapse some things you might notice include sensations of vaginal heaviness or pressure, incomplete bladder emptying or trouble initiating a bowel movement).

A pelvic floor physiotherapist can help guide you as to which exercises and precautions are most appropriate for you and your specific situation.  

The three primary treatment options for vaginal prolapse are:

Pessaries

Pessaries

  1. Pelvic Floor Exercises. Pelvic floor exercises are fantastic because they are easy to do, inexpensive, non-invasive, and fairly effective. I often say that running with prolapse might feel a bit like running without a bra on (not my favourite feeling in the world). But with a little strength and skill your pelvic floor musculature can become the sports bra. It can be strong and work to support the prolapse throughout the day, maybe even provide a little bit of lift. While pelvic floor exercises are useful and helpful, they are not a quick fix, nor are they magical. They are often more than enough for women with only minor bother symptoms or mild/moderate prolapse, but they cannot turn a prolapse that is protruding outside of your body (grade 3) into a “barely there” grade 1.

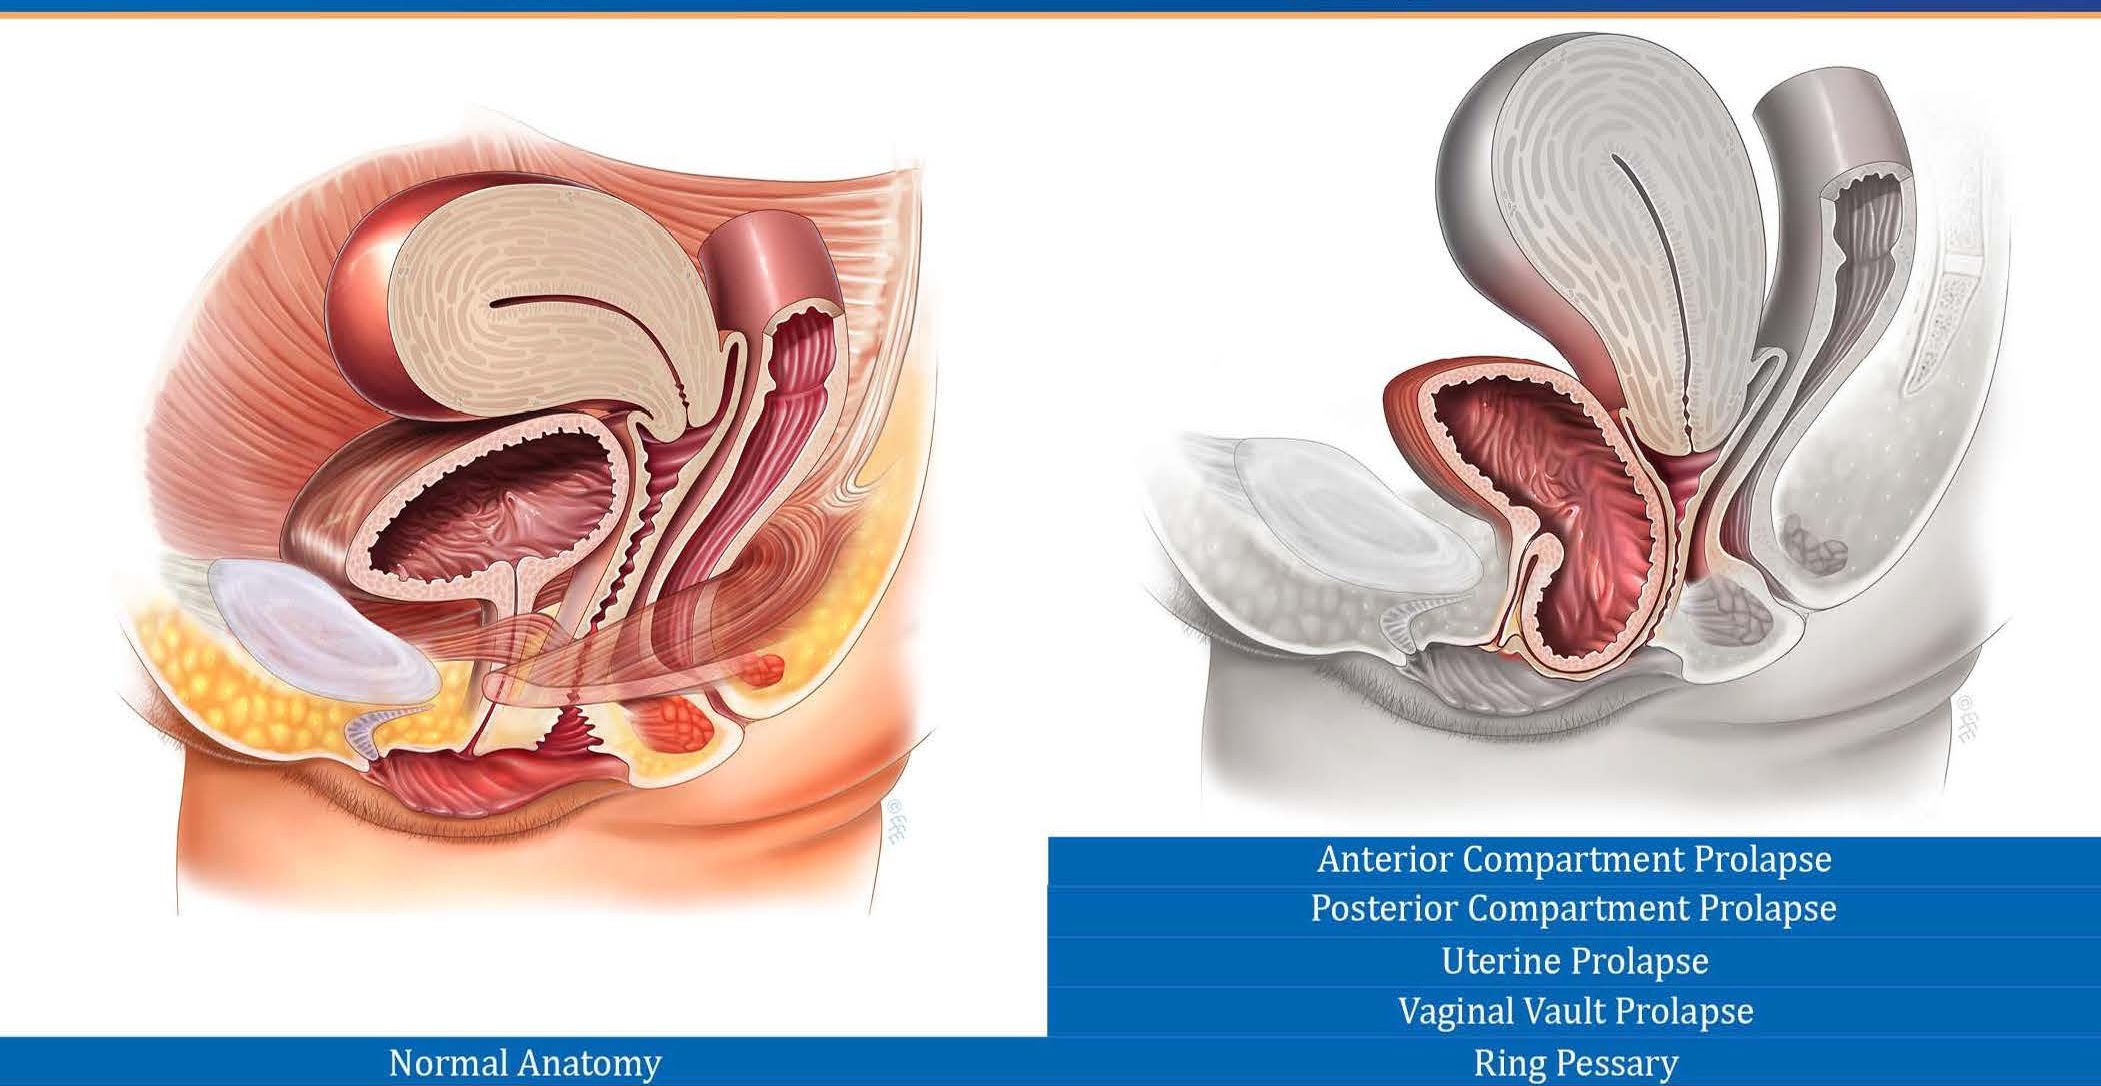
  2. A Pessary. If pelvic floor muscles are the sports bra then a pessary is a sports bra with underwire! If you have never heard of a pessary you aren’t alone. Essentially, they are silicone vaginal support inserts (maybe like an ankle brace, only for your vagina) that work to lift and support the prolapse. I get that this sounds intimidating, but here is the thing…. When a pessary is inserted (and fits correctly) you can’t feel the pessary and you can’t feel the prolapse! You read that right. It essentially takes your prolapse bother symptoms away (whatever they might be, such as feelings of vaginal heaviness, pressure, etc). Pessaries come in many shapes and sizes and have different wearing patterns. Some women only wear a pessary while exercising. Others insert it every day and take it out every night. Some people wear the pessary for several days at a time. There is some upkeep involved such as cleaning the pessary and follow up visits to ensure the pessary fits correctly. They are a successful long-term management tool as an alternative to surgery.

  3. Surgery. This is the only “true fix” that is not just supporting from below but actually “re-stringing” from above. It is also obviously the most invasive procedure. Each gynecologist and surgeon will have their own protocols so I suggest having an in-depth conversation with your specialist if you are considering the surgical route. Surgical recovery times and potential complications such as re-occurrence rates are all important questions to ask.

One big consideration, no matter which treatment route you choose, are steps you can take to help prevent further progression of the prolapse. These can include avoiding chronic constipation, minimizing high impact activity, being mindful of correct lifting techniques to name. Or maybe you have no sensations of vaginal heaviness but do experience symptoms such as incomplete bladder emptying or trouble initiating a bowel movement. These could also be a sign of prolapse.

If you have any questions about prolapse or would like to book an assessment please feel free to email us at clinic@ladnervillagephysio.com or phone the clinic at 778-630-8800.


Wondering where to find Part 1? Right here - Part 1: What is Prolapse?

Prolapse Part 1: What is Prolapse?

Whenever I am doing an initial intake interview with a client who has come in with concerns about their pelvic floor I ask about prolapse. The most common answer I get when asking if people have any concerns about prolapse is simply “what the heck is prolapse?” Well, let me tell you.

prolapse.jpg

You have various organs within your abdominal cavity, the lowest of which include your bladder, your uterus and your rectum. They are all strapped into place and held in the correct position with connective tissue, like a marionette being held upright by strings. But sometimes those strings get over-stretched (like during childbirth). So instead of having nice upright puppets you now have puppets with extra long strings, which means you now have droopy puppets. These “droopy” organs then begin to collapse downwards.

bears.jpg

It’s like your vagina is a tent (yes, like a camping tent), and then a big old bear (aka one of your organs such as your bladder) comes and sits on the edge of your tent. The bear is not physically inside your tent, but he’s leaning on it and squishing it, and making the space inside your tent smaller. This can lead to a “bagginess” or “sagging” within the vaginal canal which is also known as prolapse!

Women who have a prolapse (that they are aware of) generally describe sensations of vaginal heaviness, pressure, of something being inside of their vagina (like a tampon or a “bubble”), or a general feeling of their “insides falling out.” This can occur all day every day or occasionally. Often activities such as coughing, sneezing, carrying something heavy, or being on your feet all day can increase awareness and sensations of the prolapse. That being said, many women have a prolapse and have no sensation of it at all. This applies to small, moderate, and large prolapses. Some women have tissue protruding outside of their vagina for the majority of the day but if you asked them to stand clothes-free and hands-free they would have no awareness that their anatomy was different or changed.  

The name of the prolapse will depend on the structure causing the issue. I have listed a few of the more common terms below:

  • Anterocele/cystocele/anterior vaginal wall prolapse: these are all generally names used for when the bladder is the offender. When the bladder decides to droop, it collapses into the empty space of your vaginal canal. This can sometimes lead to symptoms such as incomplete bladder emptying.

  • A rectocele is also known as a posterior vaginal wall prolapse. This is when the back wall of your vagina (the wall between your vagina and rectum) is pushed forward due to external pressure from the rectum. Please note that a rectocele is not the same as a rectal prolapse. This is when tissue is loose inside the rectum resulting in excess tissue bulging out of the anus. A rectocele can cause, among other things, difficulty initiating a bowel movement.

  • A uterine prolapse is pretty straight forward. If your uterus is dropping it’s more like the tent is collapsing from above. It can sometimes “drag” the front and back walls of the vagina down with it and seems to be the most noticeable type of prolapse.

You can usually tell which structure has prolapsed with a brief self exam. If you put your finger inside of your vagina and it feels squishy in the front, it’s a cystocele. Squishy in the back is a rectocele. If the extra tissue feels firm like the end of your nose you are feeling your cervix and it means that your uterus is the structure that has dropped.

The grade of a prolapse will depend on how much “droop” there is. If the bagginess is happening in the upper half of the vaginal canal it’s a grade 1. If the bagginess is in the lower half of the vaginal canal it’s a grade 2. If there is tissue protruding out the entrance of the vagina the prolapse is a grade 3.

Treatment options for prolapse vary and the right option for you will depend on a few things such as A)which structure is prolapsed? B) how big is the prolapse? And C) how much does it bother you?

I will discuss treatment options for prolapse in my next blog, but if you have any specific questions or would like a consultation please feel free to contact the clinic or book an appointment and I would be more than happy to help you out!


If you’re looking for the second half of this blog, check out Part 2 - I Have A Prolapse! Now What?

But I'm Dizzy! What Else Am I Supposed to Say?!?

I like to begin my vestibular physiotherapy assessments with a simple statement: Tell me your story. Everyone has one and they often begin the same way: they’re dizzy. Almost every time, I rudely interrupt them and say:

You’re not allowed to use the D word.

A perplexed, confused, sometimes angry look often crosses the story teller’s face. But why, they ask? That’s what they feel!

Here’s the thing with the word “dizzy” - it means completely different things to different people. Maybe your dizziness feels like the world is spinning around you, or maybe you’re spinning in the world. Maybe you feel like you’re on a boat, rocking side to side or forward and back in a rhythmical fashion. Maybe the ground just won’t stay where it’s supposed to and it comes up at you from the left, from the right with no sense of rhythm whatsoever. Maybe it just feels like you can’t stay on your feet and someone is pushing you to the side, that you’re off balance all the time.

All of these experiences can be very dizzying but they all come from different sources. When you tell your story, using words other than “dizzy” allows me to figure out where your story is going.

Hold on, blog readers - here’s where I go super nerdy.

The inner ear has two parts - the auditory half (this is the snail looking part, the cochlea) and the vestibular half. On the vestibular side, there are two parts:

Inner Ear Anatomy.jpg
  1. Semi-circular canals - these fluid filled canals respond to rotation. You have three of them that are at 90 degree angles to each other so they can respond to all the different directions your head can rotate: turning left and right, looking up and down, etc. When you turn your head to the right, the fluid in the horizontal canals turn to the left, trip the little lever in the canal (aka the cupula) and tell you which way your head is turning.

  2. Otoliths (utricle and saccule) - literally meaning “ear rocks”, the otoliths respond to gravity. The crystals, or otoconia, are attached to a glue membrane which together make up the macula. The otoconia are more dense than the fluid in the inner ear and sink, just like rocks in a pool. When you tilt your head, the otoconia pull on the glue membrane, which pulls on the hair cells and tell your brain which was is down.

Different problems with different aspects of your ears will give you different kinds of dizziness. If your story involves vertigo, my brain goes to the semi circular canals - since these are the guys that detect rotational acceleration, they are often somehow involved in your story. When you include a boat or rocking sensation in your story, your sense of gravity is off and the otoliths are often involved.

Maybe your story has a bit of everything - those stories are common! With a thorough vestibular assessment and a good overview of your story, we can often determine the cause of your dizziness (after this blog, how dare I use this word?!) and a treatment plan. If you’re struggling with vertigo, imbalance or anything in between, we can help. Give us a call at (778) 630-8800 or book online at ladnervillagephysio.com.

Thanks for getting nerdy with me!

Who Doesn’t Love A Good Walk?

Walking.jpg

When I ask people how they stay active, almost everyone includes the same answer: walking. It is one of the most studied forms of physical activity and counts some big names as its cheerleader: Harvard Medical School, The Heart and Stroke Foundation and The Arthritis Foundation, just to name a few.

The benefits of walking are seemingly endless. It’s low impact enough to be gentle on arthritic joints, yet with enough resistance to help people with osteoarthritis maintain their bone density. It’s free and accessible, and requires little more than a decent pair of shoes. It works your heart, your lungs and your muscles.  It can be a great solo adventure or an excuse to hang out with your friends. Here’s a few more benefits you may not know:

  • Improved brain function – a 2017 study found the impact of the foot hitting the ground while walking produced pressure waves throughout your circulatory system, significantly increasing blood to your brain. They even found that your heart rate and stride rate were synced by your body to help improve blood flow to your brain!

  • Improved mood – A large meta-analysis published in 2016 showed walking to be a treatment option (either by itself or as an adjunct to other treatment options) to those who suffer from depression. The American Office of Disease Prevention and Health Promotion’s 2018 Report on Physical Activity Guidelines also list walking as a treatment option for anxiety.

  • Improved memory and cognitive function – given the last two bullets, this makes sense! It’s even further supported by a 2015 study on older adults in Japan. Better memory, improved focus and concentration – what’s not to love?

DSC_0903.JPG

Have we convinced you to add walking into your weekly routine? Here’s a list of our favourite walks around South Delta:

  1. Ladner Spirit Trail - Technically located in the South Arm Marshes Wildlife Management Area, this trail is a fan favourite among my kids. Filled with carvings and painted rocks, the Spirit Trail access can be found off Ferry road close to Admiral Road.

  2. Swenson Walk at Ladner Harbour Park – Access to this park is from River Road, with a bridge going over the slough just west of Ferry Road. Tall trees with views of the water make it a great escape without having to go far.

  3. Deas Island Regional Park – Another tall tree and water view combination makes this park a lovely destination. Find the access to Deas Island off River Road a few minutes north of the Tunnel.

  4. Reifel Migratory Bird Sanctuary – If you’re into feeding black birds and chickadees from your hands, this is the place for you. Located at the far end of Westham Island, the best part of this walk is the berries and farm fresh produce you can get on your way home!

  5. Fred Gingell Park – Less of a walk and more of a grind, this “walk” involves a lot of stairs. The view on the way down is stunning and there’s a counter for you at the top (assuming you plan on subjecting yourself to it multiple times….) Find this park on English Bluff Road at around 3rd Avenue.

  6. Brunswick Point – Wander on the dike while you take in the birds and the ferries on this lovely walk. Its two main points of access are Wellington Point Park and at 30B Street and River Road.

  7. Boundary Bay Regional Park at Centennial Beach – Located at the north end of Centennial Beach, this lovely walk has great views of the beach with Mt. Baker in the distance.

  8. Lily Point Marine Park – Located in Point Roberts, this lovely walk has a bit of everything – panoramic views, beaches, a bit of hiking and some birdwatching. Head straight down Tyee Road from the border to the end, turning left onto APA Road.

What are your favourites? Let us know by leaving a comment below!

DSC_0548.JPG

IMS, Dry Needling, Acupuncture... Aren't They All The Same?

As physios, we get asked this question a lot - aren’t they the same thing? Both acupuncture and IMS use very thin (less than half a millimeter!), solid (in other words, not hollow) needles, but that’s where the similarities end.

Acupuncture is based in Traditional Chinese Medicine. It is believed the Life Force, or Qi, flows through the body in paths termed meridians. When the path of Qi is blocked, an acupuncture needle can be used at specific points along the meridians to re-establish the flow of Qi. Acupuncture can be used for a whole host of things outside of a physiotherapist’s scope, including labour induction, pain control, and mental health. Often, acupuncturists will place several needles into the body at various locations and leave them there for a period of time.

DN-1.jpg

Intramuscular Stimulation (IMS), also known as Dry Needling, is a completely different approach using the same tool. It has taken off in the last several years mainly because of how fast and effective it has shown to be with certain musculoskeletal problems. With IMS, we are looking for trigger points - tight bands of muscle fibres that are sources of pain and dysfunction within the muscle. After identifying the trigger points, needles are inserted into the points with the goal of disrupting the trigger point and forcing it to relax. Needles aren’t typically left in for any length of time.

Let’s pretend your tennis elbow has been acting up for awhile and no amount of stretching, massage or rest is making a lick of difference. If we decided to give IMS a go, we would first use our hands to find the trigger points in the offending muscles in the forearm. Our goal is to use a needle to get into these trigger points and make the muscle contract around the needle. When we hit The Spot (you’ll know when we do!), the muscle contracts a few times before it gives up and relaxes. We are usually in and out with our needles in under 10 seconds.

There are several key benefits to IMS:

  • Pain reduction - several studies have pointed to the ability of IMS to reduce pain almost immediately, both at the tissue level and reducing the perception of pain in the brain

  • Increased range of motion - once that muscle lets go, you can move a lot more!

  • Increased blood flow to the area, helping to clear out the build up of waste products produced by a tight muscle

  • Improved function of a body segment

For the 24 hours after IMS, the best thing you can do is to move, but not too much! If you’re used to hitting a spin class, go for a leisurely bike ride instead - low intensity, low impact movement is best.

Of course, IMS is not for everyone and cannot treat everything. If needles aren’t your thing, we always have other things we can do. If simply reading this article made you feel yucky, we never have to do it!

That being said, if it is something you’re interested in learning more about, chat with one of our physiotherapists or feel free to give us a call!

How to Avoid Common Gardening Injuries

Gardening season is here! And if you’re like me you have launched yourself outside with enthusiasm and gusto. There is so much to love about gardening. The fresh air, it’s relaxing (sometimes), and can be a very rewarding activity. But gardening can also be very physically demanding work and if you aren’t careful you might end up with an injury that could have been prevented.

Below are some tips to help you avoid the most common gardening-related aches and pains that we see!

  1. PACING: If your normal activity level is walking the dog for 20 minutes around the block would you suddenly wake up one day and decide to run a marathon? Probably not. If you did you would probably survive the ordeal but your body certainly would not be happy with you. The same goes for gardening. If you are generally sedentary and don’t do a lot of full body exercise, then keeping your arms overhead for four hours while you trim the hedge all in one day because “you just want to get it over with” is probably not the best idea for your shoulders. Instead try to do the more intense activities for shorter periods of time and try to spread them out throughout the day or over a few different days with easier activities interspersed.

  2. YOUR LOW BACK: Repetitive bending and twisting is tough on any back, but if you have a history of back problems (especially disc problems) then you really may trigger some pain. Be careful with your lifting posture and use proper techniques (wide stance, back in neutral, lift with your legs, you know the drill). For lifting and carrying keep the load as close to the center of your body as possible.  Maybe try sitting on a low stool when working in a garden bed instead of being on your hands and knees. If your back starts to feel sore take a break. Better yet, if you notice you have been hunched for a while get up, walk around and maybe give your back a chance to arch a bit before the ache even sets in. 

  3. YOUR SHOULDERS: The reaching, the grabbing, the digging, the pulling, the pruning, the supporting of body weight while on hands and knees…. it’s almost a perfect storm. Once again, unless this is something you do regularly, shoulders can struggle with a sudden increase in heavy activity. Specifically, shoulders tend to dislike overhead activities, reaching, and twisting. The more repetitively you do these things or the more prolonged the activity, the more likely you could end up with rotator cuff impingement (pinching) or tendinopathy (overuse injury). Again, pacing and rest breaks are your friends. Also, if you must prune the hedge get on a ladder so there is less overhead work, and move that ladder frequently to avoid unnecessary reaching. 

Please note that a little bit of muscle stiffness the day after gardening is completely normal and can be a good thing. It means you worked your muscles hard enough that they will become stronger. If you experience this soreness it is probably a good idea to take a rest day in order to give yourself some recovery time. Pushing through sharp pain is not recommended.

We hope these tips have been helpful for you. If you have any questions or would like to book an assessment  you can give us a call at the clinic 778-630-8800 or access us online at ladnervillagephysio.com.

Happy gardening!

What Am I Doing Here, Anyway?

As a vestibular therapist, I get this question a lot. Here’s how it usually goes: you wake up one morning and you’re DIZZY. It may be the easy to explain kind - the world is spinning! It may be the more vague, hard to describe kind - it’s kind of like being on a boat, or someone is gently pushing you to the side, or the ground just won’t stay DOWN where it should…

However your journey starts, it usually takes you (fairly quickly!) to a doctor, who then says some word you’ve never heard of and directs you to me. As you walk into our office, you wonder how being dizzy meant you are now sitting in a physiotherapy clinic.

One of the wonderfully unique things about physical therapists is we are awesome at training bodies to do things differently. That may be revamping your squat so your back doesn’t kill, retraining your pelvic floor muscles so you don’t pee a little when you laugh or changing your brain so the world doesn’t spin or tip around you.

Your balance centres get input from three main sources:

Somatosensory-vestibular-and-visual-sensory-system-interaction.png
  • Visual System: your eyes, telling you where things are

  • Vestibular System: your ears, telling you where your head is in space and how far and fast it moves

  • Somatosensory/Proprioceptive System: all those little nerve endings in your feet, knees and hips telling you what you’re touching, what your muscles are doing and what position your joints are in

If all three of these bits of information match, congratulations! Your world is probably very much stable and in focus. If one of these is giving you the wrong information, it can throw your world for a loop.

Pretend for a second your ears are telling you are turning in a circle but your eyes and feet disagree. Chaos quickly ensues in your brain - fatigue, nausea, vomiting, and blurry vision plague you. Bold patterns, bright lights and contrasting colours drive you nuts. You lean or veer to one side, and forget doing anything in the dark without needing to hold the walls. To add insult to injury, it’s almost as if someone has replaced your brain with cotton and anything requiring concentration is close to impossible.

These are all common symptoms of a vestibular disorder, something that hits 35% of us aged 40 or older. As a vestibular therapist I will watch you walk, test your balance, and check out what your eyes are doing in both room light and in the dark. Through these tests, I can get a good read on what’s going on in your vestibular system and give you exercises specifically designed to challenge and improve its function.

Just like retraining a squat, I can change your brain so you aren’t dizzy anymore. If you’d like to learn more, head on over to the Vestibular Disorders Association’s website - it’s a great resource for sufferers and health care professionals alike. If you’re suffering from dizziness and think this might be worth a go, give us a shout!

Devon's Top Ten Tips for Sprained Ankles

I have a looooong history of sprained ankles. My first sprain was at the age of 10 or 11 - we were hiking down from Garibaldi Lake and I couldn’t keep my ankle from twisting to the inside. By the time we got to the car my ankle was the size of a grapefruit.

Since then I have sprained my ankles countless times. When I was in my 20’s, I was playing ultimate four nights per week and rolling one or both of my ankles at least once per game. I ate Advil like candy, relied heavily on ankle braces and taping and pretended it wasn’t happening. I kept brushing it off until I couldn’t.

It was then I sought the help of a physiotherapist. I had never seen one before and I had no idea what to expect. After my first visit, I was given simple things to help prevent a sprain - Stretching! Basic balance exercises! A warm-up! - and started on the process of actually healing. My physio also looked at things that were contributing to my constant sprains, like posture and muscle weakness in my core and hips.

IMG_0069.jpg

I started to feel better. No longer was I treating Advil as an appetizer to sport - I was able to play without any pain. It was also a period in my life where I wasn’t sure what career I wanted and the idea of being a physiotherapist interested me. Fast forward 15 years and it’s the best decision I have made.

Two days ago, I gave myself a double ankle sprain - see exhibit A on the right. Impressive, hey? I am currently hobbling around with little grace or dignity. I thought this may be a good time to remind myself of best practice in ankle sprain rehab. So, I present…

Devon’s Top Ten Tips for Sprained Ankles

  1. This may sound silly, but avoid them at all costs! For me, that means wearing proper footwear. I managed to do this one by jumping off a 2 foot platform IN BARE FEET. Given I have no ankle ligaments on the outsides of my ankles, I should have known better.

  2. There is currently a lot of controversy surrounding the use of ice after an injury. Here’s my approach: I use ice for 48-72 hours after a sprain, for 10-15 minutes at a time. After that, I use heat or ice depending on how I feel.

  3. Protect your ankle! That may mean using a brace or reminding your three year old not to jump on your foot. This one is important - trust me.

  4. Compression is key immediately after an ankle sprain. This helps control the swelling. A tensor bandage is a great option as are compression socks (of which I have several pairs after my pregnancies) and make sure your compression is not too tight. You want to control the swelling, not cut off blood supply to your foot!

  5. Elevate your foot - it helps the swelling go down. It’s also a great excuse to sit and watch the last few episodes of Game of Thrones before tonight’s season premiere…

  6. While you’re at it, early controlled motion is crucial to healing. I move my ankles constantly within their pain-free range, up and down as well as side to side. There are several benefits - the muscles pump the swelling out, the synovial (aka good) fluid in the joint moves around to nourish and lubricate the joint, and the pain signals to your brain decrease. And this is just a few of the benefits!

  7. REST. When your foot is telling you to sit down, SIT DOWN. I know this one is obvious, but it’s hard to avoid those things we need to do. I am guilty of this one - the dishes need to get done, the laundry pile is obscene - but the better you are at taking care of yourself, the faster you will get back to normal life.

  8. Walk normally as much as possible with whatever speed you can muster. If this is impossible and you need a gait aid (ie. cane or crutch), so be it. The last thing you need is for your back to go out on you.

  9. When you’re feeling better and that ankle is looking like an ankle again, remember to go slowly. The scar tissue laid down is weakest at 3 weeks post-injury, prime time for re-injure your ankle. Be smart about your activities.

  10. Seek the advice of a physiotherapist. We are trained in the ways of short term and long term rehabilitation for these buggers. We look at things that contributed to your ankle sprain. How’s your core? What about your glutes? What’s your sense of balance like? There are several factors that can make you more likely to sprain your ankle and most of them are correctable.

Your Head is a Bowling Ball

FREEZE!

As you read this, what position are you in? Are you slouching? Did you fix your posture once you realized I had brought your attention to it? I hope so because POSTURE MATTERS!! Poor posture can lead to unnecessarily high loads through your joints and muscles which can CAUSE INJURIES over time. Think about holding a bowling ball close to your chest. Now think about holding a bowling ball at arm’s length. It’s easier to hold the bowling ball closer to you, it’s just physics. Now think of that bowling ball as your head. And your poor neck is represented by your arms. Every time your head shifts forward by just one tiny inch you are loading up extra work onto your neck muscles. Maybe you don’t realize you’re doing it because, you know, it’s just so you can read the fine print on your phone or computer screen, or maybe you haven’t gotten around to getting new glasses yet, or maybe you enjoy the “chin poke” look, but every little indiscretion adds up over time to a lot of extra work for your joints and muscles. FYI, they don’t like that.

Head forward posture pic.png

I struggle as I write this to think of a joint that isn’t affected by poor posture. Neck injuries, rotator cuff injuries, wrist injuries, you name it. I personally have even injured my big toe from poor posture (I went through a phase where I decided it was easier to sit with my feet in “tippy toe” position rather than change the height of my chair. I’m not proud of it, but I feel like full disclosure is necessary). Basically, if you sit in the wrong position for a long enough time, something is going to start hurting. So… let’s avoid that shall we? Below is a quick overview of proper workstation setup and three tips for better workstation posture.

ergonomic-workstations-21.gif

My Top 3 Desk Posture Tips!

TRex.png

1. BE A T-REX

If you suddenly woke up one day as a T-rex (yes, the dinosaur) you should still be able to do your job. That means if you are sitting up straight and “glue” your elbows to your side, everything that you need to use on a regular basis at your desk (keyboard, mouse, phone, etc.) should still be within your reach radius. As soon as you start reaching further or twisting your body or elevating your arms/shoulders in order to complete a task you are increasing the workload on your body.

2. CAN YOU SEE YOUR SCREEN PROPERLY???

This is important. Do you have reading glasses? Do you actually use them? Is your screen close enough to you? Is the font big enough? Is it the correct height? Again, head = bowling ball. Do your neck muscles a favour and make head position a priority.

overhead.jpg

3. BACKREST

Most people tell me they have a nice ergonomic office chair. My next question is, do you actually use said awesome ergonomic chair? Or, do you sit on the edge of your chair and lean on the desk. Please use the backrest. The backrest is there to help you stay upright, supported, and relaxed. Maintaining a proper lumbar lordosis (curve in your low back) rather than a big “C” shaped slouch is a major factor to overall posture.

4. A BONUS

Shoulders should be down, back, and relaxed. It’s not military posture we are going after, but if you continue to slouch you narrow the space for your muscles and tendons to maneuver. This can lead to impingement syndrome, which is no fun at all to get rid of.

 Images from: https://shpare.com/greatest-25-ergonomic-desk-setup-images/

Let Me Tell You A Story....

My ankles are terrible. Everyone who knows me knows this to be true. I have sprained both ankles more times than I can count. When I was in physio school, I was the test subject on “what ankles without any ligaments feel like". My ankles were the catalyst for me to become a physio - more on that in a later post.

Fast forward to two years ago. My youngest was nine months old and I was determined to get back to my favourite sport - Ultimate Frisbee. I have played for 17 years and it has become a part of my DNA but I hadn’t played since I was pregnant with my first. I signed up and played my first game in over 2 years. And it was joyous. JOYOUS. It was like I had found a long lost friend and we picked right up from where we left off.

Devon+-+piri+release+at+ulti.jpg

Then the pain started. I was only playing once per week but every game left me hobbling a little longer. It started with an hour after the first game; obviously, I brushed this off. The next game, it was two hours. By three months in, the pain lasted right through the week. As a physio, I knew what I had to do - continue brushing it off and hope it would get better…. right?

Wrong. I had to quit. I couldn’t walk without limping. I had to face up to the simple fact that we, as health care professionals, are often our own worst clients and I started seeing a fellow physio. She worked her magic to the best of her ability but I was still in constant pain. I got an MRI which showed a plantar fascia three times thicker than it should have been, leaving me with a self-induced nasty case of plantar fasciitis.

Last year I had prolotherapy at St. Paul’s Hospital on the plantar fascia - basically, they cause a new injury on purpose in hopes we can make it heal properly this time. Make no mistake - it HURT. But I kept seeing my physio and did my exercises and it worked. Since about 6 weeks after the procedure, I have been completely pain free.

I’m gradually getting my running back. I’m ridiculously slow but I’m doing it. My goal is to play ultimate in the new year but if it takes longer, that’s okay. I’ve learned my lesson - I cannot rush this and I need to do it properly. I’ve also learned to listen to my body, even if I really don’t want to, even when it’s screaming at me to listen to it.

Time to Stop Leaking

Do you cross your legs before you sneeze?

Do you avoid jumping jacks?

What about jumping on a trampoline?

There are two basic types of accidental urine leakage: The first type is called stress incontinence. If you leak urine when you cough, sneeze, laugh, jump, run or lift something heavy you are not alone. In fact, 1 in 3 women who have given birth suffer from this condition. (Side note, men who have had their prostate removed also suffer from stress incontinence, but I will save that topic for another day).

The second type of leakage is known as urge incontinence. This is when you get an urgent urge to urinate, rush to the bathroom, and maybe you don’t make it on time. I will also talk about how to address this at another time!

Why does stress incontinence happen?

Essentially, if there is a strong downward pressure (such as increased intra-abdominal pressure from a cough), and that downward pressure is stronger than the closure pressure provided by your pelvic floor muscles, then the stronger force wins and a leak will occur. It’s not that your pelvic floor isn’t there anymore, it just means that it wasn’t strong enough to resist that force and was overpowered in that moment. That lack of closure pressure is usually due to muscle weakness and could be due to a number of things, but the most common culprits are childbirth, a chronic cough, obesity, pelvic floor surgery and age.

Okay, so now what?

Here’s the thing…stress incontinence is very fixable. Not in the “okay I feel more confident but I’m going to wear a pantyliner just in case” kind of fixable, but the “I’m going to have a contest with my kids to see who can do a better star jump” kind of fixable, the “oh my goodness I’ve been walking around all day and moving furniture but my underwear is still completely dry” kind of fixable, and the “I’m going to skip the aisle with all of the absorbent products because I don’t need them anymore” kind of fixable. You do not have to accept the leaking as your new level of normal. You do not have to live with this for the rest of your life. You can do something about this! You can have confidence and control over your bladder again.

I want that! How do I get that?

 I’m not going to lie, there is a little bit of homework involved. The strength, endurance, and skill level of your pelvic floor need to improve. That’s where pelvic floor physiotherapy comes in. A pelvic floor therapist can make sure you are contracting the correct muscles in the correct way and give you a treatment plan to suit your current skill level and your specific situation. If this is something you are interested in learning more about, please feel free to contact me or book an appointment and I would be thrilled to go over it all with you one on one!

I’m Spinning! Is This BPPV?

As a vestibular therapist, I get a lot of people complaining about things they can only describe in sound effects and hand movements. It’s tough to communicate the whooshes, whoozes and weird feelings that happen when you have an inner ear issue.

BPPV is different. Simply put, it’s a SPIN. The world spins with lying down, with sitting up, with checking out that plane flying overhead. You move your head in the right (wrong?) way, and everything just spins. Luckily, it’s easily treated.

BPPV stands for:

Benign (not going to kill you – fabulous!)
Paroxysmal (has an on/off quality to it)
Positional (only with certain head positions)
Vertigo (the spin!)

https://vestibular.org/understanding-vestibular-disorders/types-vestibular-disorders/benign-paroxysmal-positional-vertigo

https://vestibular.org/understanding-vestibular-disorders/types-vestibular-disorders/benign-paroxysmal-positional-vertigo

It occurs when crystals (also known as otoconia) fall off the utricle and into one of the canals, usually the posterior canal. These fluid-filled canals are responsible for detecting which way your head moves – when your head moves to the left, the fluid in the canal will move and tell your brain which way your head is moving. When these crystals are in the canal, they bounce around the canal giving you a sensation of spinning.

In the clinic, we first put you through a few tests to figure out which canal has these rogue crystals in them. Then we do the appropriate treatment which involves a series of gentle head movements and body rolls to get the crystals back where they belong. The most common way to do this is the Epley Maneuver but another maneuver may be needed.

If you are suffering from intermittent vertigo, give us a shout – it may be BPPV and treated in as little as 3 minutes.

For more information, check out The Vestibular Disorder Association’s page on BPPV, or feel free to ask a comment below.

Welcome to Ladner Village Physiotherapy!

Let us introduce ourselves!

IMG_9593[17310].jpg

I’m Devon, the vestibular half of LVP. I grew up in Richmond and Surrey before meeting my husband at UBC and settling in Ladner in 2013. Since then we’ve had two little girls who are the absolute light of our lives. I love playing ultimate frisbee and hiking in the summers, and have a (possibly unhealthy?) affinity for board games. I travel whenever I get the chance and am always up for a foodie adventure. I consider myself incredibly lucky to have found such a great community in Ladner, and I’m excited to put some serious roots down in my adopted home town!

I’m Nicole, the pelvic floor physio! I decided that I wanted to be a physiotherapist when I was eleven years old and haven’t looked back since. I was born and raised in Ladner, and currently live here with my husband, my two young toddlers and my giant golden retriever who thinks she is a lap dog. Life is busy but so fun! In my younger days I was a competitive softball player, soccer player and horseback rider. These days I stick to the gym and running. I do not have Devon’s skill in board games, but I can recite almost every Disney song lyric that I’ve ever heard. Maybe that will become a useful skill one day? But for now I think I’ll  stick with helping the community heal ankle sprains, shoulder strains, and leaky bladders. I can’t wait to meet you all!

 
IMG_2131.JPG

We met during our Masters of Physical Therapy program at UBC and have been fierce friends since. Ladner Village Physiotherapy started as an fantastical idea when we were both pregnant, wistfully dreaming of a day when we could open our own clinic. With time and effort we were able to follow through and create our own space, offering orthopaedic physiotherapy as well as our specialties.

We are incredibly excited to serve our community. We hope to see you soon!