#surreybc

How NOT To Do Vestibular Rehab

Devon Konrad has been a practicing vestibular physiotherapist for 14 years. In that time, she has worked with many people with vestibular deficits who were given misleading, confusing or just poor advice in how to deal with their symptoms. In this blog, Devon highlights her biggest pet peeves in the world of vestibular rehab.

There’s a certain level of anger I experience when I walk into a new vestibular assessment and I can already feel the client’s walls are up. I then often learn that the person sitting in front of me has been through 1, 2 or more “vestibular therapists” who didn’t help or made things worse. They often come into this appointment with a lot of hesitation and reluctance, expecting the same treatment they’ve had in the past.

Here’s the problem: there is no official accreditation in Canada to call yourself a “Vestibular Therapist”. Anyone can say they are a vestibular therapist, no matter how many (or how few) courses they take or how much mentoring they have received. As a result, Canada is filled with people who highlight “vestibular rehabilitation” as a specialty without actually having the knowledge or expertise to do so.

Balance and Dizziness Canada is trying to change that. They have a list of curated professionals from across the country - physiotherapists, audiologists, occupational therapists - who have taken the gold standard courses in their field. If you are looking for someone who has expertise in vestibular conditions and vestibular rehabilitation, this is a great place to find them.

Until we have a system of accreditation, this will continue to be a problem. So this blog is for all the people out there in the vestibular rehab world, either as patients or practitioners - a What Not To Do, of sorts.

How NOT To Do Vestibular Rehab

1. Keep pushing through symptoms, no matter what

One of my biggest pet peeves is when people have been told they just need to keep pushing and ignore their symptoms; that their symptoms will decrease eventually as long as they just keep pushing.

This. Doesn’t. Work.

Not only does this often put people in a state of perpetual symptoms, it often drives anxiety. And while we don’t have the research yet to implicate poor treatment approaches in developing chronic forms of dizziness, we do know that about about a quarter of people with vestibular deficits go on to develop Persistent Postural-Perceptual Dizziness (PPPD). We also know there is a massive link between anxiety and developing PPPD.

By pushing people into a state of constant symptoms with no locus of control around those symptoms, I argue this is setting people up for longer term problems. Which leads me to my next point…

2. Not learning how to reduce symptoms

When I’m working with someone who has “failed” vestibular rehab, I’ll pick a task that I know will slightly increase their symptoms and then ask them to settle their symptoms.

More often than not, they look at me like I have three heads. Here’s the response I often get: “I don’t know how to settle them! If I knew that, I wouldn’t be here!”

Let me be clear: I’m very good at making people feel dizzy. But my job is to make them feel better and I cannot do that if I’m not teaching them HOW to feel better.

With vestibular rehab, we definitely want to introduce exercises that increase symptoms. You cannot drive the brain changes needed to feel better if you aren’t challenging the brain! But I’d argue it’s even more important for people to learn how to settle these symptoms after increasing them.

Here’s my cues in how to “ground out” and settle symptoms:

  • I want the person to look at something they are sure is not moving. This could be a light switch, the corner of a table, a lamp shade. Something inoffensive and stable. NOT the curtains, the dog or another human - those things cannot be trusted.

  • Next, I want the person to really feel their feet. I want them in a wide base of support and paying attention to what their feet are telling them. Some people like to weight shift, some people don’t - it’s whatever feels right for them.

  • Then, the biggest one - I want slow, deep breaths. The vestibular system and the autonomic system are highly intertwined: when dizziness starts, so does the fight-or-flight response. Breathing cues to the parasympathetic system to bring balance back to the autonomic nervous system, bringing symptoms down.

  • Finally, I don’t allow people to add more touch points while they recover (unless they’re a falls risk or safety risk - then, by all means, please sit!). If the exercise was done in sitting, they can keep sitting while settling their symptoms. If they were standing, they do not get to lean on a door frame or touch the counter for support. Their brains need to learn how to settle their symptoms without this additional touch point.

I give people about 5 minutes to settle their symptoms in this way. After that, I let them do what they’d like to get their symptoms under control - sit down, lie down, close their eyes, get some fresh air: whatever it is for them.

A good vestibular exercise should stimulate their symptoms enough to be uncomfortable and be able to get back to their pre-stimulated levels of symptoms within 5 minutes. If there’s no symptoms at all, we need to make it harder. If symptoms are taking way longer than this to settle, the exercise is too hard.

Whether they are doing their exercises in the clinic or at home, I drill into them that this “settling piece” is a non-negotiable piece of their rehab. They need to develop a locus of control around their symptoms and have strategies to get those symptoms down. In my opinion, this is the number one goal of vestibular rehab.

3. Not teaching people why things trigger them

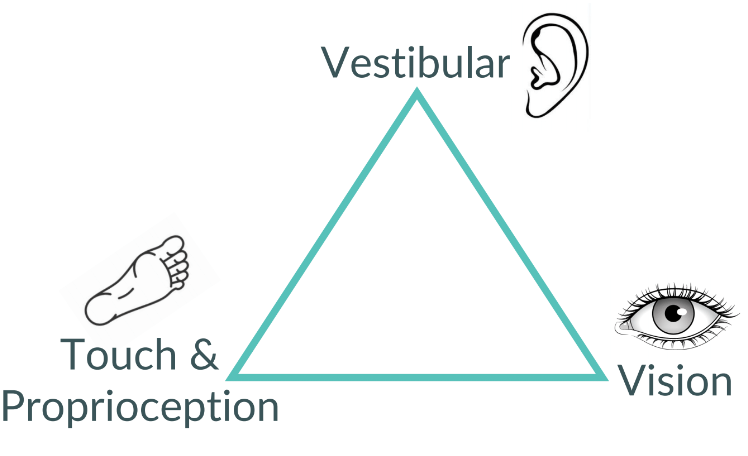
A Triangle of Balance captured in the wild!

In my clinic, you’ll see a lot of triangles written on white boards with “vision”, “vestibular”, and “touch & proprioception” written on them. This is because we spend so much time teaching people about how their vestibular system works as well as how it interacts with their other balance systems. (Want to know more? Check out our other blogs on vestibular rehab!)

Why do we do this? Because people need to understand why they feel the way they do. They need to be able to figure out why their symptoms are up if they’re a passenger in a car, or watching their kid’s soccer game, or skiing in the alpine. By giving them that ability, they can use their strategies to immediately reduce their symptoms and keep them involved in their own lives and doing the things they love to do.

I’m a big believer in making myself obsolete. I want people to leave here filled with knowledge about their vestibular system and how to make their lives work for them. I want them to be able to use their tricks to enjoy the movies on the big screen and play on the playground with their kids.

4. Ignoring symptom burden with exercises and looking exclusively at performance

I see this a lot: instead of asking how people feel during and after their exercises, therapists watch their performance of a specific exercise and make it harder solely on that.

I can see the therapist’s point a bit more in this one - in order to learn new motor patterns, you need to make mistakes so the brain can learn how to correct them. With a perfect performance, you’re not learning much so it makes sense to make the exercise harder.

But what that therapist isn’t taking into account is how awful that exercise is making the person feel. For a lot of these clients, they have just learned how to perform an exercise while feeling awful.

This is not the goal! We are not just trying to make people perform. We are actively trying to strengthen the vestibular system so people feel better. By looking at performance alone, we often miss the most important piece.


This Not To Do list is far from complete but it’s a start! If you’re looking for a good vestibular therapist and don’t know where to start, head to Balance and Dizziness Canada for some great recommendations.

If you’d like to book with us, call us at (778) 630-8800, book online or email us.

The Autonomic Nervous System - What It Is and How We Can Train It

The nervous system is incredibly complex. Everything we do, think and feel involves the nervous system at multiple levels. In this blog, we are going to focus on one specific area - the autonomic nervous system: what it is, why it’s important and how we can train it.

What is the autonomic nervous system?

The autonomic nervous system (ANS) plays a pivotal role in regulating vital functions, doing so unconsciously. It serves as the body's autopilot system, controlling involuntary actions such as heart rate, digestion, respiratory rate, and glandular secretion.

It consists of two main branches: the sympathetic nervous system (SNS) and the parasympathetic nervous system (PNS), which work together to maintain your body in homeostasis (in other words, to keep everything in balance, from body temperature and heart rate to the amount of oxygen and carbon dioxide in your blood).

1. Sympathetic Nervous System (SNS):

  • Often referred to as the "fight or flight" system, the SNS mobilizes the body's resources during times of stress or danger.

  • Functions include increasing heart rate, dilating airways, and redirecting blood flow to vital organs, preparing the body for action.

  • In rehabilitation, an overactive SNS may contribute to conditions like high blood pressure, anxiety, and muscle tension, requiring interventions to promote relaxation and stress management techniques.

2. Parasympathetic Nervous System (PNS):

  • Known as the "rest and digest" system, the PNS promotes relaxation, digestion, and energy conservation.

  • Functions include slowing heart rate, constricting airways, and stimulating digestion, facilitating restorative processes.

  • In rehabilitation, enhancing PNS activity can aid in promoting recovery, reducing stress, and improving sleep quality, through techniques such as deep breathing exercises, meditation, and progressive muscle relaxation.

(Note - for those of you with an in-depth knowledge of the nervous system, you understand that this is an incredibly simplistic way of talking about the ANS and misses a lot of things, like how poly-vagal theory challenges this framework and the concept of the freeze response. But hey, we all have to start somewhere, right?)

Like anything else in the human body, the ANS can become dysfunctional, leading to wide-ranging effects. Autonomic dysfunction, or dysautonomia, is well documented in spinal cord injuries, Parkinson’s disease, traumatic brain injury and long COVID. There is more and more research looking into stress-induced dysautonomia as a cause for heart disease. Dysautonomia has also been suggested as one of the mechanisms underlying chronic fatigue syndrome and complex regional pain syndrome.

When ANS dysfunction occurs, a multitude of symptoms may result including:

  • Balance problems

  • Nausea & vomiting

  • Brain fog, forgetfulness or trouble focusing

  • Fatigue

  • Fast or slow heart rate

  • Feeling like you cannot regulate your temperature

  • Sweating more or less than usual

  • Fainting or passing out

  • Shortness of breath

  • Dizziness or lightheadedness

  • Heart palpitations

  • Headaches

  • Exercise intolerance

  • Mood swings or anxiety

  • Vision issues

What can I do to help my autonomic nervous system?

While we cannot consciously control much of the ANS, certain practices and interventions can influence its function. Here are some techniques for training the ANS:

1. Breathing Exercises:

  • Deep breathing exercises, such as diaphragmatic breathing or box breathing, can stimulate the PNS, leading to a relaxation response.

  • Techniques like coherent breathing, where inhalation and exhalation are paced evenly, can improve heart rate variability and promote ANS balance.

2. Mindfulness Meditation:

  • Mindfulness practices involve non-judgmental awareness of the present moment, which can help regulate ANS activity by reducing stress and promoting relaxation.

  • Regular mindfulness meditation has been shown to increase PNS activity, decrease SNS arousal, and enhance overall well-being.

  • New to mindfulness practice? Try an app like Calm, Headspace or Insight Timer to get started!

3. Physical Activity and Exercise:

  • Aerobic exercise and physical activity can have profound effects on ANS function, promoting cardiovascular health and improving autonomic balance.

  • Moderate-intensity exercise, such as walking, swimming, or cycling, can enhance PNS activity while reducing sympathetic arousal.

4. Relaxation Techniques:

  • Progressive muscle relaxation and guided imagery are relaxation techniques that can help reduce ANS activation and promote relaxation.

  • These techniques involve systematically tensing and relaxing muscle groups, visualizing calming scenes, or inducing sensations of warmth and heaviness in the body.

5. Yoga and Tai Chi:

  • Mind-body practices like yoga and tai chi combine physical postures, breathwork, and mindfulness, promoting ANS balance and stress reduction.

  • These practices have been shown to increase heart rate variability, improve baroreflex sensitivity, and enhance overall resilience to stress.


If you’re looking to add some ANS training into your day, try one! These simple options can help improve sleep, reduce stress and help heal and recover from injury.

Looking for help with your autonomic nervous system, or anything else rehab-related? Book online with us - physiotherapy, massage therapy or kinesiology!

Pain: A Rant

If you haven’t heard, Nicole Coffey has been doing a deep dive into pain science with Neil Pearson, a physiotherapist who is an internationally recognized expert is pain science. And let me tell you: Nicole has thoughts about how we treat people in pain. Buckle up for this one!

I need to rant:  It should not be the responsibility for a person in pain to have to convince anybody that they are, indeed, in pain.

When did we stop believing people? When did someone saying “that hurts” not become enough for us? How do we expect people to prove that they are in pain? How miserable do they have to be before we believe them? Do we sympathize more if the pain is more intense? How intense is “intense enough” to warrant treatment? What if they pain lasts a long time? Do we feel more sorry for them or less? Where is the distinction between “poor you, it really sucks, that’s been bothering you for a while” versus “It’s been going on forever, surely you should be over it by now”?

I wanted to write about this because as a physiotherapist I run into this issue so often. I see people in pain who have to convince others about the legitimacy of their pain. Sometimes it’s a skeptical family member, sometimes it’s a health professional, and sometimes it’s insurance companies. Insurers do not love paying for “invisible conditions” and because pain is hard to measure, clients do not have a lot of traditional or mainstream quantitative data to demonstrate evidence of their illness. People in pain often cannot point to an MRI or blood test results for an explanation of why they are no longer able to fully function in their lives the way so many other people with chronic health conditions can.

Measuring Pain

Why is it hard to measure acute (short term) and chronic (long term) pain? One factor is because the experience of pain often depends a lot on context. Two people can be exposed to the same painful stimulus and still have two very different experiences.

Let’s use a simple example of trying to hold your hand in a bucket of ice water for as long as possible. If one person said the pain was 5/10 and one person said their pain was 7/10, would we ever say that one person is correct while the other is wrong?

Pain is a unique experience, and it is impacted by a multitude of factors including:

  • previous experiences

  • social and emotional factors

  • sounds

  • visual information

  • and so much more

How much pain can be influenced by numerous factors is a huge topic which I will try to tackle another day, but for now can we suffice it to say that two different humans with different backgrounds, different beliefs, different amounts of stress, different amounts of anxiety, different physical abilities, different knowledge backgrounds (and so on and so forth) could very plausibly interpret any situation differently from each other.

Maybe one person takes ice baths every day and is used to extreme shocking cold, maybe one person has a history of severe frost bite and almost lost some fingers a few years ago so now they are extra cautious around cold. Maybe one person has calloused hands. Maybe one person had a huge fight with their spouse the night before and didn’t sleep well and is feeling irritable and upset. Maybe one person practices meditation and can separate out the emotions and panic that accompanies the feelings of cold more than the other participant.

Regardless of any of these things, would we ever say that their reported experience is wrong? Or could we maybe just trust the participant gave any honest answer about how much pain they experienced in that moment.

Maybe we could just believe them.

The Insurance Conundrum

Let me dive into the topic of insurance for a second. Because frequently when my clients are being told that they are lying, exaggerating, malingering, or whatever other term is thrown around, it’s often from the insurance adjustor who is giving justification for denying a claim or refusing to pay for treatment. I have witnessed too many times the panic and desperation people experience when dealing with insurance companies, especially when a claim is denied.

A claim being denied does several things:

  • It invalidates the person’s experience and insinuates that they are catastrophizing

  • it increases their mental load (they now have to appeal again and go see another doctor and another specialist hoping someone will believe them enough to fight for them)

  • it strains them financially beyond belief.

Too many people attempt to go back to work earlier than they are able because they can no longer afford to stay at home and seek treatment. Would they love to try a knee brace? Of course, but they can’t afford it. Would they love to see if dry needling helps their neck? Of course, but they have run out of benefits and can’t take time off work to come to a physio appointment.

To take it further, people often underestimate the social impacts on those who experience chronic pain are swept up battling their insurance trying to justify coverage. Again and again, clients are forced to absorb the responsibility of self advocating to the detriment to other aspects of their lives in order to justify their coverage or else they quickly run out of options.

Story Time

I remember so clearly a client of mine in tears because she had to transport herself downtown to see yet another doctor (for the third time, only to be told once again that nothing could be done for her, but it had been 6 months since her last specialist visit so it was mandatory that she go otherwise her benefits would be cut off). She was in so much pain and so exhausted from that unnecessary outing that she no longer had the capacity to attend a very important family event that night.

She was absolutely shattered. She wasn’t even angry, she was just defeated. She told her family that she was fine but she wouldn’t be able to make it because she was tired. She told them not to worry and go on with the celebration without her. She told them maybe she will see them the next time they are in the country. This is what she told her family. She said she was fine.

She wasn’t fine.

She was suffering not only from her physical pain but also the mental/emotional aspect of feeling as if she had disappointed her family, while she herself was disappointed because she had been so excited to see her loved ones.

I’m not a mental health professional but I really feel that being with her family and helping them celebrate would have been so good for her mental health, but instead once again “like a wounded cat that just wants to hide”, she was left alone in her “black pit of pain” (client’s words). This upsetting experience could have been avoided completely had she not mandated to expend every ounce of her energy going to that unnecessary doctor’s appointment.

I know the next thought of many people is…. But what if they are faking it? What if they just want time off work? Maybe it’s not as bad as they say it is. They seemed okay when I saw them for a coffee date?

I would answer that most people want to feel good. Most people want to work and exercise and spend time with their families. Most people want to decrease their amount of suffering. They probably used every ounce of their energy to show up for that coffee date you had, and it would naïve of you to assume that how they present themselves in one hour of the day is representative for the other 23 hours of the day let alone the rest of the week. Also, I don’t think you get to decide how they feel.

A Thought Experiment

Do an exercise with me and think about a time that you were in extreme pain. For me this was childbirth and when my appendix was about to rupture. Even in those extreme situations I had the benefit of knowing that my pain was temporary and would come to an end. Many people do not have that luxury. Could I have lived with that pain 24/7? Was I able to hold a logical conversation during those times? What words would I use to describe that pain to a friend or a healthcare professional to paint an accurate picture of that situation? If I had been experiencing the same amount of pain but I did not know the reason I was in pain, how unsettling would it feel knowing that that overwhelming pain could return at any time and last for any duration without warning?

How invalidating would it be for a random man to say “Meh, I don’t think childbirth is that bad, I think you’re exaggerating”? I would be infuriated that someone who never in a million years could experience what I had experienced felt entitled to bestow judgment on my recollection of events.

Taking it further, what if that random person’s opinion affected the outcome of an insurance claim and I lost coverage because someone who works at a company has decided it’s probably “not that bad”? How much would I resent this as I had to cancel my children’s extra-curricular activities because I could now no longer afford them? What effect would that have on my mental health? On my marriage? I very quickly realized that if I had chronic pain I too would be automatically labeled a “catastrophizer.”

So the next time you have lunch with someone who suffers with chronic pain and you leave thinking “they seem fine they had a great time” remember that:

  • you probably saw them on a good day

  • they used every ounce of energy to try to show up and be with you (be honoured)

  • if they do open up about some of their struggles and difficulties, please believe them that they are giving an accurate account of their lived experience.

Invalidating them does nothing helpful.

When in doubt be kind.

Rant over, thank you for listening.  

Ask A Physio - What Happens To Balance As We Age?

As a vestibular physiotherapist, I talk a lot about the triangle of balance. There are three main inputs to our sense of balance:

  1. Vestibular System - a complex network involving the inner ear, brain stem and cerebellum, the vestibular system is responsible for detecting head movements and the head’s position relative to gravity.

  2. Visual System - another complex network, the visual system goes well beyond the eyes, involving several areas of the brain stem and cerebral cortex.

  3. Touch & Proprioception - these are all the receptors in your muscles, joints and skin telling you what you are touching and where your limbs are in space. If you can touch your nose while your eyes are closed, congratulations! Your proprioception is working!

Vestibular deficits are one of the most common causes of imbalance. BPPV, vestibular neuritis & neuritis, vestibular migraine, and Meniere’s disease are all well-known vestibular causes of imbalance and are all very treatable.

But in reality, balance is a very complex interplay of not only those three things but also cognition, attention, emotion, perception, muscle strength, joint flexibility, pain, motor planning, general stress levels and so much more. Impairments in balance can come from anywhere and have a massive effect on people’s function, especially as we age. With 20-30% of seniors experiencing one or more falls each year and 1 in 5 of those resulting in serious injury, preventing and treating balance issues is imperative.

Other Factors Leading to Imbalance with Age

There are a myriad of factors that can add to imbalance as we age. Here are some of more common ones:

  • Dehydration - as we age, the part of the brain responsible for telling us we are thirsty becomes less active, leading us to reach for the water bottle less and less. This dehydration can very quickly lead to light-headedness and imbalance.

  • Medications - several medications list dizziness as a side effect. There’s also a host of medications listing vision changes, light-headedness and drowsiness as side effects, all of which can affect balance.

  • Walking speed & instability - the slower someone walks, the higher their chance of falls. Combine that with a limp or unsteadiness and imbalance increases significantly.

  • Foot problems - if people have impaired sensation in their feet, balance problems are likely to follow. Bunions, numbness, thick calluses and ulcerations can directly impact how people are feeling the ground.

  • Heart issues - a common symptom of cardiovascular disease is dizziness and light headedness especially when untreated.

  • Vision problems - aging often affects how our eyes adjust to light and distance, taking longer and longer to shift. It’s common for prescriptions to change as we age and people often struggle adjusting to bifocal or progressive lenses.

  • Cognition changes - so many aspects of cognition affect balance. Multi-tasking takes a lot of brain power and often leads to impaired balance. Cognitive processing and reaction time are critical for maintaining balance. Memory problems are also linked to imbalance.

  • Fear of falling - one of the leading predictors of imbalance and falls is a fear of falling. People with this fear often do not move nearly as much, leading to inactivity and muscle weakness.

Top Ten Things To Do For Balance (That Aren’t Balance Exercises)

  1. Stay active - the old adage “use it or lose it” is very true, at least when it comes to muscles and the brain. The more active you are, the better. It really doesn’t matter what your passion is, just keep doing it at whatever level you can! Go to the gym or an exercise class to keep your muscles lean, mean and flexible.

  2. Stay hydrated - brains are thirsty and, as we age, our brains forget to tell us. Pay attention to how much water you drink during the day and try to drink at least 8 glasses per day.

  3. Learn something new - your brain never stops changing. It adds new connections and removes connections that aren’t being used. By trying something you’ve never tried before, you are inducing neuroplasticity in your brain. This helps your cognitive power and can help improve balance. The McKee House Seniors Society in Ladner has a whole range of things to try, from line dancing and yoga to water colour painting and ukulele.

  4. Walk with friends - this one checks all the boxes: exercise? Check! Head turns and vision challenges while looking around and looking at your friend? Check! Carrying on a conversation while dodging obstacles? Check! Soul-filling and stress-relieving? Absolutely. Walking with friends should be a part of everyone’s weekly routine.

  5. Cook complex meals or maintain a garden - these are just two examples but the idea is to do complex tasks that take longer than a day to plan for and complete, then require movement to do the task. Other examples are fixing cars, large art projects, being on an organizing committee - the options are endless!

  6. Bring your stress down - stress has a massive effect on your brain. Cognition can become impaired through several mechanisms leading to reduced ability to multi-task, process information and react appropriately. There are several ways to de-stress: yoga, Tai Chi, meditation, boxing, knitting, reading or anything that feels relaxing.

  7. Review your medications with a pharmacist - more than 4 medications is associated with an increased risk of imbalance. Pharmacists are experts in drugs and drug interactions and are the best source of this information.

  8. Be proactive about mental health - anxiety and fear of falling are two of the biggest drivers of imbalance and falls in seniors, with one in five resulting in serious injury. Mental health experts such as clinical counsellors are wonderful resources to address these issues at the root cause.

  9. Have a great relationship with your optometrist - eyes change as we age. Find yourself an optometrist and see them annually.

  10. Treat what needs to be treated - if you’re diabetic, make sure your sugars are in check to avoid peripheral neuropathy. If you have cardiac issues, follow your cardiologist’s advice on medications and exercise. The better you are to your body, the better your balance.

For more on age-related imbalance, head to Balance and Dizziness Canada. You can also find a vestibular therapist in your corner of the world on their practitioner’s list.

Shockwave Therapy: A Game Changer!

It’s finally here! Our BTL Shockwave has arrived and we cannot wait to start using it! .

Never heard of shockwave? Let’s dive into the depths of this groundbreaking treatment and explore how shockwave may help you on your journey through recovery.

Shockwave’s Effect on Tissues

Shockwave therapy involves the application of acoustic waves to targeted areas of the body, creating a cascade of biological responses that stimulate healing. This non-invasive and high-intensity treatment has several benefits:

  1. Enhanced Blood Flow
    The acoustic waves trigger increased blood circulation, promoting the delivery of oxygen and nutrients to the injured or affected area. Shockwave also causes release of specific growth factors leading to angiogenesis (aka blood vessel growth). This encourages more capillaries to grow in the targeted area.

  2. Tissue Regeneration & Tendon Repair
    Shockwave therapy stimulates the production of collagen, a crucial protein for tissue repair. Evidence suggests shockwave stimulates proliferation of fibroblasts, the cells responsible for making collagen. This promotes the regeneration of damaged tissues, aiding in the restoration of normal function.

  3. Pain Reduction
    By targeting pain receptors and interfering with the transmission of pain signals, shockwave therapy provides relief for individuals grappling with chronic pain conditions. It also decreases the amount of Substance P in the targeted tissues, a well known pain neurotransmitter. Shockwave is a welcome alternative for those seeking a non-pharmacological approach to pain management.

  4. Reversal of Chronic Inflammation
    Chronic inflammation can be thought of an inflammatory reaction that gets stuck in a cycle of heightened inflammation. Shockwave therapy breaks this cycle by increasing the activity of mast cells, leading to a reboot of the inflammatory cycle and allowing tissues to return to a non-inflammatory state.

  5. Muscle Relaxation
    If the thought of needles and IMS makes you feel queasy, shockwave is a great alternative. By targeting trigger points, shockwave can help decrease muscle stiffness and spasticity, leading to more flexible and relaxed muscles.

Conditions Treated with Shockwave Therapy

Shockwave therapy has been shown to have lasting effects across a variety of conditions, including:

  • Tendinitis and Tendinopathies: Achilles tendinopathy, rotator cuff tendinitis, tennis elbow and other tendon-related issues.

  • Plantar Fasciitis: A common cause of heel pain, often alleviated with shockwave therapy.

  • Muscle Injuries & Tightness: Long-standing strains and tears, tight hamstrings and sore traps.

  • Calcific Shoulder Tendinopathy: Helping to break down calcifications in the shoulder.

  • Stubborn Hands & Wrists: Dequarvain’s and carpal tunnel syndrome respond well to shockwave therapy.

  • Chronic Pain Conditions: Myofascial pain syndrome and chronic low back pain, to name a few.

Shockwave therapy is best for chronic conditions. If you are suffering an acute injury (for instance, a fresh ankle sprain that’s swollen and painful at rest, or a new whiplash), shockwave isn’t for you quite yet.


If you’re ready to try shockwave, give us a call! To book an appointment, book online, email us at clinic@ladnervillagephysio.com or phone us at (778) 630-8800.


Looking for some resources for the claims above? Here’s a great review article from Adam Tenforde & colleagues, published in 2022: Best practices for extracorporeal shockwave therapy in musculoskeletal medicine: Clinical application and training consideration.

Don't Call It A Mild Concussion

Devon Konrad, MPT, is one of our physiotherapists at Ladner Village Physiotherapy. She has a special interest in vestibular rehabilitation and concussion management. She also has some opinions, if you couldn’t tell. Read about what’s annoying her in the field of concussion rehabilitation below!

The concussion world moves fast. It wasn’t long ago the first line treatment for someone with a concussion was to sit in a quiet, dark room until symptoms had completely abated. Only then was the sufferer allowed to crawl out of their hiding hole and into the world, often to be bombarded with a complete assault on their senses: everything was BRIGHT, everything was LOUD, and it was all TOO MUCH.

While many advancements have been made in the world of concussion rehab, there are so many myths and old school ways of thinking that still persist. In the past few months, I have heard people say you need to lose consciousness to have a concussion (you don’t), helmets prevent concussions (they don’t) and if the CT or MRI is normal, it’s not a concussion (imaging can’t see a concussion. Yet.).

While these myths annoy me, most health care practitioners now understand they are, in fact, myths. However, I still see too many people that have been given out-of-date and just plain wrong information from health care practitioners.

There Is No Mild Concussion Anymore

Just yesterday, I ran into a very common one: the concept of a graded concussion, either mild, moderate or severe. We used to grade concussions based on a few factors: if someone lost consciousness and for how long; if they had any amnesia; and the presence of certain symptoms that supposedly indicated if the concussion was more or less severe.

In the last few years, this concept has been thrown out the window.

We no longer discuss the grade of the concussion. Instead, we discuss the domains affected by the concussion. The research world still hasn’t figured out exactly how to break this down and different models exist. In general, researchers (see links below) consider these 8 areas to be ones of importance in concussion rehabilitation:

  • Ocular / visual - how your brain is taking in and processing visual information as well as how your eyes are moving. Problems with your visual system may result in blurry vision, difficulty reading or missing objects when you try to grab them.

  • Vestibular - how your brain senses your body’s movement and its relation to gravity. Problems with your vestibular system tend to be dizziness, vertigo or imbalance.

  • Cardiovascular / autonomic - your brain is implicitly involved in heart rate and blood pressure and how these respond to changes in posture and demand. Problems here may show as an elevated or blunted resting heart rate, inability to tolerate exercise or lightheadedness when standing up.

  • Anxiety / mood - emotional lability, irritability and anxiety are very frequently seen after a concussion. Often these symptoms dissipate as brains heal but it’s common for people to see a psychotherapist trained in brain injuries to help treat this domain.

  • Cognitive / fatigue - difficulty thinking, multi-tasking, remembering items and words, and navigating spaces are all common complaints after a concussion. This can be secondary to other domains (for instance, if you are having trouble with your vision, it’s going to be much more difficult to focus on reading a book and thinking about what you’re reading) but it may also be a problem all on its own.

  • Headache / migraine - one of the most common symptoms after a concussion, this is typically caused by any of the other domains or it could be a domain of it’s own.

  • Cervical - also known as the neck, people typically get some type of neck injury after a concussion. If necks aren’t treated properly, they can exacerbate the symptoms from all the other domains.

  • Sleep - this can often be thrown for a loop after a concussion, either with too much sleep, too little, or both at the same time. Sleep hygiene is imperative for a healing brain and, just like the neck, impaired sleep can exacerabte all the other domains.

At this point in concussion rehabilitation, health care practitioners who claim to treat concussions should be very well versed in this concept. They should be doing multi-domain assessments and referring to appropriate health care practitioners because one practitioner cannot possibly treat all these domains. Concussion rehab is a multi-discilpinary field and all practitioners involved in concussion care should understand this implicitly.

Get Out Of The Dark Room

I heard this one a few weeks ago - someone came in with a concussion and one of their health care providers told them to stay in a quiet, dark room until their symptoms went away.

The research on this one is super clear. No one should be living in a dark room for days or weeks on end.

Rest is great for the first 24-48 hours, but that’s it. In this time, people with concussions are allowed to sleep as much as they want and be relatively subdued. Even in these first two days, however, they need to be exposed to some level of stimulation. It is often as simple as a walk around the block with sunglasses and a hat, and that’s ok! But staying full time in a dark room for days and days is simply not allowed anymore.

After those first 2 days, exercise needs to start. However, when I say exercise, I don’t mean go for a 10km run. Here are the parameters I use in returning to exercise after a concussion:

  • Before exercising, take note of your symptom level out of 10.

  • Aim for 20 minutes of movement. Breaks are fine, especially initially!

  • During and after exercise, it is normal and safe for your symptoms to be slightly exacerbated. We want to keep those symptoms within 1-2 points of your baseline.

  • Once you have finished exercising, your symptoms should return to their pre-exercise level within one hour.

If you find that your symptoms went higher or lasted longer than they should have, that’s ok! Use this as a guide for next time and try your best to stay within this range.

Typically, people start exercising with walking around their neighborhood. It’s a great way to keep control of symptoms as well as get some visual and auditory stimluation. As brains heal, people find they can gradually increase their pace, intensity or how long they’re exercising. As long as symptoms aren’t peaking too high and coming down within an hour, then it’s all good!

The Resources Are Piling Up

There are lots of up-to-date concussion resources out there for practitioners, parents and people who have suffered concussions. Here’s my curated and definitely not complete list:

For People With Concussions & Their Loved Ones:

VCH My Guide: Concussion - a wonderful, up-to-date resource that everyone with a concussion should visit.

VCH My Guide: Teen Concussion - the same as above, but focused on adolescents with concussions.

Concussion Online Training Tool - a wonderful tool for athletes, coaches, parents, teachers, medical professionals and anyone who may come into contact with someone who has had a concussion. This one is much more focused on recognizing an acute concussion and what to do immediately after it happens. I recommend everyone take this training.

For Health Care Practitioners Wanting To Get Deeper Into Concussions:

There are so many weekend courses focussed on concussion management as well as units on concussion as part of another specialty (for instance, the CCVR course through 360NeuroHealth has a large unit on concussion from a vestibular perpsective). If concussion rehab is where you want to be, check out these:

Consensus Statement on Concussion in Sport - published in 2023, this is our guiding document in how we currently treat concussions.

University of Calgary Online Concussion Course - run by the world renowned Kathryn Schneider, a free online course that takes a deep dive into concussion pathophysiology and introduces rehabilitation strategies.

Concussion Nerds - a massive course designed to go as deep as possible into concussion rehabilitation as we know it. Facilitated by the amazing physiotherapist Natasha Wilch.

Canadian Concussion Network - for those wanting to stay up to date with concussion research, I implore you to join the CCN. The leading brains in Canada run this organization!


Neuro Physio - What Does It Look Like?

Neurological physiotherapy plays a crucial role in enhancing the quality of life for individuals living with neurological conditions, including stroke, spinal cord injury, Parkinson’s disease and multiple sclerosis.

One effective approach is the Bobath Concept, which focuses on task-specific and goal-oriented treatments. Our physiotherapist Rebecca Harper treats people with neurological conditions and has advanced training in the Bobath Concept. In this blog, we'll delve into what assessment and treatment look like as well as explore the principles behind the Bobath treatment approach.

A Neurological Physiotherapy Assessment

Like any physiotherapy assessment, a neuro physio assessment has four key components:

  1. Subjective History: The assessment process begins with an in-depth discussion between you and your physiotherapist. Key points covered include your medical history, current diagnosis, home environment, daily activity levels and individual goals. This initial exchange of information lays the foundation for your personalized treatment plan.

  2. Physical Assessment: The physical assessment involves evaluating various aspects of your physical capabilities. This includes assessing muscle strength, range of motion and sensation. The physiotherapist observes how you perform specific movements such as sitting to standing, transfers, reaching and walking. These observations provide valuable insights into your movement patterns and limitations.

  3. Movement Analysis: Delving deeper, the physiotherapist breaks down the movements observed in the previous step. This is often accomplished through hands-on assessment, where the therapist uses manual techniques to both analyze movement patterns and facilitate improved mobility. Tasks like standing from a chair and reaching for an object are broken down into components, allowing for precise muscle activation and movement pattern improvement.

  4. Developing a Treatment Plan: Based on the assessment findings, the physiotherapist collaborates with you to create a tailored treatment plan. This plan outlines the frequency of appointments and incorporates home exercise programs. The goal is to integrate the newfound movement patterns into the patient's daily activities, fostering sustainable progress.

Going Forward with Treatment

As you embark on your neurological physiotherapy journey, subsequent sessions become pivotal in achieving sustained progress and functional improvement. Building upon the foundation laid during the initial assessment, these sessions are tailored to address your specific needs and goals.

  • Progressive Muscle Activation and Movement Refinement: Subsequent treatments aim to build on the initial assessment's insights and progress made. Your physiotherapist will continue to refine muscle activation patterns and movement techniques. Through a combination of hands-on manual therapy and targeted exercises, you'll work together to enhance your muscle control and coordination. These sessions play a crucial role in solidifying the improved movement patterns identified earlier.

  • Task Integration and Functional Practice: One of the hallmarks of the Bobath Concept is its focus on real-world functionality. In subsequent sessions, you'll have the opportunity to integrate the improved movement patterns into tasks that mirror your daily activities. This step bridges the gap between rehabilitation exercises and practical application, ensuring that the progress you make directly translates to your daily life.

  • Goal Reassessment and Setting: As you progress through your treatment plan, goals achieved will be celebrated and new ones will be set. Neurological rehabilitation is a dynamic process and your goals may evolve as you regain more functionality. Your physiotherapist will work closely with you to set realistic and motivating goals, keeping you engaged and motivated throughout your journey.

  • Feedback and Collaboration: Subsequent sessions are also a platform for you to provide feedback on your progress and experiences. Your input is invaluable in tailoring the treatment plan to your evolving needs. Collaborative discussions with your physiotherapist ensure that the treatment remains aligned with your aspirations, making the process more personalized and effective.

  • Home Exercise Program Enhancement: In addition to your in-clinic sessions, your physiotherapist will continue to refine your home exercise program. These exercises are designed to complement the progress you're making during your sessions and contribute to the overall success of your rehabilitation. They empower you to actively participate in your recovery journey even outside the clinic.

  • Adaptation and Long-Term Planning: Neurological conditions often involve long-term management. Subsequent sessions serve as checkpoints for evaluating your progress over time. Your physiotherapist will help you adapt your treatment plan as needed, ensuring that you're consistently working towards your goals and addressing any new challenges that may arise.

The Bobath Concept

The Bobath Concept is a leading approach within neurological physiotherapy, emphasizing task-specific and goal-oriented treatments. This method revolves around utilizing specific muscle activation patterns and sensory input to enable successful task completion across various contexts and environments. Everyday tasks such as dressing, walking, and reaching become the focus of treatment, promoting functional independence.


The heart of the Bobath Concept lies in its use of manual handling techniques to activate muscles and facilitate movement. This initial facilitation sets the stage for active participation, practice opportunities, and meaningful goal achievement.

If you have any questions, please contact us at (778) 630-8800 or clinic@ladnervillagephysio.com. To book an assessment, contact us or book online.

Top Five Tips for the Fair-Weather Runner

If you’ve ever been a runner, you probably know this feeling: the weather is getting nicer, sun is coming out again, so you decide to pull out the running shoes and head out for a run.

If you’re anything like me, you probably think, “how bad can it be? I’ll just run the same distance as I used to, aim for the same pace, and everything will be fine!”. Unfortunately, this isn’t always how it works.

Jumping right back into running can often lead to injuries, including a bruised ego when you realize how hard it is to run at your old pace (trust me, I’ve learned this the hard way). In this blog, we are going to talk about a few tips on how to get back into running in a safe and productive manner.

Kheya’s Top Five Tips To Getting Back to Running

1.      Make A Plan and Start Slow

The first tip to getting back into running is to make a plan. How often are you going to run? For how long? Do you have an end goal in mind for how long you would like to be able to run? When making your pain, consider the following:

  • Frequency - aim for 3 times per week max. This will allow you to have at least one rest day between each of your runs to give your body the appropriate amount of time to recover, as well as time to add in some strength training.

  • Pace - start slow! I often recommend to my clients to start with a walk/jog mix, then slowly decreasing your walking time and increasing your running time. For example, this might look like walking for 2 minutes, then running for 1 minute the first week, and then increasing to 1 minute and 30s walk and 1 minute and 30s run the next week, 1 minute walk, 2 minutes run the following week, and so forth. Continue this until you can keep up a slow running pace for your whole run!

  • Time/ distance - start small and add a little bit of time each week. This is going to be very dependent on your current fitness but beginning with 10-20 minutes and slowly working your way up is a great place to start. Once you get comfortable with this time, you can start adding 5 minutes to your run each week. You can also track this with distance (for example, starting with 1-3km run and adding 0.5km each week).

  • Setting a goal: having a goal distance in mind is a great way to keep yourself motivated when getting back into running. Goals should be SMART (specific, measurable, achievable, relevant, and time-bound). This means you should set a clear distance you would like to run in a clear within a reasonable time frame. A great example would be “I am going to run 3 x per week, beginning with a 2km run and increasing by 0.5km each week, with a goal of being able to run 5km in 6 weeks”.

2.      Train Smarter, Not Harder

Up until this point, we’ve only been talking about your basic steady run. However, just doing a simple base pace run isn’t always the most effective way to improve your running. When setting up a running schedule, it is great to break up your runs into different types. For example, you could split up your week into doing one long run, one run with sprint intervals, and one recovery run. You could even investigate different types of runs such as hill runs, Fartlek running, or tempo runs.

Here’s an example:

  • Monday: 25 minutes of sprint intervals, 20s sprint, 2 minutes of walking/jogging

  • Wednesday: Recovery run (3km at a slower pace than typical)

  • Saturday: Long run (8km at your base pace)

3.      Have A Proper Warm Up and Cool Down Routine

A warm up that focuses on mobility and activating the muscles you are going to be using during a run is important. I would then start your run with a fast walk or very slow job for 5-10 minutes, before transitioning into your faster running pace. For a cool down, I would recommend doing a light walk at the end of your run, to help transition your body as your heart rate slows down, followed by some light stretching. Remember, a proper routine also includes proper nutrition and rehydrating!

4.      Keep Up With Your Strength Training

Strength training is very important for preventing injuries as well as increasing your running speed and efficiency. If you decide to totally transition into running without keeping up with your other workouts, you are going to be missing out big time! Aim for 2-3 days a week of strength training.  

5.      Invest In The Proper Shoes

Fun fact: did you know runners should be replaced every ~800 kilometers? Running shoes are the foundation of your performance and having improper shoes can impact your running gait, posture, and cause a whole array of problems. I would strongly recommend going to a proper running store like the Run Inn and have someone assess your foot and gait and recommend proper shoes for you. I promise, paying the price to have proper shoes is well worth it in the long run!


I hope you enjoyed these tips on getting back into running! If you have any questions, give us a call at (778) 630-8800, email us or book online to seek advice/treatment from a physiotherapist or to work with a registered kinesiologist.

My Jaw Locks & Clicks! What's Going On?

One of the most common jaw complaints is clicking and locking, often associated with pain in the jaw, face, head and down the neck. This can often be caused by an anterior disc displacement, something we see frequently in the clinic.

But what is an anterior disc displacement and what can we do about it? Before we dive into that question, let’s back it up and talk about the anatomy of the temporo-mandibular joint.

The Anatomy of the TMJ

The temporo-mandibular joint (aka the TMJ) is what attaches the mandible (aka the jaw bone) to the skull. It is located just in front of the ear and, if you place your hands on either side of your face just in front of your ears, you can feel that jaw moving forward and back as you open and close your jaw.

The TMJ is a synovial joint between the temporal bone of the skull and the condyle of the mandible. Between the condyle and the temporal bone is a donut-shaped fibrous disc that is essential for proper opening and closing of the jaw. This disc is partially held in place by the retro-discal tissue, a network of loose connective tissue, blood vessels and nerves attaching the back of the disc to the bone behind it, just in front of the ear canal.

Anterior Disc Displacements

One of the most common causes of temporo-mandibular dysfunction (aka TMD) is when the disc becomes displaced, typically anterior in the joint and away from the ear canal. When this occurs, the retro-discal tissue in the back gets stretched and is unable to hold the disc back in its normal position.

Common symptoms of anterior disc displacements include:

  • pain in the TMJ with chewing, yawning & talking

  • pain in and around the ear

  • headaches

  • a reproducible click in the TMJ, with or without pain

  • decreased range of motion with opening

When a disc moves anteriorly in the joint, it may click or block jaw movements but this isn’t guaranteed. Every person’s anatomy is different: jaw condyle shapes, depth of the socket, size of the disc, amount of retro-discal tissue and all the other factors that make a person unique can play into their TMD and experience of pain.

Treating a Disc Displacement

A few things to know first:

  1. One third of asymptomatic people have at least one displaced TMJ disc. It’s really common to have a disc issue and not be bothered by it at all!

  2. Discs will not (typically) relocate back to where they were. Instead, your body heals and creates a “pseudo-disc” from the now-stretched retro-discal tissue to act as the original disc.

  3. When that disc moves forward, it can often block the opening of the TMJ. Over time, the disc remodels to be less donut-shaped and more wedge-shaped so the condyle of the jaw can easily slide over it.

Acute Disc Displacements

Remember how I said just up there that discs won’t relocate?

If the injury has occurred in the past 3 days, we can sometimes (and I stress SOMETIMES) get the disc to relocate. It has to be before the retro-discal tissue has stretched too much. Our therapists who treat TMD can attempt a specific maneuver to try and get that disc back to where it was.

Outside this 72 hour window, we are looking at healing and remodeling the disc.

Chronic Disc Displacements

We have a whole tool-box of therapy techniques to help with disc displacements in the TMJ. These include:

  • Manual therapy of the TMJ - we use specific techniques to increase the range of motion of the jaw and help the disc remodel into the wedge shape we’re looking for.

  • Soft tissue techniques (including IMS and massage) of the surrounding muscles - with a disc displacement, these muscles (for instance, the temporalis and masseter) are often clenching or working hard to compensate for the TMD, leading to increased pain and headaches.

  • Neck assessment & treatment - when the TMJ is irritated, up to 70% of people also have neck pain. As a part of TMD treatment, the neck needs to be evaluated and treated accordingly.

  • Exercises - the right exercise for you and your TMD is so important. The right exercise helps discs remodel, muscles relax and pain reduce. We spend a lot of time with you to make sure you are doing the correct exercise with the correct technique.

Top Five Tips in Dealing with a Disc Displacement

Finally, we live by these principles of managing disc displacements:

  1. Don’t test it!! You will be tempted - does it still click? Is it still stuck? - but we beg you to resist this temptation. Let your disc heal. The more you poke it, the longer it’ll take to heal.

  2. Avoid hard/crunchy/chewy foods for the first 6-8 weeks after a disc displacement. We promise you can eat your favourite food soon but avoid those types of foods initially.

  3. Support your jaw when yawning. If you have the urge to yawn and really open your jaw, place a hand under your chin so you have something to push against and limit how much your jaw actually opens.

  4. Sleep is so important for healing & pain control. We know that under 6.5 hours of sleep per night increases your experience of pain. We also know that you heal when you sleep. So make sure you’re getting enough sleep, with a good pillow supporting your head!

  5. Posture also play a huge role. Make sure your computer is set up properly so you aren’t sitting in a head forward posture, putting more inappropriate muscular forces through your jaw. (Need some tips on computer set up? Read our blog!)

If you are dealing with a disc displacement, TMD or headaches, book with one of our TMJ therapists online, by email or calling us at (778) 630-8800.

Strength Training vs. Cardio - Which Is Better?

First off, let me start by saying that the title of this blog is a total hook. Cardiovascular exercise and weightlifting/strength training are both fantastic and one is not better than the other. The truth is that it is important to include both in your routine and have several benefits on their own.

Cardiovascular Training

Cardiovascular or aerobic training refers to exercise which increases heart rate and respiration. Examples include running, walking, cycling, swimming, or skiing.

Regular aerobic exercise (also known as cardio) has many incredible benefits:

  • Reduce risk of cardiovascular disease and chronic health conditions

  • Improve heart and lung health

  • Positive benefits on mental health

  • Improve endurance

  • Improve immune system function

Overall, cardiovascular training can help you stay healthy and live longer!

Strength Training

Strength training refers to any training using weights or against resistance. This may include body weight, dumbbells, barbells, kettlebells, or a resistance band.

Strength training has many fantastic benefits, many of which overlap with aerobic training. These include:

  • Maintain and improve bone strength

  • Increase muscle mass

  • Reduce risk of heart and lung disease

  • Improve metabolism by helping your body burn more calories

  • Decrease risk of certain diseases including heart disease, diabetes and arthritis

  • Decrease risk of injury

Strength training is very important to keep up with as you age, as it will allow you to keep up the strength to do the things you love and even just your activities of daily living (i.e., cooking, cleaning, grocery shopping) without assistance.

Both cardiovascular exercise and strength training have a plethora of benefits, many of which I didn’t even mention! A successful exercise routine should include a mix of resistance training and cardiovascular training.

And Now, Some Myth-Busting…

Now that we’ve had a little introduction, I need to bust a myth I hear a lot in clinic: That cardio is the best and only method to use for weight loss.

Keep in mind, the literature on this topic is constantly changing, so this is where the research is at the moment. While weight loss shouldn’t be your only reason for exercising, I understand it is a motivator for many people to start. However, the myth that cardio is going to be better than strength training for weight loss is not actually as true as we used to believe.

Cardio can certainly assist with weight loss as it will increase the number of calories you burn; however, strength training is an excellent weight loss tool as it increases muscle mass. When you increase the amount of muscle in your body, these muscles continue to burn more calories, even when you are resting. Think of it like this: muscles help to burn more calories at rest than other types of body mass such as fat- the more muscle you have from strength training, the more calories you are going to burn day to day. While cardiovascular exercise can burn calories and can help you enter the calorie deficit which is necessary for weight loss, it doesn’t have the added benefit of increasing muscle mass. This means you will not continue to burn as many calories you would at rest compared to when you are strength training. 

 So How Much Of Each Type Of Exercise Should I Do?

Current exercise guidelines suggest that adults should get 150 minutes of moderate intensity or 75 minutes of vigorous intensity cardiovascular exercise per week and at least two strength days of strength training in a week.

If you’re not here yet, don’t fret! Start small and slowly increase as you feel comfortable and get into a routine. The most important thing is just that you are moving your body, no matter what that looks like! Ideally you still need at least 2 days of resistance training per week but outside of that stick with what you enjoy! If the gym and running or biking isn’t your thing, try joining a sports team, going on walks with friends, or anything else that gets your heart rate up.

 Decreasing Sedentary Time

Another important tool for staying healthy is decreasing sedentary time - this means time sitting or laying down not doing anything. There are lots of things you can do to break up your sedentary time:

  • Get up for small breaks during long periods of sitting at work

  • Use a standing desk

  • Do some stretches while you watch tv

  • Do squats while you brush your teeth

Anything you can do move your body will contribute!

I hope you learned something about the differences between strength training and cardio in today’s blog! The main takeaway should be that both resistance training and cardio should be incorporated into a strong exercise regimen. If you have questions or need help figuring out to incorporate different types of exercises to meet your goals, be sure to book in with our registered kinesiologist for support.


Give us a call at (778) 630-8800, email us or book online to seek treatment from a physiotherapist or to work with a registered kinesiologist.

Vestibular Exercises for Tired Caregivers of Little Ones

Does this story sound familiar? You go see your favourite physiotherapist who gives you a bunch of great, well-intentioned exercises perfectly targeted for you and your body. By the time you get home, life hits - the laundry needs attention, someone needs to make dinner and someone is crying. How are you supposed to get it all done?!

For caregivers of littles, this often presents a huge challenge - how do you get your exercises in while still managing everything you have going on at home?

When it comes to vestibular exercises, I have come up with a great list that you can try at home. As always, check in with your vestibular therapist to make sure these exercises are appropriate for you.

Devon’s Top Ten Exercises for Vestibular Stimulation With Babies & Toddlers

1. Create an obstacle course with tape

Grab some masking or painter’s tape and start taping lines on the ground. Tape a long, straight piece down and walk heel to toe on it; tape a zig-zag on the ground to walk along; tape some shapes to jump into - you are only limited by your creativity!

Bonus points if you use different colours of tape and assign different rules to different tape colours. For instance, move slowly on the yellow tape, fast on the green tape and backwards on the blue tape.

2. Play Floor is Lava

Grab all the pillows you can find and scatter them around the room. Go from one pillow to the next, making up rules as you go. Let your little one pick a pillow to “sink into the lava” or decide that all the blue pillows sunk.

3. Peak-A-Boo with movement

For the super-littles, a game of peak-a-boo is a great place to get some vestibular input. When you close or cover your eyes, move either forward/backward or up/down - that movement with eyes closed will give your vestibular system a nice kick. Remember to do this one in sitting if you’re quite off-balance with eyes closed in standing!

4. Ring Around the Exersaucer

If you have a little sitting in an exersaucer, jolly jumper or even on a blanket on the ground, walk around them in some kind of silly walk while making eye contact and having your head turned toward them. You could be a penguin, a hopping bunny, a gorilla - whatever you’d like! The bigger and more exaggerated the movement, the better!

5. The Hokey-Pokey

If you want to get your body moving, do the Hokey Pokey! You can move as much as you want and even close your eyes for parts of it to give you a real challenge. Putting your head in? Drop that head as far down as you can!

6. Toy handoff

A common vestibular exercise I prescribe is looking at something in your hand while moving your head. This is easy to do here - when you grab a toy to hand your kid, look at the toy as you turn and move towards your kid without allowing your eyes to come off of the toy.

7. Yoga

You may be thinking, how am I supposed to do yoga with little kids around? My kids and I started down Cosmic Kids Yoga together during the pandemic and they loved it. Give it a try! It even became a regular thing in our home before lunch.

8. Silly walks

Create your own silly walks with your littles! High kicks, wobbly knees, spins… take turns creating a silly walk and having everyone else copy it. If you have one walking little and one non-walking little, holding the baby while doing your silly walk gets your bonus points!

9. Tickle fights

Honestly, the vestibular system and spontaneous movement are made for each other. Tickle fights are such a great way to engage in unpredictable movement patterns and react to their movements. Add some rolling around and you’ve got the whole package!

10. Patty Cake

When playing patty cake, keep your eyes switching back and forth between your hands - this gives your vestibular system some great stimulation.

Remember - make sure you’re safe to do any and all of these exercises, especially ones in which you are closing your eyes and moving through space. The last thing you need is a fall! If in doubt, check in with a vestibular therapist about which exercises are appropriate for you.

If you need the help of a vestibular therapist, call us at (778) 630-8800, book online or email us.

How To Recognize A Concussion

Concussions have been getting a lot of media attention lately, and rightfully so. If you’re an ardent or casual consumer of American football, you likely heard about Tua Tagovailoa. The 24 year old quarterback of the Miami Dolphins seemed (to my eyes) to show symptoms of a concussion on Sunday, September 25th. He was cleared to play in the Thursday, September 29th game where he sustained a head injury, just four days later. Tagovailoa was carted off the field on a spine board and transported to hospital where it is reported he was diagnosed with a concussion. The NFL has since been under fire for its handling of Tagovailoa’s initial hit.

Repeated concussions within a short time frame are a big problem and can be fatal. Second Impact Syndrome occurs when someone suffers a second head injury before recovering from their first, leading to swelling of the brain. It is thankfully rare but it does happen.

Since this occurred, there’s been a lot of discussion around concussions. Can you tell from a video that Tagovailoa suffered a concussion? What signs are you looking for? Most importantly, what do we do about it?

Before We Start: Things To Know About Concussions

Parents, partners, friends and teammates need to be aware of the common signs and symptoms of a concussion. For people not in health care, the Concussion Recognition Tool is a handy document to have readily available. It lays out everything I review here: the basics of how to recognize a possible concussion and some basic tests anyone can do to help figure out if someone suffered a concussion.

These are hard and fast rules about concussions that everyone should know:

  1. When in doubt, sit them out. Concussions are no joke. They are brain injuries, full stop. Most heal well but they need to be given the time and space to heal. If you think a concussion has occurred, stop and seek medical help.

  2. You don’t have to hit your head to suffer a concussion. While most concussions occur through a blow to the head, a force to the body can produce enough jarring force to the head to cause a concussion. Do not blow off concussion symptoms simply because the head did not physically hit anything.

  3. You do not need to be knocked out to suffer a concussion. In fact, most concussions do not result in a loss of consciousness.

  4. We cannot see a concussion with imaging. While research is getting closer to finding something that can definitely diagnose a concussion, we aren’t there yet. X-rays, MRIs and CTs are not able to diagnose a concussion.

  5. Baseline testing is not needed to diagnose a concussion. A concussion can be appropriately diagnosed by trained medical professionals without baseline testing.

  6. Return to sport/work/play protocols are important to follow. Medical professionals involved in concussion care are well versed in these protocols.

  7. Always have your primary medical practitioner involved in concussion care. This may be a doctor or nurse practitioner, but they need to be involved from the start.

How To Recognize A Potential Concussion

If you have just witnessed someone hit their head or take a large, jarring force to their body and you’re concerned they have sustained a concussion, watch for these signs:

  • Unconsciousness or lying motionless after the hit

  • Slow to get up

  • Confusion, disorientation and inability to respond to questions

  • A blank or vacant look

  • Imbalance, poor coordination, stumbling and gait difficulties

  • Any facial or head injuries

If you see these signs, call 9-1-1:

  • Neck pain or tenderness

  • Double vision

  • Weakness, tingling or burning in the arms or legs

  • Severe or increasing headache

  • Seizure or convulsions

  • Loss of consciousness

  • Deteriorating conscious state

  • Vomiting

  • Increasingly restless, agitated or combative

Watch Tua’s first injury on September 25th - how many of these can you see in the video? Now watch his second injury four days later - what do you see?

Immediate Signs And Symptoms Of A Concussion

If you suspect someone has had a concussion, you should check in with them for their symptoms.

Signs and symptoms of a concussion can be cognitive, behavioural and/or physical. The most common signs and symptoms to watch out for include:

  • “Don’t feel right”

  • More emotional

  • More irritable

  • Sadness

  • Nervous or anxious

  • Neck pain

  • Difficulty concentrating

  • Difficulty remembering

  • Feeling slowed down

  • Feeling like “in a fog“

  • Headache

  • “Pressure in head”

  • Balance problems

  • Nausea or vomiting

  • Drowsiness

  • Dizziness

  • Blurred vision

  • Sensitivity to light

  • Sensitivity to noise

  • Fatigue or low energy

If they complain of or display any of the above, assume they have had a concussion and seek medical attention.

It’s not uncommon for people who have had a concussion to just waive everything off and say they’re fine, especially for athletes in the middle of the game. In this case, it’s important to check their memory with a few basic questions. Some great options include:

  • Where are we playing today?

  • Which half/inning/period is it?

  • Who scored last?

  • What team did you play last time?

  • Did your team win the last game?

If you are still unsure, remember Rule #1: When In Doubt, Sit Them Out.

After A Concussion

If it’s pretty clear someone has a concussion, they need to be seen by a medical professional. If symptoms aren’t severe, an appointment with their GP or NP can be made in the next few days.

People with concussions shouldn’t be left alone initially in case symptoms worsen. They don’t need to be woken up every 1-2 hours like we used to do but they do need to have someone keep their eye on them. People with concussions should not drive, drink or self-medicate with drugs. Seek medical attention from a GP, NP or pharmacist for recommendations on medications.

In the first two weeks after a concussion, most people heal well. We have come a long way in our understanding of how to treat a concussion, which you can read about in our blog So You’ve Had A Concussion, Part 1: The First 2-4 Weeks.

All of this information is laid out in the Concussion Recognition Tool and is free to download.

If you’ve suffered a concussion and need follow up care, book an appointment online, email us or give us a call at (778) 630-8800.

Busting Common Exercise Myths: Part 2 - The Perfect Squat

Is there a perfect squat form for everyone?

If you’ve been around a gym or done much exercise in your life, it is likely you have tried to adjust your squat form at one point or another. Maybe you have seen videos of fitness influencers on social media and tried to copy what their squat looks like.

In our heads, the ideal squatter often has their toes facing forward, feet shoulder width apart, knees stay behind their toes, chest up, back straight, and no “buttwink” (curving of the low back as it drops at the end of a squat).

Unfortunately, this isn’t the perfect form for everyone, and there isn’t a one size fits all perfect squat form. This is due to the differences in our anatomical build. We all have different anatomy in our spine, hips, knees, pelvis, and ankles, and everyone has different levels of function and mobility at each of these joints.

One of the easiest examples of differing anatomy is the angle at which our legs naturally sit. When in a natural position (I.e., laying flat on your back with your legs down and relaxed), some people’s feet will naturally face straight up and forward while some will naturally sit with their toes pointing outside away from their bodies. By forcing everyone to put their toes forward, we may be putting them in a position which is less natural for their specific body anatomy. Individuals whose feet naturally fall towards the outside when in this position may feel more comfortable with their toes pointed away from their bodies when squatting, rather than having their toes facing forwards.

Another good example of this is ankle mobility. Individuals with tight ankles may have a difficult time going into a deep squat as the don’t have a large enough range of motion through the ankle joint to allow their knees to move forward. There are a couple of ways to adjust this. Firstly, these individuals should be working to improve their ankle mobility. However, some people may not be able to improve their ankle mobility a whole lot, and that is okay! People with tight ankles may benefit from raising their heels when they squat. This may mean using a small wedge or small plate under the heels- this will allow them to squat much deeper as their ankles are less limited.

The last example we will talk about is the length of your femur (aka your thigh bone). Online, we often see individuals being praised for how deep they can go in a squat- but this is not something everyone will be able to do safely or comfortably. Individuals with longer femurs will naturally have to lean forward more in their squat to stay balanced and offset the weight or their body. Individuals with longer femurs also may not be able to squat down quite as deep, as they will be unable to stay upright due to the weight of their body or barbell pulling them backwards.

The important thing to remember here is there are anatomical features that CAN NOT BE CHANGED and that is not a bad thing!

This means no squat form is better than another. The best squat form is the one that is safe and feels right for your body.

We don’t expect you to know the length of your femur, hip angle or ankle mobility. If things aren’t feeling right in your squat, play around until they feel better. Here are some things you can try:

  • Depth - short calf muscles and femur length will affect how deep you can go in your squat, so adjust to find the right depth for you

  • Foot angle - pointed straight ahead or pointed outside? This will often be based on your hip anatomy and the amount of torsion on your shin bone

  • Foot width - femur length and the width of your pelvis play in here as well, so feel this one out. A wider stance is more stable and requires less distance to travel.

  • Type of squat - different types of squats (front squat, barbell back squat, goblet squat, box squat, sumo squat, etc.) demand different body positions, depending what muscle group you want to target

  • Ankle position - tight calves or limited ankle mobility may require doing things a bit differently, such as a heel elevated squat

While there is no perfect squat form that works for everyone, there is absolutely a perfect squat form for your body! If you are unsure of where to start or how to perfect your squat form, our registered kinesiologists would be happy to work with you to create an exercise program which matches your exercise goals and injury specific recovery needs.

Give us a call at (778) 630-8800, email us or book online to seek treatment from a physiotherapist or to work with a registered kinesiologist.

Happy squatting!

How Not To Injure Yourself During Your DIY Reno

If you have spoken to Nicole in the past year you have likely heard at least something about her recent bathroom renovation. Nicole is an experienced physiotherapist but she is brand new to the world of home renovations and it is safe to say there were some growing pains during the process (both mental and physical).

The renovation involved taking walls down, putting them back up, fixing a ceiling, waterproofing and then tiling a shower, installing a floor and much more. Through some trial and error, Nicole is here to share with you some of the techniques and insights she utilized along the way to decrease the strain on her body.

Nicole’s Top 11 Tips for Home Renovations

1. Share the load!

Whenever possible alternate which hand you are using for a task or use both hands at the same time. This is especially great for tasks that do not involve a lot of precision such as breaking old tile or taking down cabinets. 

2. Use the equipment!

Wear knee pads if you are kneeling. Prolonged pressure on your knees can cause bursitis and it is no fun. Also remember that having the correct tools can literally make your life easier. Don’t saw by hand if you have power tools available. Use extender poles to help you reach high places. You get the idea.

3. Repetition is not your friend.

Repetitive wrist extension is one of the leading causes for tennis elbow and other tendinopathies. Unfortunately, many construction tasks involve a lot of repetition. When you are able, try to use whole arm movements and drive the movement from the shoulder or elbow rather than using little wrist flicks. This can make drywall mudding and taping, hammering, and painting a lot easier on your body (fun sidenote: sometimes wearing a wrist brace will increase your awareness of your wrist motions and help you maintain a neutral position, this could potentially help you avoid these issues altogether). 

4. Avoid over-gripping equipment.

You don’t need a death grip on that paintbrush. Same goes for hand sanders, etc. Gripping too hard is another leading cause of tennis elbow and wrist/hand tendinopathies. 

5. Decrease the load.

Don’t carry around unnecessary tools, equipment, or materials. This can be applied on big and small scales. If you are drywalling, put less mud into your container at any one time to decrease the strain on your wrist. Why hold a 10lb weight if you can hold a 2lb weight and refill it more often? On a bigger scale, if you have to transport materials from one spot to another, it is easier on your body to make more trips while carrying less load rather than a few trips with huge loads. 

6. Be nice to your neck!

If working on a ceiling or something else overhead try not to look directly above yourself. Instead, look at the ceiling a few feet ahead of you and work in that spot (using your pole) to avoid straining your neck. Also make sure you don’t jut your chin out - the more you can keep your neck in a neutral position (no matter which direction you are looking) the better your neck will feel at the end of the day.

7. Beware of prolonged awkward positions.

Home improvements can have you twisting and turning into bizarre positions and sometimes you have to stay there for a long time. 

  • Take breaks. It’s often tempting to “power through” but if you have been bending over for a long time stand up, arch your back backwards and give yourself a bit of a walk break. 

  • If you have the ability to alternate between tasks that is also awesome as it challenges different muscle groups and gets you in different positions. You can hang a light fixture, which is tough on your neck and shoulders, but then to give that area a break maybe choose to install a door handle or take some time to tidy your work area before you hang the next light. The more you can distribute load between different body parts the better off you will be. 

8. Proper lifting techniques are a must. 

Follow these rules:

  • Prepare for the lift.

  •  Keep the load as close to you as possible. 

  • When in doubt it’s always better to get a second person to help you. 

  • Treat lifting materials like a workout. If you were at the gym exercising with a personal trainer, how would they have you pick up that bag of cement? How would you carry those 4x4’s? How would you manage the overfull garbage bag of debris?

  •  Try using an in athletic “ready position” stance instead of hunching to help your back out when working. This especially applies to tasks like mixing mortar. It’s so tempting to hold the bucket between your feet and hunch while you mix the materials but it that is a difficult position for your back to hold for several minutes. A split stance mini squat gives your body more stability and less strain. 

9. Take the time to do it right.

Move your ladder more often to avoid overreaching which can strain your neck and shoulders, it could also help you prevent a fall. 

10. Some tools have more than one use.

We often think to use an extender pole when painting a ceiling. You can just as easily use one to reach low areas as well to prevent excessive bending/stopping/crouching (like staining a deck or a fence). 

11. Momentum can be your friend.

When you need to generate a lot of force to demolish something whenever possible use a “baseball swing” that uses your whole body. Your shoulders will thank you. 

This list is by no means complete but if it saves one person from an unnecessary sore neck or shoulder, it’s worth it. If you are an industry professional we would love to hear your favourite body-saving tips and tricks - comment below!

To book an appointment with one of our physios, book online, email us or call us at
(778) 630-8800.

Are You Ready For Pointe?

When I was a young dancer, I remember wrapping ribbons around my ballet shoes and going on my highest tippy toes pretending I was in pointe shoes. I couldn’t wait to turn 13 so I can start dancing en pointe like all the big girl ballerinas.

Then came the day! I got my first pair of pointe shoes and had my first pointe class. Within a few minutes I remembered thinking, “ow this hurts”, followed by “this is much harder than it looks”. I spent the next 5 years struggling through pointe classes and performances, accompanied by lots of ankle sprains, painful blisters, bunions, and blackened toenails (that would occasionally fall off).

Looking back now, I wish someone would have told me that I was not ready to start pointe at 13.

There is a misconception that all ballet dancer’s are ready to start pointe by the age of 11-13 years of age because of sufficient bone maturation. This is false! Yes, bone maturation is important but is not the sole marker.

When it comes to pointe readiness, a strong ballet foundation, and adequate mobility, strength, and body control is imperative for a dancer to be successful en pointe.


“There’s no reason to get a young dancer on pointe if she cannot do anything once she is there.”

- George Balachine


The Pre-Pointe Assessment: What's The Pointe?

A pre-pointe assessment goes beyond just the dancer’s feet. We take a thorough look at the dancer as a whole. During the assessment, the physiotherapist will examine overall mobility, strength, balance, body alignment, trunk and core stability, and neuromuscular control. These components are all critical in pointe work. The purpose of a pre-pointe assessment is to identify deficits in each category and to provide corrective steps to address the problems to reduce risk of injuries once en pointe.

What should I expect at a pre-pointe assessment?

At the beginning of the session, the physiotherapist will ask a series of questions to better understand the dancer's background and medical history. After that, the dancer will be asked to perform a series of dance and non-dance specific tests and movements.

It is recommended that dancers dress in clothes they can dance in (ie bodysuit, tights, shorts, leggings, athletic wear) and dance shoes (for turning). After the assessment, the physiotherapist will debrief and provide recommendations and exercises based on the findings from the assessment.

What are the risks of starting pointe before a dancer is ready?

There are several risks with rushing to pointe work, including:

  • Overuse injuries: inadequate strength of foot and ankle muscles will cause compensations up the chain including knee, hips and low back, as well as stress fracture in the foot

  • Strains & sprains: dancers with inadequate ankle strength put themselves at risk for ankle sprains and chronic ankle instability

  • Foot malalignment: poor pointe technique can put unnecessary stresses through foot joints which overtime can lead to irreversible deformities such as bunions and hammer toes

Successful pointe work requires a lot of patience, commitment, and a willingness to listen to and apply corrections. Having the right attitude and expectations going in lay the foundation for a successful transition to pointe.

If you’re considering starting pointe work, book an assessment with Anh at Ladner Village Physiotherapy online, by email or phone at (778) 630-8800.

Busting Common Exercise Myths: Part 1

There are a lot of myths out there surrounding exercise. While online and social media resources can be great for providing exercise ideas, inspiration and routines, not all the information we see online is reliable. Today we are going to chat about some common myths we hear in clinic about exercising and get to the truth behind them.

Myth 1: You can spot reduce fat 

Truth: It is a common misconception on the internet that you can use certain exercises to reduce fat in one part of the body- for example, doing sit ups or crunches to reduce stomach fat. Unfortunately, you cannot spot reduce fat.

Think of it like driving a car- you can’t only use gas from the right side of your tank! When we drive the whole tank empties, and when we work out, we burn calories from all over the body. This may result in a loss of fat from some area quicker than others- for example, the abdominal area is one of the first areas to decrease fat for many people.

However, don’t let his confuse you- you can still target muscle growth in certain body parts, but this is a completely different process! Fat cells do not magically transform into muscle cells or vice versa. By working out we burn calories from all over our body, which can help reduce fat, and by strength training we can increase muscle definition in certain areas.

Myth 2: Lifting will make you bulky

Truth: Lifting heavy weights will not make you bulky!

Lifting weights is actually a great way to lose weight if that is your goal. When we lift the appropriate weights, our body will begin to build muscle. Muscle has a higher metabolic rate than fat, meaning when we lift weights our body will naturally burn more calories, even at rest.

At the end of the day, bulkiness or weight gain comes down to calories in versus calories out. If you are putting more calories into your body then you are burning, then you are will likely gain weight. If you are burning more calories than you are eating, you will lose or maintain your weight. To gain a lot of muscle bulk, you would need to greatly increase your caloric intake as you increase your strength training. 

Myth 3: No pain, no gain 

Truth: This is a tough saying that we hear a lot in clinic. However, it is important to differentiate between types of pain and understand that this is not always true! While it is okay to work through some types of pain, it is important to learn to differentiate between different types of pain such as delayed onset muscle soreness, muscle fatigue, and pain related to an injury. 

Firstly, it is totally possible to have an excellent workout without being sore afterwards. Other indicators of a good workout to look for may be how difficult the workout feels, whether you are able to lift heavier weights than you previously could, or if you can do more reps than you previously could.

Delayed-onset muscle soreness (DOMS) tend to be muscle soreness which occurs between 24-48 hours after a workout and dissipates within 2-5 days. DOMS are normal and a type of pain we are okay with! However, we don’t want severe pain which lasts outside this time frame, pain which comes with excessive swelling, or pain that continues to worsen for days after a workout.

And again, remember you can still have a good workout without having bad DOMS!

In clinic, we normally try and avoid any sharp, pinching, or tingling type pains. A general rule of thumb to keep in mind is to not let your pain increase above 2 on a pain scale while completing an exercise. For example, if you come in with baseline shoulder pain of 2/10, we typically wouldn’t want to push this pain past a 4/10 with any of the exercises we complete. However, this may vary between injuries and exercises, so always listen to your practitioner’s advice first and foremost! 

Need some help with your exercise routine? Book with our kinesiologist online, by email or at (778) 630-8800.

Questions I Get Asked the Most as an RMT (Registered Massage Therapist) 

Our fabulous RMT Gabrielle De Winter joined us in January of this year. An instructor at the West Coast College of Massage Therapy, she has pursued further training in jaw pain, also known as temporomandibular joint dysfunction. In this short question and answer blog, Gabrielle answers the questions she most frequently gets as an RMT.

Gabrielle’s Most Frequently Asked Questions 

Do you get free massages? 

Only from my husband! Most RMTs are independent contractors that don’t have built in extended medical benefits through their union (in fact we don’t have a union) or through their workplace. Some RMTs will work out exchanges with other RMTs they know. Mostly, we will need to book in with a practitioner to get a massage, just like everyone else. 

Do your hands get sore? 

Sometimes! But if you’re in an appointment with me as your therapist, I’m more concerned about how your body is feeling and not thinking of my own. 

Can massage help migraines and headaches?

 Yes! Tension headaches are typically muscular in origin and respond well to massage. I have a particular interest in treating tension headaches with massage. I did a study in school where we found tension-like headaches can be reduced significantly with massage.

Migraine headaches are a little trickier - sometimes massage can help calm down the nervous system. Migraines are usually multi-faceted and if you haven’t tried massage, it may be worth a go.

If you come in for massage related to headaches, I’ll ask you a lot of questions around your activities, if you’ve seen your dentist or optometrist lately, if you have balance issues… From there, we will figure out the best course of action with massage therapy.

Is massage painful?

 It doesn’t have to be! I want to work within your comfort level and what’s safe and effective.

What if I fall asleep and snore?

If I notice that you’re falling asleep, I’ll ask if you’re okay with me working on you while you’re asleep. If that’s fine, great! If not, I’ll make sure you stay awake while I’m working on you.

But this happens all the time! We are engaging with the autonomic system and if the goal is relaxation, people definitely sometimes fall asleep.

Is it okay to ask for more or less pressure?

Absolutely! We will discuss this on our first visit - what kind of pressure you’re comfortable with. While we are in the treatment, if you decide the pressure level needs to change, we can adjust as we go.

Are my muscles tight? 

Muscles can be “tight” but we can use better words to help us better describe what is happening. What feels “tight” is often a muscle which has been shortened, lengthened, or aggravated. 

What most patients think of as “tight” is a shortened muscle. Muscles cross joint(s) that they act on which as a result can limit their range of motion if they are shorter than usual. In order for me to see if a muscle is short, I would perform a muscle length test, which involves bringing the insertions points of a muscle away from each other so I can see if a shortened muscle is decreasing a joint(s) range or movement. 

Muscles could also be felt as “tight” if they are in a lengthened position. Much like a rubber band stretched out. This happens often to desk workers who sit for long periods of times with their shoulders rotated forward. In order for their shoulders to be forward, the muscles that bring the shoulders back will lengthen to allow that opposite position of the shoulder blades to happen. Some of the muscles between the shoulder blades, namely the rhomboids and the middle fibres of trapezius in this desk worker scenario tend to become lengthened and weak overtime. 

Muscles can be aggravated or carry extra tone for a number of reasons. Common reasons are injury, overuse or poor posture. When a muscle gets aggravated, it may react by feeling tight, stiff, or sore. A few ways to avoid having constantly aggravated muscles include regular stretching, strength training, and of course a massage with your favourite RMT. 

Are you looking for a massage? You can book with Gabrielle online, by emailing us or giving us a call at (778) 630-8800.

Our Favourite Summer Activities

Here at Ladner Village Physiotherapy, we like to stay active. Let’s introduce you to our therapist’s favourite summer activities and why you might want to give them a try!

Devon (Physiotherapist/ clinic owner):

Favourite activity: Ultimate frisbee

Why you may want to try it: Ultimate frisbee is one of few sports where players often don’t begin to play until they are adults. This is great as it means everyone starts on an even playing field. The ultimate frisbee community is welcoming and encouraging. According to Devon, ultimate frisbee might be the activity for you to try if you enjoy hard work, games of strategy, sprinting, sarcastic banter and a few cold drinks after the game!

Where to try it: the Vancouver Ultimate League plays on fields all over Vancouver and they also have a Surrey league.

Nicole (Physiotherapist/ clinic owner):

Favourite activity: Horseback riding

Why you may want to try it: Horseback riding is an activity perfect for animal lovers. Nicole loves horseback riding because she loves spending time around horses, being outside, and working on her core strength and balance. Horseback riding might be the right activity for you if you are looking for a new and challenging activity to try which is fairly low impact and a lot of fun!

Where to try it: Delta has so many barns and stables for horseback riding, from beginner to advanced level! Crescent Stables offers lessons to all ability levels as does Five Star Farms and Top Form Equestrian.

Sofy (Physiotherapist):

Favourite activity: Running

Why you may want to try it: Running is one of the most accessible activities around! All you need is a pair of runners and you’re good to go. Sofy enjoys running as it is a great way to enjoy the outdoors, explore the city, and there are always new ways to challenge yourself. She recently completed her first marathon!

Where to try it: Out your front door! If you’re looking for a clinic or a group to run with, the Run Inn out of Tsawwassen is a great group to join (they can also get your feet set up for success with the right shoes for your body).

Stephanie (Physiotherapist):

Favourite activity: Climbing

Why you may want to try it: Climbing is a fantastic way to challenge yourself and try something you may not have tried before. Outdoor climbing is an amazing way to explore our beautiful backyard and (literally) bring your exploring game to new heights! Stephanie loves climbing as it is a social activity where you can enjoy time with her friends, and you are able to challenge yourself by setting goals (or projects as they are called in the climbing world) to complete.

Where to try it: The Hive is a great place to try bouldering, a type of climbing with shorter walls, no ropes and thick crash pads. If you’d prefer to be roped in, try Coastal Climbing in Surrey.

Trevor (Physiotherapist):

Favourite activity: Golf

Why you may want to try it: Golf is the perfect mix between a challenging competitive sport and a great relaxing activity. Whether you hit up the driving range, play 18 holes, or even just go to a pitch and putt, golf is a fun social activity that can be accomidated to your skill level. Trevor enjoys golf as he likes spending time with friends, a good competition, and taking a break from the craziness of life for a few hours.

Where to try it: Try one of South Delta’s fabulous golf courses! We have The Links at Hampton Cove, Kings Links by the Sea, Tsawwassen Springs & Beach Grove Golf Club.

Anh (Physiotherapist):

Favourite activity: Tennis

Why you may want to try it: Tennis is a perfect summer sport! It’s very accessible, affordable, and a lot of fun! Anh enjoys playing tennis as it’s a great way to work on her hand eye coordination (which we hear could use some work!). One reason we love tennis is that it’s an easy to learn sport for people of all ages! You can easily bring your kids out to play (or run around and chase balls for you, either way, we don’t judge)!

Where to try it: South Delta has tennis facilities at several major parks in Ladner and Tsawwassen. We also have two tennis clubs, the Ladner Tennis Club and Tsawwassen Tennis Club, both offering tennis lessons, lit courts at night and tournaments.

Gabrielle (Register Massage Therapist):

Favourite activity: Swimming

Why you may want to try it: Swimming is a fantastic low-impact activity. Since you can float in the water, swimming takes pressure off your joints and allows you to move them into different ranges of motion than you may be able to out of the water. Swimming not only helps stretch muscles by allowing them to move more freely, but it’s also a full body strengthening workout! Gabrielle loves swimming because you can stay cool, hang out with your family, and it’s great for stiff joints!

Where to try it: If lap swimming is your thing, your best local options this summer are Winskill Aquatic and Fitness Centre and the Ladner Outdoor Pool (the Ladner Leisure Centre will be closing at some point for several months, but we don’t know when that will happen as of yet). I’d also encourage you to get into nature and try swimming at Centennial Beach (warm and shallow for daaaaays).

Kheya (Registered Kinesiologist):

Favourite activity: Volleyball

Why you may want to try it: Volleyball is a fun, challenging, and quick moving team sport. Volleyball is a blast because you can play it indoors, outdoors, or even on the beach! Kheya loves volleyball as she loves the amount of teamwork involved, being outside, and the rush you get after getting a great hit or block in. Volleyball is great a great way to meet new people and be involved in the community as everyone all supportive, friendly, and welcoming.  

Where to try it: Volleyball BC offers several leagues for various ability levels all over Metro Vancouver. Urban Rec offers a beach volleyball league in Ladner.

We hope you enjoyed learning a little bit about our practitioner’s favourite summer activities and may even feel inspired to try a few of them for yourself!

If you have any aches or limitations preventing you from trying these activities, come visit one of our therapists to get the help you need to get back to it!

To book an appointment, call (778) 630-8800, email us or book online.

Neck & Back Pain - Part 2: Strengthening Exercises

She’s back! Registered kinesiologist Kheya McGill is here with part 2 of her two-part blog series on exercises for back and neck pain. In this final instalment, Kheya goes over her favourite strengthening exercises. Go back and read part 1 for a refresher on spinal anatomy and some great mobility and stretching exercises!

If you read our last blog, you know that you are not alone if you’re dealing with back and neck pain. In this blog, we will talk about the importance of adding strength exercises into your routine when dealing with your back and neck pain.

Strengthening is a very important part of this routine! When a person has back pain, we like to focus on strengthening the core and glutes (in addition to the muscles in the back and neck themselves). Increasing strength helps provide more support for the muscles that are tense and increases the ease with which we can complete our daily activities. Strengthening is also a very important tool for avoiding reinjury.

Why do we focus on strengthening the core and glutes when dealing with back pain?

The core helps support the spine. When an individual has a weak core, these muscles can’t do their job properly, putting more strain on the back. However, don’t be fooled by the myth that a strong core always means having rock hard abs!

In terms of postural support, one of the most important muscles to learn how to activate and strengthen is the transverse abdominus (your deepest core muscle). To activate the transverse abdominus, you want to tighten the muscles in the lower abdomen.

I like to think as if I am trying to gently pull my hip bones together but there are lots of different cues we can use, depending on what works for you. Notice in the photos below how I even have my fingers placed on my stomach (roughly 3cm in from my hip bones) so I can feel these muscles turning on beneath my fingers.

The glutes are another important muscle to strengthen when you have low back pain. The glutes include the largest muscle in the human body, the gluteus maximus, and play a very important role in supporting the lower back. When an individual has weak glutes, back muscles often take over the glutes’ job which can add tension and pressure in the low back. If you have a difficult time activating your glutes, the exercises outlined here should help! 

Kheya’s Top Five Strengthening Exercises

1) Toe taps 

Begin on your back. You will want to start this exercise by activating the core muscles as we talked about above. Next, you are going to lift your legs up so both your hips and your knees make a ~90 degree angle. From here, you are going to slowly lower one leg down at a time, trying to keep your knee bent at 90 degrees, and tap your toe to the floor. Try and keep your core engaged the entire time, and don’t let your lower back lift off the ground. Lastly, remember to breathe!

Complete 10 reps (5 toe taps per side) for 2-3 sets.

2) Bridges

Begin laying on your back with your knees bent. Engage your core and lift your bum off the floor, trying to create a straight line down your body and legs. Try and think about squeezing your bum at the top of the movement. If this is too easy, try adding a weight on top of your hips or a band just above your knees.

Complete 8-12 reps for 2-3 sets.


3) Bird dog

Begin on all fours with your hands below your shoulders. Engage your core and extend one arm and the opposite leg. When extending the leg, think about pushing your back heel through the wall behind you to extend as far as possible. If this is too difficult, try beginning by just lifting one arm at a time, keeping both legs on the floor. You can then progress to lifting one leg at a time keeping the arms on the floor, until you are able to lift opposite arms and legs at the same time.

Complete 10 reps (5 per side) for 2-3 sets.

4) Chin tucks 

Stand against a wall with your shoulders and the back of your head against the wall. If you need to, move your feet a step out from the wall so you can put your back flat against the wall. Push your chin so that your head goes straight back, lengthening through the back of your neck.

Hold the tuck for 3-5 seconds and repeat this 10 times.

5) Back rows

To do this exercise, you will need a band. Begin by looping the band at elbow height around something stable such as a banister or a doorknob. Hold one end of the band in each hand and bend your arms at the elbow to 90 degrees. Now, slowly pull your arms backwards, thinking about squeezing your shoulder blade together at the back.

Complete this 10-15 times for 2-3 sets.


In addition to all these exercises, any type of general strength and exercise will be great for lower back pain, even exercises working the muscles not involved in your pain. (For more information on this, see our blog on general exercise for injury rehabilitation.)

If you are unsure of where to start, our registered kinesiologists would be happy to work with you to create an exercise program which matches your exercise goals and injury specific recovery needs.

Give us a call today give us a call at (778) 630-8800, email us or book online to seek treatment from a physiotherapist or to work with a registered kinesiologist.

Neck & Back Pain - Part 1: Mobility and Stretching Exercises

Our fabulous registered kinesiologist Kheya McGill is back! In part 1 of her two-part blog series, Kheya reviews her favourite mobility and stretching exercises to help you tackle your neck and back pain. For Kheya’s favourite strengthening exercises, visit Part 2.

Neck and back pain are very common conditions. Sinnott et al. found that, at any given time, 15-20% of us will report back pain and 10-20% of us will report neck pain. Those numbers are huge! Spending more time hunched over computers (like most of us have been over the past two years) hasn’t helped.

Taking movement breaks throughout the day can be incredibly helpful for keeping pain at bay. It really boils down to the saying “motion is lotion” - the more you move your body, the easier (and less painful) it is to move. If you’re able to, taking a quick break every hour can make all the difference.

In this blog I will outline a few of my favourite exercises to increase spinal mobility and stretch tight back muscles. Make sure to stay tuned for part 2 of my blog series on neck and back pain, which will focus on my favourite strengthening exercises.

But first, a review of spinal anatomy…

Our spine is organized into 5 main regions. From the head down, these regions are:

  • cervical spine - 7 vertebrae that make up the neck

  • thoracic spine - 12 vertebrae in the upper and mid-back, all of which attach to ribs

  • lumbar spine - 5 vertebrae of the low back

  • sacral spine - 5 vertebrae fused to form the sacrum, the triangular bone that helps make up the pelvis

  • coccyx - also known as the tailbone, located at the very bottom of the spine

The spine has three main jobs:

  1. Central supporting structure - the spine acts as a scaffold for your body. Muscles, ligaments and connective tissue attach to each vertebra of the spine and to the limbs. The rigidity of the spine also holds us up against gravity.

  2. Protector of the spinal cord - millions of nerve cells travel up and down your spinal cord, sending signals up to the brain and out to the entire body. Without the bony protection of the vertebrae, the spinal cord would be much more vulnerable to trauma and injury.

  3. Movement - the multiple joints of the spine allow a lot of movement to occur including sitting, standing, walking, bending forward and twisting around.

Keeping your spine healthy is critical to your overall health - the stronger and more mobile you are, the better!

Kheya’s Top Five Mobility and Stretching Exercises

The Mobility Exercises

What is it:

Mobility refers to the ability of a joint to move actively through a range of motion (see our previous post on flexibility vs. mobility for more on this). Improving mobility helps increase the range of motion available in the joints, leading to improved function and decreased pain.

1)      Thoracic spine openers

Begin by laying on your side with your legs slightly bent and stacked on top of each other. Stretch your arms out straight in front of you. Keeping your bottom arm on the floor, roll on your back and sweep your arm up and over to the other side, opening the chest. Keep your eyes on the top hand, rotating your neck as your arm rotates over your body. Once you have reached your end range, bring your arm back across your body.

Repeat 5-10 times per side.

2)      Lumbar rotation

Begin on your back with your knees bent, feet flat on the floor and your arms stretched out on either side of you like a “T”. Keeping your back flat on the ground, drop both legs out to one side. Hold this position for 5-10 seconds. Bring your knees back to the middle and then repeat the same movement on the opposite side.

Repeat this movement 10 times for 2-3 sets.

3)      Cat cow

Begin on all fours. With the hands underneath the shoulders, lift your head and chest while simultaneously letting your stomach sink and lower back arch. After this, switch and round the back and let the head and neck drop while rounding your back as much as possible.

Repeat these alternating movements 10 times and then repeat this for 2-3 sets.

The Stretches

Stretching is the ability to move muscles through a range of motion passively. In other words, pushing to get to the joints through the end range using assistance from your hands, the wall, a strap, or anything else (see our previous post on flexibility vs. mobility for more on this). Stretching is useful for back pain as it can help loosen sore and tight muscles.

1)      Childs pose

Begin on your hands and knees and drop your bum back onto your heels. Reach your hands forwards, dropping your head and shoulders down towards the floor.

Hold for 20-30s and repeat 2-3 times.

2)      Knee hugs

Begin laying on your back and hug one leg in towards your chest.

Hold this for 20-30s. Repeat on both sides and complete 2-3 sets.

Next up, the strengthening exercises! Head over to Part 2 for my favourite exercises to make your body stronger.

If you are unsure of where to start, our registered kinesiologists would be happy to work with you to create an exercise program which matches your exercise goals and injury specific recovery needs.

Give us a call today give us a call at (778) 630-8800, email us or book online to seek treatment from a physiotherapist or to work with a registered kinesiologist.