#shoulderpain

Overhead Shoulder Pain in Volleyball Players

Kheya McGill graduated from UBC with a Bachelors Degree in Kinesiology. A lifelong Tsawwassen resident, Kheya has recently joined Ladner Village Physiotherapy as a registered kinesiologist. In this article, she reviews the most common causes of shoulder pain in overhead movements common with volleyball players and five great exercises to help combat the pain.

Shoulder pain is common in volleyball players, particularly while arms are in the overhead position. The shoulder is one of the most mobile joints in our body, meaning it is also one of the most unstable joints. If you enjoy playing volleyball (or other overhand activities such as lacrosse, tennis or fly fishing), chances are you’ve experienced shoulder pain at some point whether that be soreness, stiffness or sharp pain.  

What causes overhead shoulder pain?

Common causes of overhead shoulder pain include:

  • Shoulder impingement - A shoulder impingement occurs when tendons get “impinged” or compressed between the head of the humerus (aka the arm bone) and the bony architecture of the scapula (aka the shoulder blade). When you lift your arm overhead, the space between these bones in your shoulder decreases and increases pressure on the tendons. This can cause irritation, which can lead to an impingement. 

  • Rotator cuff injury - The rotator cuff is a group of 4 muscles which surround your shoulder. These muscles help move the arm and scapula, while protecting the shoulder. Rotator cuff injuries are common and can occur for many reasons, including overuse, trauma, or degeneration. (Need more on this? Read our blog on the rotator cuff!)

  • Osteoarthritis - A degenerative joint disease, osteoarthritis causes problems with the cartilage, synovial membrane, ligaments and bone in a joint. Osteoarthritis can cause tissue loss, remodeling, inflammation and lead to loss of normal joint function. A history of shoulder injuries leads to a higher risk of developing osteoarthritis here. Remember, arthritis isn’t just seen in “old” people!! (For more on osteoarthritis, read our blog!)

How can I improve my shoulder pain?

Although these injuries are all quite different, the good news is all of them can be improved with the right exercises! Here are a few of our favourite exercises and stretches to add to your routine: 

1. Internal and external rotation with band 

Using a band, secure one end of the band to a stable point (we suggest tying a large knot in one side and securing the band behind a door).

Internal rotation: 


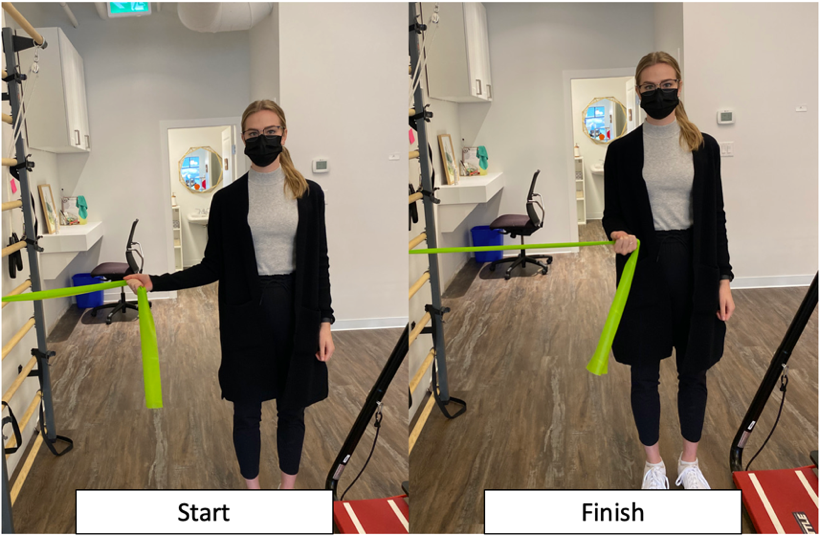
  • Grab the band with your hand so that the band is pulling your hand away from your body

  • Bend your elbow and tuck it gently into your side

  • Move your hand from the outside of your body towards the inside, bringing your hand closer to your belly

External rotation: 


  • Turn your body around so the band is now going in front of your body and pulling your hand towards your body

  • Bend your elbow and tuck it gently into your side

  • Move your hand away from your belly while keeping your elbow tucked in

2. Shoulder flexion with resisted external rotation 

  • Put a band around your forearms and bend your elbows at 90 degrees 

  • With your arms shoulder width apart, place small amount of tension in the band, and lift your arms up from the shoulder

3. Thoracic spine openers

  • Start laying on your side, with your hips and knees bent in front of you 

  • Place both arms straight out in front of your chest 

  • Keeping your bottom arm on the floor, reach your top arm across your body and towards the floor on the other side, opening the chest 

  • Follow your top hand with your head and eyes, and then slowly return to starting position

  4. I, Y, T, W’s 

  • Laying on your stomach, face down, with your arms overhead, thumbs pointing upwards (You may want to place a folded dish towel under your forehead - this helps you keep a neutral neck and breathe!)

  • Pick a position (I, Y, T or W) and raise your arms, pulling your shoulder blades together

  • Lower your arms back down to the ground, and repeat

  • Try in each position to target different muscle groups

5. Pectoral stretches 

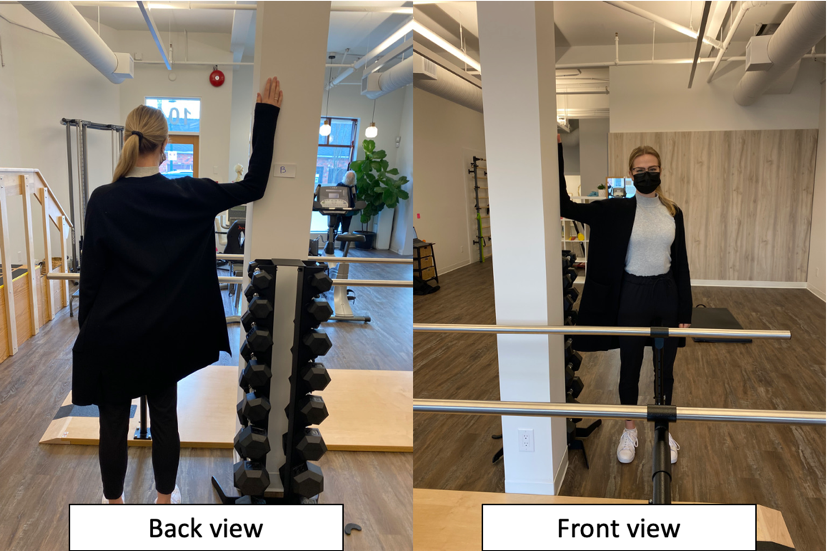
  • Standing next to the corner of a wall, place your forearm against the wall, with your arm and shoulder at 90 degrees

  • Lean your body forward until you feel a stretch across your chest

  • Play around with the height of your arm to stretch different portions of your pectoral muscle

There you have it! Five simple exercises you can do at home or add to your daily workout routine to improve shoulder pain and scapular stability. 

If you’re suffering from shoulder pain, give us a call at (778) 630-800, email us or book online to seek treatment from a physiotherapist or to work with a registered kinesiologist.  

Stephanie's Top Tips For Managing Your Sore Shoulder

IMG_8112.jpg

Stephanie Yip is one of our physiotherapists here at Ladner Village Physiotherapy with a passion for treating shoulder injuries. In her latest blog post, Stephanie shares her top tips for acute shoulder management.

The shoulder joint is the most mobile joint in our body, but that also makes it the most unstable joint and prone to injury. Chances are you’ve experienced an achy shoulder at some point in your life. With rock climbing and paddle boarding being my two favourite activities, I have definitely had my share of annoying shoulder pain. I get it - you can’t sleep, easy tasks feel impossible, and you just want to get back to life.

To learn more about shoulder anatomy and the muscle of the rotator cuff, check out this blog post. Today, I am here to share some practical, easy-to-implement, everyday tips for managing your sore shoulder in the early days of your rehab journey.

EVERYDAY LIFE

If your shoulder is in pain, you will automatically want to hold your arm to your side and not use it as much. This will only increase the stiffness and tension in the surrounding muscles, and add to your discomfort.

AdobeStock_178583612.jpeg

Instead, follow these tips:

  • Continue to use your arm in pain-free ways throughout the day - The best way is to use it for easy tasks like turning a page in your book, picking up your keys, or taking out your credit card.

  • Keep tasks within an easy arm’s reach - Avoid long levers. Carry loads close to your body. Avoid reaching far away for items by moving your body closer to what you need.

  • Avoid repetitive overhead motions - The most unstable and (muscle-speaking) demanding position for your shoulder is overhead. When your shoulder is healing, avoid being up here as much as you can.

PAIN MANAGEMENT

So your shoulder is sore and bugs you all the time – now what?

  • Avoid compensating movements - The most common one is hiking your shoulder up to reach items overhead. This will create more tension and discomfort in the muscles around your shoulder.

  • Try heat or cold to ease the pain - This is 100% your choice; pick the one that feels better for you.

POSTURE

Your posture plays a huge role in where your shoulder is positioned and as a result, how much pain you experience while at rest.

  • Don’t let your shoulder poke forward - This means no slouching!

  • Support your arm when resting - If you’re chilling on the couch or at your desk for a while, support your arm with a cushion/pillow/armrest so that it’s in a neutral, stable position

  • Use the “fish hook” rule - Imagine there’s a fish hook pulling you up by your sternum. This will help set your back in a better position.

SLEEP

AdobeStock_78207150.jpg

It is normal to feel more pain or discomfort at night while trying to fall asleep. When sleeping, you aren’t aware of where your arm is in space and are much more likely to put it in a position that can get quite painful.

  • If you’re a back sleeper - Place a rolled up tea towel under your elbow. This will help keep your shoulder in a more neutral position.

  • If you’re a side sleeper - Sleep on your unaffected side and hug a pillow with your injured arm so that it is comfortably supported.

  • DO NOT TUCK the injured arm under your pillow

EXERCISE

You get some shoulder rehab exercises, and you’re super excited to get started. Remember these key points:

  • Do your exercises in small, but frequent bouts - Your shoulder is like a young puppy: it wants to get exercised regularly but gets tired quickly.This means it’s better to do your exercises 3 times per day for 5-10 minutes, rather than doing just one session for 30 minutes.

  • Use pain as a general guide - It’s okay to feel mild discomfort while performing your exercises (think 3-4/10 on an imaginary pain scale) but it shouldn’t feel excruciating. It’s normal to feel a bit of soreness afterwards for a couple of hours but it shouldn’t leave you in agony for days.

If you need this as a printable tip sheet, download it here - Shoulder Management 101


Are you experiencing shoulder pain? Book an appointment online, through email or by calling (778) 630-8800 - we will help get you started on your own rehab journey to getting back to what you love to do most!

Ask A Physio: Any Tips for Mouse Finger Pain?

AdobeStock_294358654.jpeg

So I don’t know about you, but COVID has certainly pushed me to using my computer a lot more. A. Lot. More. My body is feeling it, too - my neck is stiffer than it was, my hands are tired and my shoulders make a lot of noise after a long session on the computer.

We know that prolonged postures of any kind - standing in one spot, sitting still - aren’t great for anyone. Our bodies are for movement and all too often we get stuck in postures for hours at a time. When that prolonged posture is on the computer, that finger and wrist pain is often directly related to the position of the neck and shoulder as much as it is the wrist and hand.

So what should you do? The best thing you can do is set an alarm for 30 minutes and make a point of moving and stretching your body. If you have two minutes (or less!), this movement and stretching routine can help combat the stiffness and soreness associated with prolonged computer use.

Without further ado, presenting:

Top Ten Exercises for Computer-Related Pain

AdobeStock_151993350.jpeg

1. Shake it out! - I love a good shake - who doesn’t? Sit up straight, take your wrists and hands and give them a good shake, letting your fingers fly.

2. Chin to chest - Something we often forget is how much posture contributes to pain further down the chain. Sit up straight and tuck your chin into your chest, feeling a stretch down the back of your neck. Hold this for 10ish seconds.

3. Ear to shoulder, then a twist - Still sitting up straight, lean your ear to your shoulder and hold it for about 10 seconds. Then twist your head so your nose gets closer to your armpit; hold this for another 10 seconds. Repeat on the other side.

AdobeStock_264162260.jpeg

4. Shoulder rolls - Still sitting up straight (are you sensing a theme yet??), roll your shoulders up to your ears then squeezing them back and down, pushing your shoulder blades as far down your back as you can. Bring your shoulders forward then back up to your ears. Do this 5 times.

5. Wrist stretch - Stretch your right arm in front of you and bend your wrist and fingers back. Use your left hand to pull your right fingers further back, feeling a stretch in your forearm. Hold for 10ish seconds and repeat on the other side.

6. Prayer stretch - Place your hands together in a prayer position in front of your chin. Lower your hands down, keeping your palms together and feeling a stretch in your forearms. Hold for 10ish seconds.

AdobeStock_331129900.jpeg

7. Finger stretch - Place all your finger tips together - think Mr. Burns from the Simpsons - and push your fingers together. Keep your fingers together and pull your palms away from each other. Stretch your thumbs away from your other fingers. Feel a stretch for 10ish seconds.

8. Wrist circles - Draw circles with your wrists! 5 in one direction, 5 in the other.

9. Hand fist and open - Squeeze your hands into tight fists for a few seconds. Then stretch your hands out wide, reaching your fingers out as far as you can for a few seconds. Repeat 5 times.

10. Finish this off with a final shake!

Looking for a print out of this program? Here it is in PDF form, with pictures!

The better you support your body with proper ergonomics (see our previous two ergonomic blogs here and here) and frequent movement breaks, the less likely you’ll suffer from computer related pain. So set that alarm, stretch it out and stay pain free!

As always, if you would like to book an assessment with one of our fabulous physiotherapists or our amazing massage therapist, give us a call at (778) 630-8800 or email us at clinic@ladnervillagephysio.com.

Finally - do you have a burning question one of our physiotherapists can answer? If you’d like to #askaphysio, we would love to answer!