#exercises

Neck & Back Pain - Part 1: Mobility and Stretching Exercises

Our fabulous registered kinesiologist Kheya McGill is back! In part 1 of her two-part blog series, Kheya reviews her favourite mobility and stretching exercises to help you tackle your neck and back pain. For Kheya’s favourite strengthening exercises, visit Part 2.

Neck and back pain are very common conditions. Sinnott et al. found that, at any given time, 15-20% of us will report back pain and 10-20% of us will report neck pain. Those numbers are huge! Spending more time hunched over computers (like most of us have been over the past two years) hasn’t helped.

Taking movement breaks throughout the day can be incredibly helpful for keeping pain at bay. It really boils down to the saying “motion is lotion” - the more you move your body, the easier (and less painful) it is to move. If you’re able to, taking a quick break every hour can make all the difference.

In this blog I will outline a few of my favourite exercises to increase spinal mobility and stretch tight back muscles. Make sure to stay tuned for part 2 of my blog series on neck and back pain, which will focus on my favourite strengthening exercises.

But first, a review of spinal anatomy…

Our spine is organized into 5 main regions. From the head down, these regions are:

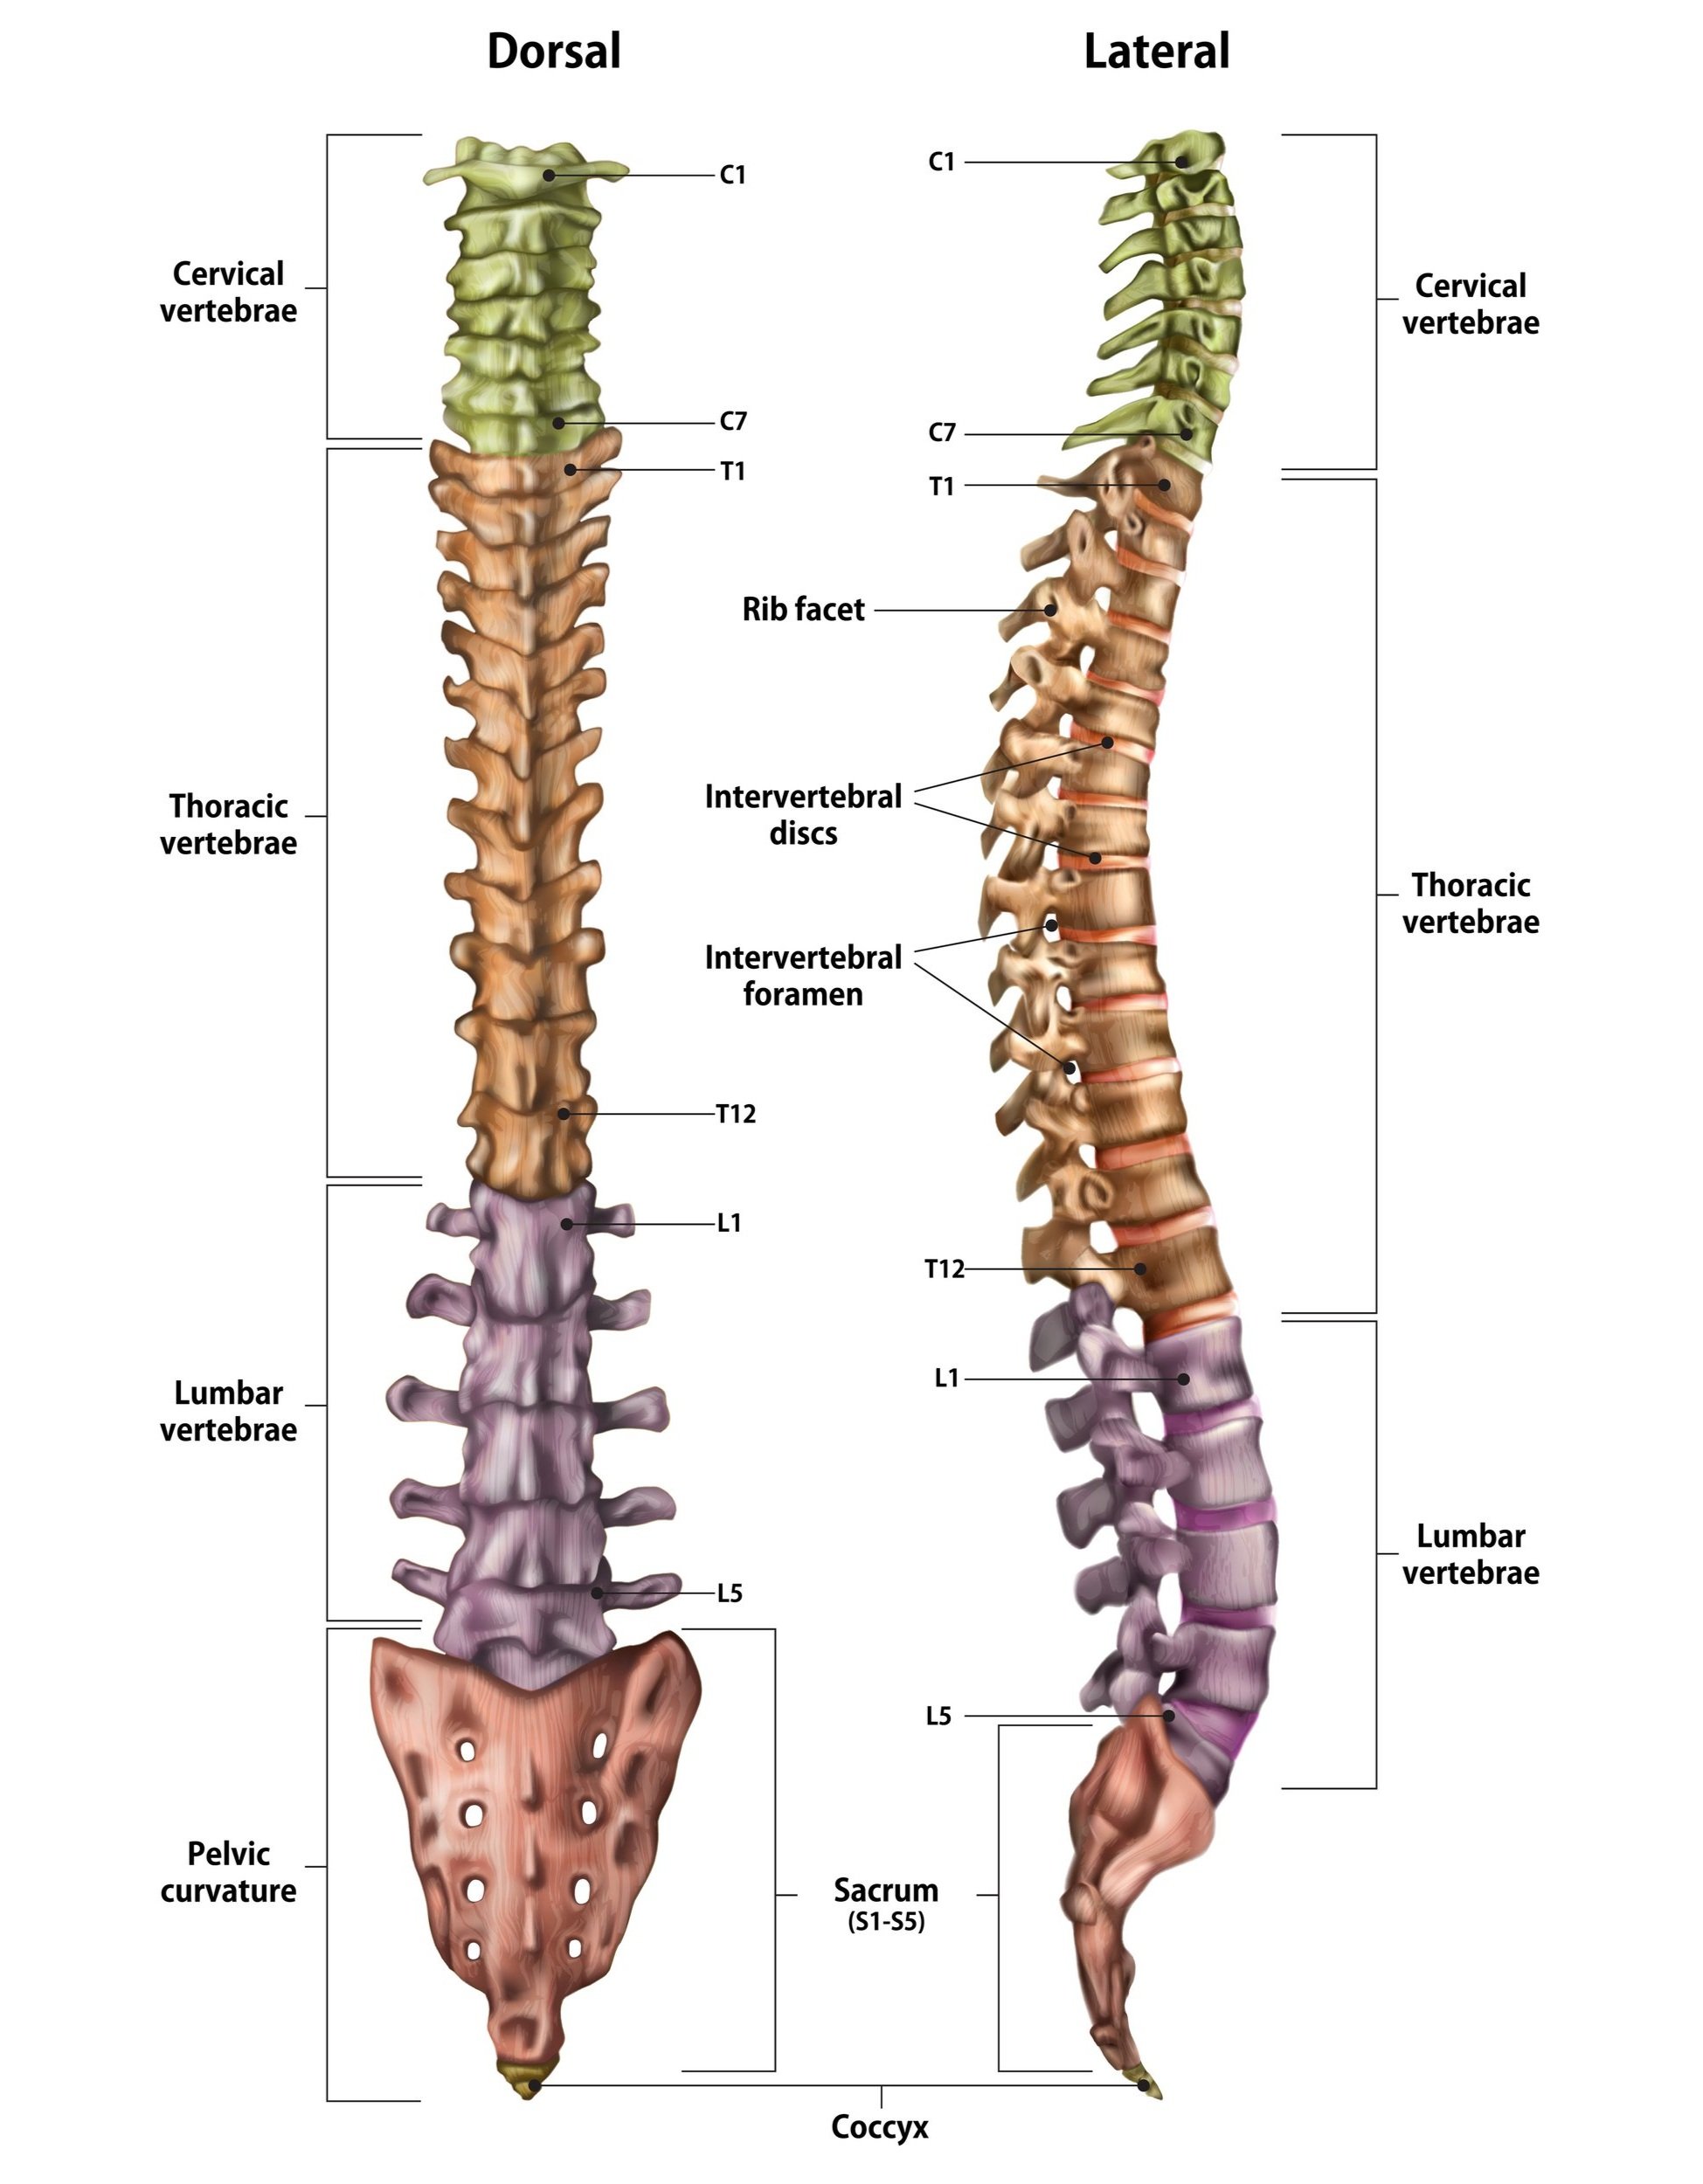
  • cervical spine - 7 vertebrae that make up the neck

  • thoracic spine - 12 vertebrae in the upper and mid-back, all of which attach to ribs

  • lumbar spine - 5 vertebrae of the low back

  • sacral spine - 5 vertebrae fused to form the sacrum, the triangular bone that helps make up the pelvis

  • coccyx - also known as the tailbone, located at the very bottom of the spine

The spine has three main jobs:

  1. Central supporting structure - the spine acts as a scaffold for your body. Muscles, ligaments and connective tissue attach to each vertebra of the spine and to the limbs. The rigidity of the spine also holds us up against gravity.

  2. Protector of the spinal cord - millions of nerve cells travel up and down your spinal cord, sending signals up to the brain and out to the entire body. Without the bony protection of the vertebrae, the spinal cord would be much more vulnerable to trauma and injury.

  3. Movement - the multiple joints of the spine allow a lot of movement to occur including sitting, standing, walking, bending forward and twisting around.

Keeping your spine healthy is critical to your overall health - the stronger and more mobile you are, the better!

Kheya’s Top Five Mobility and Stretching Exercises

The Mobility Exercises

What is it:

Mobility refers to the ability of a joint to move actively through a range of motion (see our previous post on flexibility vs. mobility for more on this). Improving mobility helps increase the range of motion available in the joints, leading to improved function and decreased pain.

1)      Thoracic spine openers

Begin by laying on your side with your legs slightly bent and stacked on top of each other. Stretch your arms out straight in front of you. Keeping your bottom arm on the floor, roll on your back and sweep your arm up and over to the other side, opening the chest. Keep your eyes on the top hand, rotating your neck as your arm rotates over your body. Once you have reached your end range, bring your arm back across your body.

Repeat 5-10 times per side.
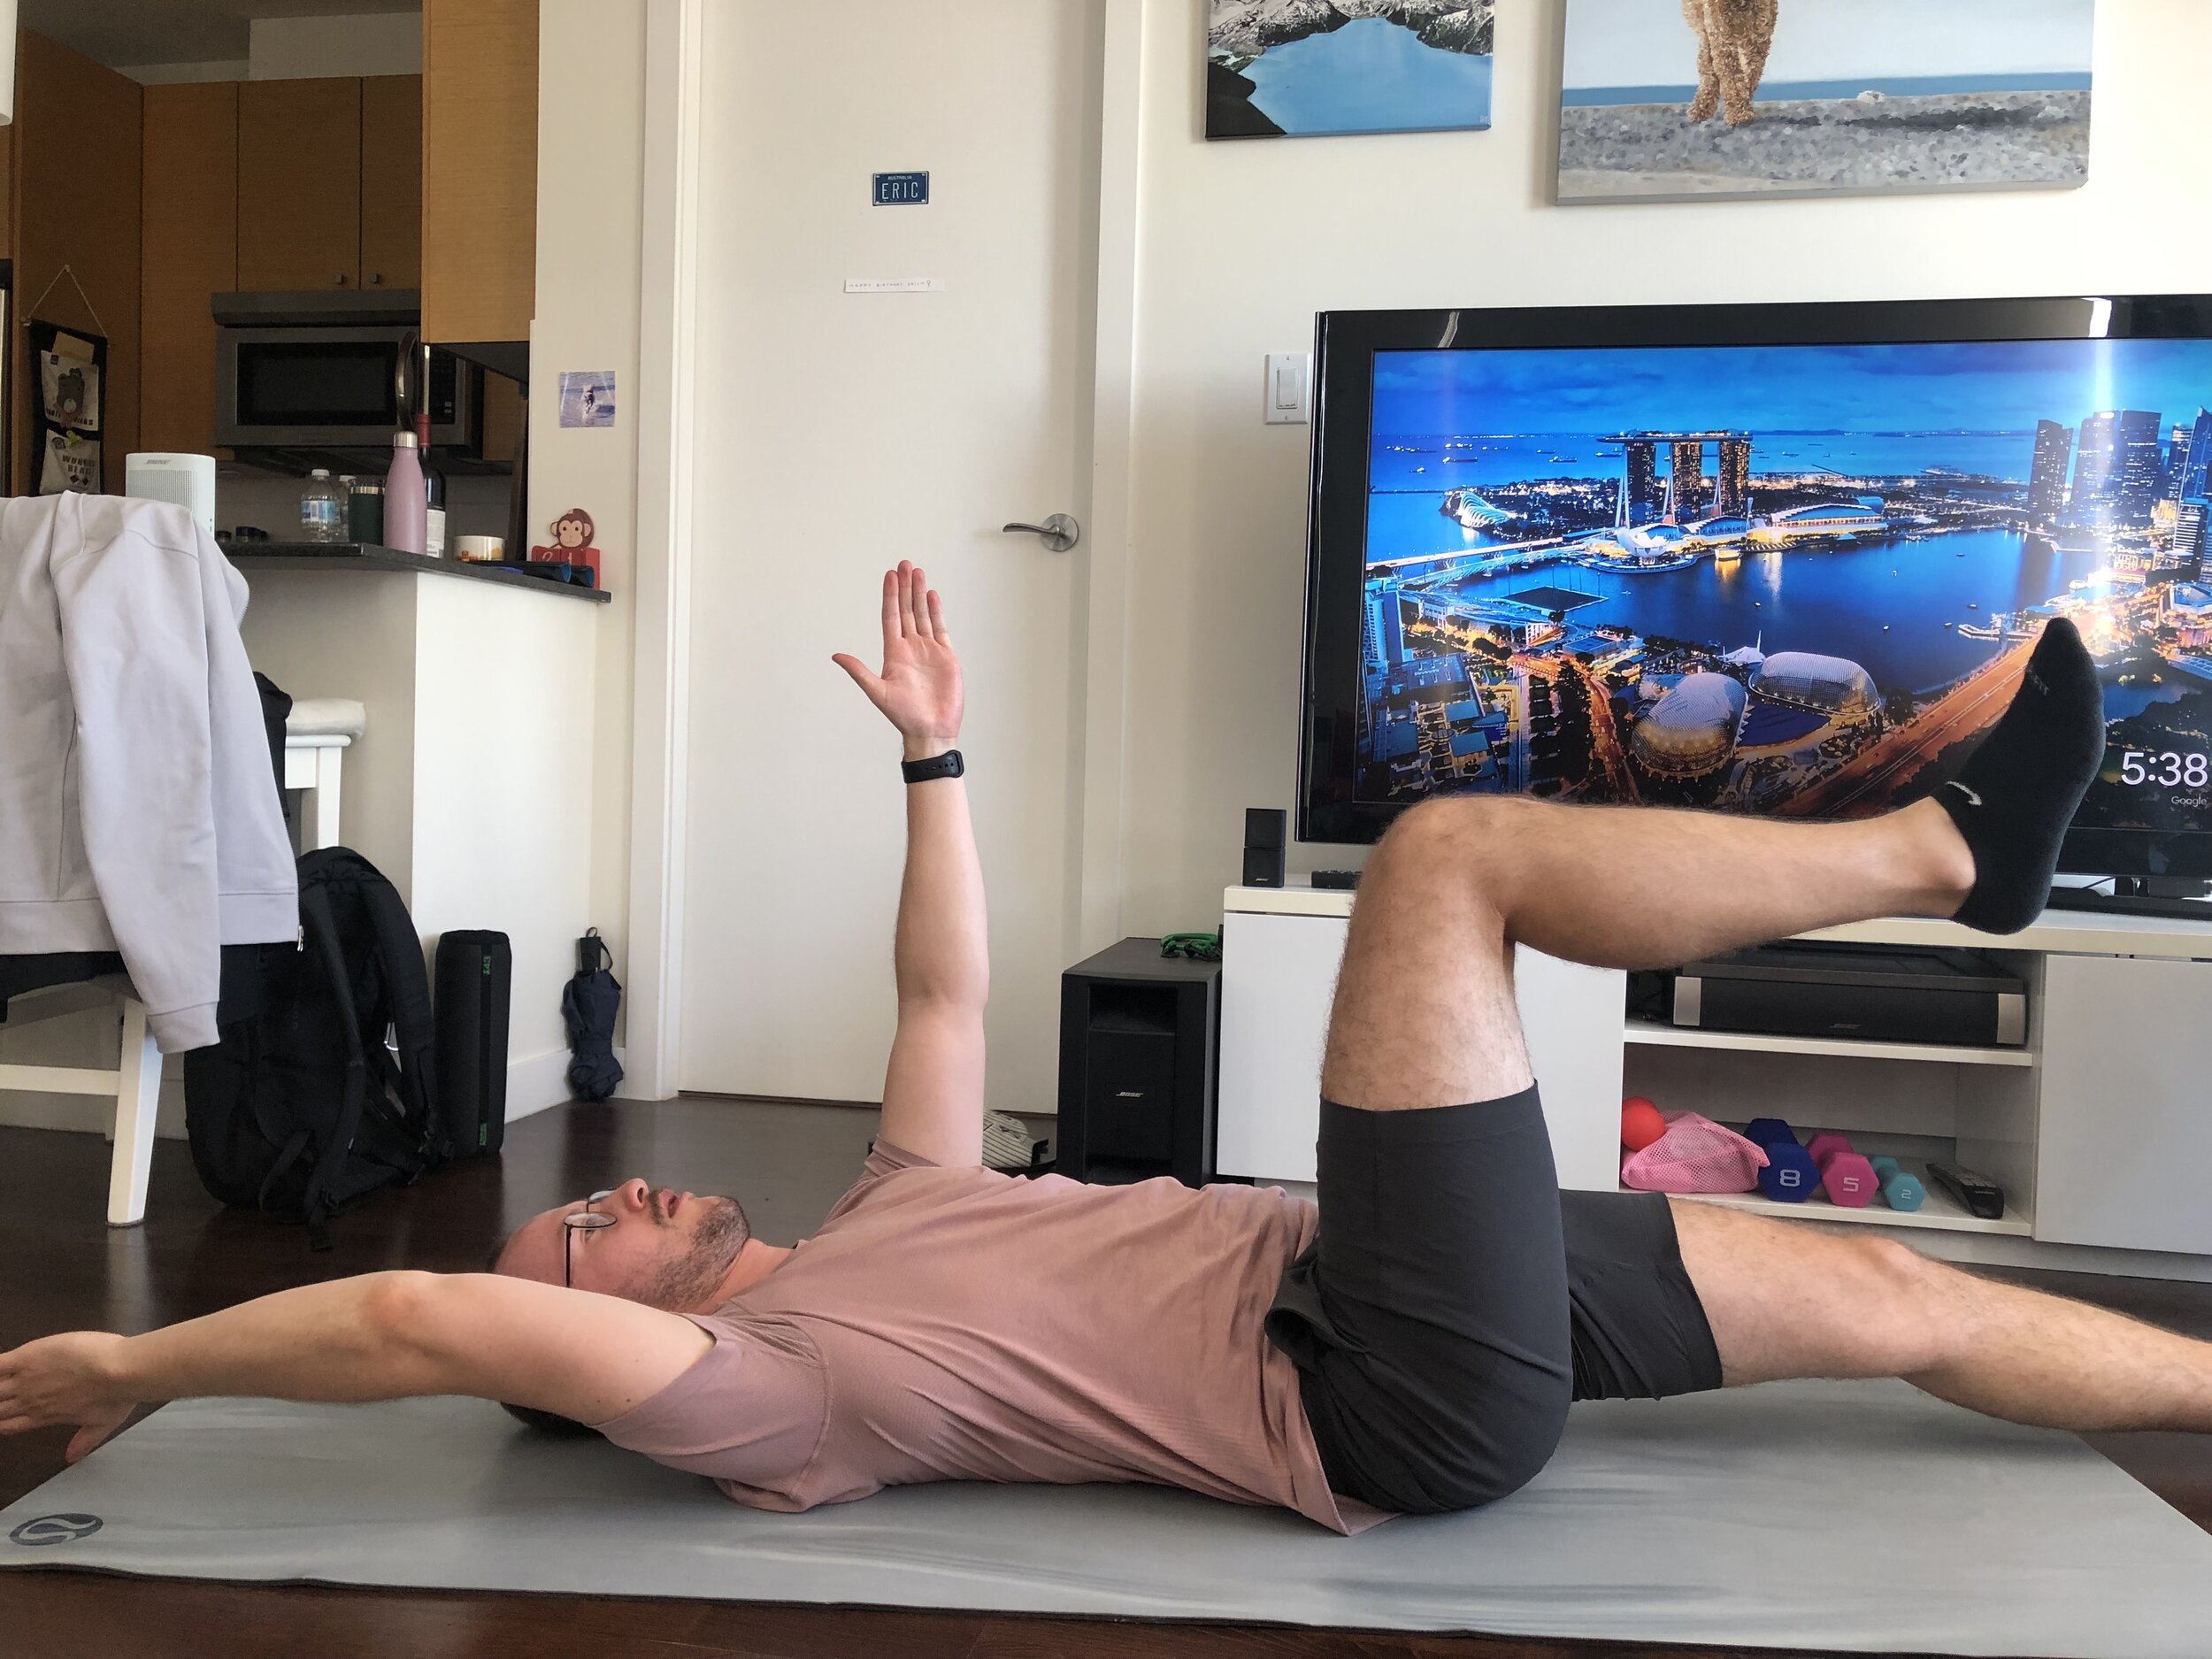
2)      Lumbar rotation

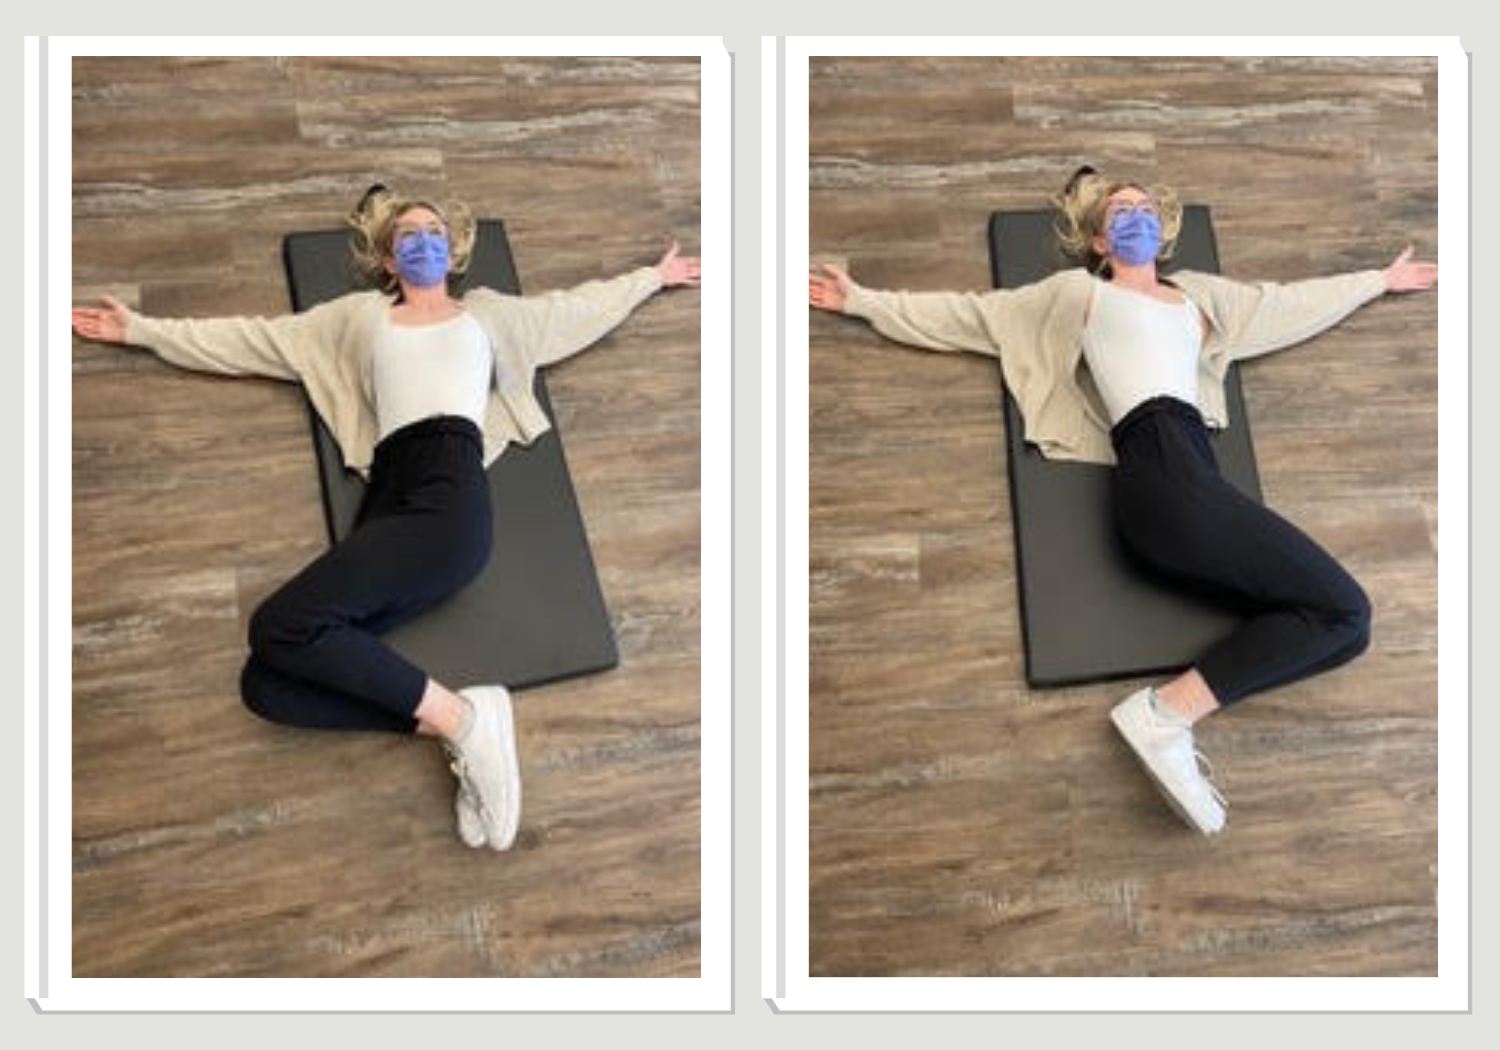
Begin on your back with your knees bent, feet flat on the floor and your arms stretched out on either side of you like a “T”. Keeping your back flat on the ground, drop both legs out to one side. Hold this position for 5-10 seconds. Bring your knees back to the middle and then repeat the same movement on the opposite side.

Repeat this movement 10 times for 2-3 sets.

3)      Cat cow

Begin on all fours. With the hands underneath the shoulders, lift your head and chest while simultaneously letting your stomach sink and lower back arch. After this, switch and round the back and let the head and neck drop while rounding your back as much as possible.

Repeat these alternating movements 10 times and then repeat this for 2-3 sets.

The Stretches

Stretching is the ability to move muscles through a range of motion passively. In other words, pushing to get to the joints through the end range using assistance from your hands, the wall, a strap, or anything else (see our previous post on flexibility vs. mobility for more on this). Stretching is useful for back pain as it can help loosen sore and tight muscles.

1)      Childs pose

Begin on your hands and knees and drop your bum back onto your heels. Reach your hands forwards, dropping your head and shoulders down towards the floor.

Hold for 20-30s and repeat 2-3 times.

2)      Knee hugs

Begin laying on your back and hug one leg in towards your chest.

Hold this for 20-30s. Repeat on both sides and complete 2-3 sets.

Next up, the strengthening exercises! Head over to Part 2 for my favourite exercises to make your body stronger.

If you are unsure of where to start, our registered kinesiologists would be happy to work with you to create an exercise program which matches your exercise goals and injury specific recovery needs.

Give us a call today give us a call at (778) 630-8800, email us or book online to seek treatment from a physiotherapist or to work with a registered kinesiologist.

Improving Your Golf Game

LVP-Final-3.jpg

Trevor Reid, one of our physiotherapists at Ladner Village Physiotherapy, is a former athletic therapist with some of Fraser Valley University’s varsity teams. An avid golfer, Trevor has given his tips on how to improve your golf game.

Want to know more about Trevor? Read all about him here!

Golf is a fun sport played by many in our community. We are lucky to have an abundance of courses including Beach Grove, Tsawwassen Springs, The Links at Hampton Cove, Kings Links and Delta Golf Course. I’m still working my way through all of them!

The Golf Swing

As you could imagine there are many different forces and mechanical components involved in a golf swing. As complex as a golf swing may be, Newton’s Third Law of Physics still applies:

When two objects interact, they apply forces to each other of equal magnitude and opposite direction.

In other words, when a club hits the golf ball it causes the ball to go flying in the opposite direction. We can use this simple concept to our advantage in two main ways: generating more force and moving through a bigger range of motion:

  1. Producing more force - Any exercise that strengthens an individual’s muscles involved with a golf swing will allow them to produce more force which can then be applied to the golf ball.

  2. Increasing available range of motion - Any mobility exercise that can gain range of motion related to a golf swing can allow for force to be generated over a longer period of time.

When performing a specific strength and mobility regime you will be able to hit the ball further and improve your game!

A good golf swing involves your entire body. Your feet need to be planted and well engaged. The power behind your swing is driven from your legs and core and transferred to your arms in one seamless motion. Making the most of your swing requires strong muscles and mobile joints from head to toe.

AdobeStock_345242654.jpeg

The Exercises

Looking for some starters? Here are some of my favourite golf strengthening and mobility exercises you can do at home 2-3 times per week. The first four exercises can be performed for 10 repetitions (both sides) for 2-3 sets, then finish off with the stretch at the end.

1. Dead bug: A good exercise to strengthen the core muscles.

yqDYm+D+QHy4PE8ALDGw1g.jpg
urUHYigRTOuM8q8x8+rQrA.jpg
 

Lay flat on the ground, raise your arms and legs in the air and keep the knees bent at 90 degrees. You will then straighten/lower one arm and the opposite leg at a time while the opposite limbs stay in the starting position. You will then return to the starting position and repeat the same movement on the opposite side. Be mindful to keep your core engaged - no back arching!


2. Resistance band trunk rotation: Helpful on strengthening the rotational muscles.

QlXItzjLQTunzZniX0YjTA.jpg
U5ysyuB7RkqLjyvpSV1IjA.jpg
 

Tie a band around a stationary structure (like a door knob) then stand 3 to 4 feet away from the band. Straighten both arms fully and hold the band between your interlocked hands. From this position, you will rotate away from the band and then return to the starting position, perform this movement on both sides.


3. Knee swings: Effective at keeping the hip muscles and lumbar spine mobile.

eAEFUCmzS1imaKrkFpch2w.jpg
8pcp8tYFTcCzC0G9LSV1Jw.jpg
 

Lay on your back, bend both knees and then swing them side-to-side.

4. Seated thoracic spine rotation: Good for improving the mobility of your thoracic spine.

P%35pjvWQNOyIDYA3c9a3w.jpg
MLtC4cAWTlyWlZU+bW88mg.jpg
 

Sit in a normal chair, cross your arms across your chest and then slowly rotate left and then the right.


5. Quadratus lumborum stretch: A muscle commonly tight in golfers.

xFchnp4wTCuXVsB0YVQm6g.jpg
 

Start on your hands and knees and place your hands slightly off to the side. Lean back while keeping your hands in the same place, go until you feel a stretch on the opposite side of your lower back. Hold for 30 seconds on both sides.


Does your golf swing need a bit more oompf? Book with us online, by email or phoning (778) 630-8800. Until then, see you on the course!

Diastasis Rectus Abdominis 101: All About The "Mummy Tummy"

Abdominal diastasis, diastasis rectus abdominis, diastasis recti, abdominal separation, ab gap, “mummy tummy” ….. it has a lot of names. But whatever you call it, I want you to know a little bit more about it so you can be better equipped to manage it.

 
DRA.png
 

What is it an abdominal diastasis?

Diastasis Rectus Abdominis (also known as DRA) is a common occurrence where the linea alba (the line of connective tissue between your six-pack muscles) gets stretched. Note that I said stretched, not torn. Think of pizza dough - stretching the pizza dough is a diastasis, but there are no holes or tears in the pizza dough (which would be a hernia).

DRA most commonly occurs during pregnancy but can also occur in people who have never been pregnant, such as people who lift really heavy weights with poor abdominal engagement and technique.

DRA is considered a normal change in pregnancy!

Your body stretches to accommodate the growing baby and honestly, stretching is kind of the name of the game when it comes to pregnancy. Did you know that uterine capacity increases from 4ml to 4000ml at term and abdominal length increases by an average of 115% at 38 weeks gestation? Can you imagine how uncomfortable pregnancy would be if your stomach didn’t stretch? I can only imagine the heartburn.

So I hope we can all agree that the stretch is a good thing and we are on team stretch - yay for stretch! But unfortunately, as with other body parts faced with a sudden increase and then decrease in size (RIP pre-baby boobs), it is also quite common for that stretch to remain after pregnancy.

How common is DRA?

Way more common than you think! Here’s the research from Mota et al and Sperstad et al showing how common DRA is in pregnancy:

  • 33.1% of women at 21 weeks pregnant

  • 100% of women at 35 weeks pregnant

  • 60% of women at 6 weeks post-partum

  • 32% of women at 12 months post-partum

How do I know if I have a diastasis?

DRA Doming

There are a few ways to tell! The most obvious sign that people notice is the presence of an abdominal “dome”, “cone” or “triangling” of their stomach when they exercise or during daily activities (like getting up from the couch or straining on the toilet). This is a protrusion or bulge down the center line of your stomach when you attempt to use your muscles without correctly preparing or stabilizing first.

Some common movements which can cause doming are crunches, “V” sits, Russian twists, pull ups and getting up from bed or a reclined position.  This picture is someone with a diastasis doing a double leg lift without any preparation for the movement. Can you see the peak down the middle of her tummy? This is what we are talking about when we say “the dome.”

Avoiding the dome is one of the biggest considerations for proper DRA management.

If you haven’t noticed a dome you may also be able to feel the increased space between your abdominals.

To test yourself for DRA:

  • Lie flat on your back and press your fingers into your midline right underneath your sternum.

  • Press again a few inches down and keep going all the way down to your pubic bone.

  • When you press you might feel that some places feel firm and springy while in other places your fingers might sink in deeper. This could indicate an area that has stretched.

  • You can confirm this with a head lift test: with your fingers in the soft spot do a mini crunch and lift your head and shoulders off the ground, does the soft spot narrow? If it does that is another indication that you likely have a diastasis (the narrowing is a good thing, don’t let it freak you out!).


Need a visual? Check out this youtube video for a guide to assessing your own DRA.

Still not sure if you have a DRA? A pelvic floor physio, midwife or OB could also tell you right away if you have a diastasis and give you further direction.

Is it my fault?

This is a question I hear a lot and the answer is usually a resounding NO. Women often say to me “maybe if I didn’t gain so much weight” or “maybe if I was younger then my gap wouldn’t be so big” but according to the research this simply isn’t true.

According to a wide body of research, here is a list of things that are NOT risk factors for DRA:

AdobeStock_404215893.jpg
  • Age 

  • Ethnicity

  • Height 

  • Pre-pregnancy weight

  • Duration of labour  

  • Method of delivery

  • Weight gain during pregnancy 

  • Baby weight at birth

  • Gestational age 

  • Exercise training before, during and after pregnancy

  • BMI before pregnancy or at 6 months postpartum

Some things that we think might contribute to a diastasis are:

  • Having multiple pregnancies close together

  • Being pregnant with multiples

  • Heavy lifting using a Valsalva technique

  • Genetics

Will it go away?

While some natural recovery can occur in the first 8 weeks postpartum a large number of women will still have a DRA and need to learn how to properly manage it going forwards.

How do I manage my DRA?

DRA dome.png

Management will include learning proper movement and abdominal techniques so you can exercise without worsening your diastasis. You will need to avoid the dome. I know I mentioned that earlier but it needs to be repeated.

Exercises and movements which cause a dome will need to be modified until you are strong enough to maintain control throughout the entire movement.

DRA no dome.png

Take a look at the pictures on the right hand side. You can see the doming in the DRA in the top picture. Through proper technique, this doming can be controlled - this is demonstrated in the bottom picture. This person has properly activated the rest of her abdomen and is in control of the movement. Can you see how her stomach remains flat even when she lifts her legs?

(For what its worth, this lady deserves a lot of credit because that move is really hard to do properly and I’m sure it took some time and practice to get to this level!)  

The most important thing to remember:

AVOID THE DOME. Say no to the dome. You are now a dome-free zone.

A pelvic floor physiotherapist will be able to assess your abdominal diastasis, teach you correct abdominal control techniques, give you exercises to increase your abdominal strength and endurance, and help you transition back to your preferred type of exercise.


If you suspect you have an abdominal diastasis and want to investigate further, please feel free to book with Nicole at Ladner Village Physiotherapy by booking online or calling us at (778) 630-8800. She will be happy to help!

Ask A Physio: Anything You Can Do About Tennis Elbow?

AdobeStock_396571043.jpeg

Sometimes, it seems like we see injuries in spurts. I’ll have a day where I haven’t seen a sprained ankle in months and I’ll see 4 new ones that day. Lately, I’ve seen a lot of people with Tennis Elbow all asking the same question: is there anything you can do?

I’m sure you can guess the answer - YES! We have strategies for getting the pain to settle down, treatment techniques to help settle the tissue, and appropriate exercises to build it back up. But first -

What Is Tennis Elbow And Why Does It Happen?

Tennis Elbow (also known by it’s long name, lateral epicondylalgia or lateral epicondylitis) in an overuse injury of the muscles that attach to the outside part of the elbow. These muscles are responsible for pulling the hand backwards at the wrist, creating wrist extension.

AdobeStock_243823577.jpeg

People with Tennis Elbow complain of pain on the outside of their elbow, especially after using their wrists and hands a lot. Often, this pain is in a specific spot and when you hit it, it can be excruciating. People will often complain their grip strength has decreased especially when their arm is stretched out. (If you’ve heard of Golfer’s Elbow, it’s similar to Tennis Elbow but instead of the wrist extensors, it’s the wrist flexors that attach to the inside, or medial, part of the elbow that are the culprit. We can treat this, too!)

Tennis Elbow isn’t just for tennis players either! Anyone who does a lot of gripping or squeezing movements with their hands are at risk of developing Tennis Elbow - gardeners, plumbers, carpenters and painters are all great examples. We’ve also seen an uptick in people developing Tennis Elbow from increased typing and mouse work, both of which demand a lot of wrist action.

When it comes to rehab, physiotherapists are key to conquering this painful and annoying condition. Here are the top 5 most important things to remember in recovering from Tennis Elbow:

Top Five Tips for Tennis Elbow

  1. Do not overuse an overuse injury! This is a common problem - your elbow hurts when you move your wrist, so you try to stretch it and work it out. A lot. This often just leads to more pain - instead of allowing the tissue to rest and heal, it just gets further irritated.

  2. First, settle it down. We have a tonne of options for this - ultrasound, laser, soft tissue techniques, manual therapy, and gentle and appropriate exercises help to settle the tissue down and allow healing to begin.

  3. A brace might help. Using a tennis elbow brace may be the break your muscle needs to start healing. These braces act like a fret on a guitar string - when you use your wrist, it stops the muscles from pulling on the irritated part, allowing it to heal.

  4. Tape might help. Often, Tennis Elbow is accompanied by joints that aren’t working optimally. Tape can be used to adjust how the joints are moving, taking more pressure off the extensor muscles.

  5. When it’s settled, start building it back up. For any overuse injury, the key is to slowly progress exercises appropriately while not letting it flare back up again. This can be tricky! Every body is different and needs to be treated as such - there is no cookie-cutter rehabilitation plan for Tennis Elbow. This is where your physiotherapist is your guide.

As for all overuse injuries, exercise is key to success BUT they need to be appropriate exercises. The goal is to challenge the elbow without aggravating the injury. Success depends on a slow, incremental approach that allows the muscles to gradually gain strength and to get rid of this annoying condition once and for all!

If you’d like to see one of our fabulous physiotherapists for your elbow pain (or any other pain!), book online or give us a call at (778) 630-8800.

Motion Sensitivity - Part 2: Top Ten Exercises!

Stephanie.jpg

Stephanie Yip is one of our vestibular therapists here at Ladner Village Physiotherapy. In Part 2 of her two part series on motion sensitivity, Stephanie gives some great exercise options for motion desensitization.

If you read my last blog post on what motion sensitivity is, and have now realized that this is what has been plaguing your existence, do not fret! Like I emphasized in my last post, this does not have to be your reality! I am here to share with you 10 easy exercises that you can start doing today to finally get over your motion sensitivity! 

Before we start, here are some disclaimers:

  1. As mentioned, motion sensitivity rehabilitation DOES require triggering those icky symptoms. I know, so not fun. However, we only want to trigger mild symptoms that resolve within 3-5 minutes. Therefore, it’s really important that for all of these exercises, you start at a small enough dose that you aren’t making yourself sick for the next several hours. This may mean just trying the exercise for 15 seconds to start, and then gradually increasing the amount of time you expose yourself to the stimulus.

  2. Motion sensitivity exercises work best when individualized to the person. You’ve probably already realized that the way you experience motion sickness is very different from your friends. Some people get really sick riding elevators/escalators but have no issues in the car. Others can’t stand being a passenger in a car, but have never had any issues with those spinny rides at amusement parks. In order for your motion sensitivity rehab to be optimal, the exercises you do should be as similar to your personal triggers as possible. Since this is just a generalized list of exercises, you may find that some of them do nothing for you, while others may make you feel awful.

With this in mind, here are some great ideas of motion sensitivity exercises that are easy to fit in to your day-to-day life!

My Top 10 Motion Sensitivity Exercises

1) Look out the side window of your car next time you’re the passenger

If you are one of my fellow car sick sufferers, you have probably noticed that you feel a lot better if you sit in the front seat and look straight ahead. This is because when you are looking straight ahead, your visual and vestibular systems are in agreement and saying the same thing. On the flip side, if you look out the side window, your visual system is seeing all sorts of quickly moving trees and street poles making you feel like you’re moving while your vestibular system is telling the brain you’re just sitting in your car; a mismatch that creates the icky feeling you get. It may not feel great, but if you start with just 15-30 seconds of looking out the side window, then resume looking straight ahead, settle your symptoms, and repeat – you’ll gradually increase your tolerance until sitting in the backseat will no longer be impossible. All your tall friends will love you for it!   

AdobeStock_246579099.jpeg

2) Play on the swing set

Next time your kids beg you to push them on the swings, see if you can take a turn on the swings instead! The world around you will blur as you swing through, really messing with your visual system, and really helping you with your rehab!

3) Go on the see saw

Since you’re already at the playground, having a blast on the swings, why not take a whirl at the see saw? This exercise is particularly helpful for those of you who get a horrible lurch in the stomach every time you take the elevator, aka those who can’t stand vertical motion.

4) Play some Mario-Kart or any other video game with a lot of looking around

Ever tried playing a first-person shooter game, tried to look around while walking forward and just felt queasy? If yes, and you need an excuse to play some video games guilt-free, you can now tell the world that you’re actually training your vestibular system and being very productive.

5) Watch the clouds while you walk

Do this one responsibly and do check that your coast is clear first! As you walk, your vestibular system will be telling your brain that you are moving forward, but the clouds floating about will be telling your visual system something totally different. Use this mismatch to your advantage and get training.

6) Log roll down a hill

This one is pretty self-explanatory and is definitely for those looking for an advanced level exercise. Be warned – go slow with this one and build up gradually.

AdobeStock_290217744.jpeg

7) Read while walking, as a passenger in the car, in a hammock or while sitting in a rocking chair

If you’re focused on non-moving words on a page, your visual system won’t be able to correlate with the vestibular system which is telling your brain you’re moving. You can adjust how much you move to make this one easier or harder.

8) Play some focused catch

If you watch a ball being thrown very closely, keeping the ball in focus the whole time, the background behind the ball will be both blurry and moving. This can confuse your brain and bring on those feelings of motion sickness.

9) Do some eyes closed yoga or t’ai chi

You wouldn’t expect something as simple as yoga or t’ai chi to really amp up your motion sickness. If you’re a regular yogi or t’ai chi practitioner, this is often a really nice way to slowly start tackling those gross feelings. When you take away your vision and add some movement, your brain really has to work overtime to figure out where you are!

10) Do some chair spins

That office chair you spend most of your day in? Give it a good twirl every once in awhile! Not only can this one be done quickly, you likely can do it a LOT throughout the day without too much effort.


What are your favourite exercises to combat motion sickness? Add some ideas in the comments below!

If you’re suffering from motion sickness, we can help - book online, send us an email or give us a call at (778) 630-8800.

Motion Sensitivity - Part 1: What Is It?

Stephanie.jpg

Stephanie Yip is one of our vestibular therapists here at Ladner Village Physiotherapy. In Part 1 of her two part series on motion sensitivity, Stephanie explains what motion sensitivity is, why some people suffer from it and what we can do about it. Enjoy!

As a kid growing up, cars were my nemesis. I still have vivid memories of throwing up on pretty much every family road trip, and even worse, throwing up in my friend’s dad’s brand-new car on the way to a soccer game. Planes were even worse. One of my earliest memories is of me as a 5-year-old, non-stop projectile vomiting on a 12-hour flight, with everyone around us handing us their puke bags since I had used up all of my own. As I got older, my motion sensitivity got a bit better in the sense that I didn’t necessarily puke during every car ride, but I would still feel sick within minutes of being in any moving vehicle.

AdobeStock_170919742.jpeg

How many of you can relate to this? After sharing with friends, I discovered that there are so many of us out there, struggling with cars, buses, boats, and thinking that this is something we just have to live with. Well, I am here to share with you all the greatest revelation which has completely turned my world upside down.

This does not have to be our reality.

There is a solution. Just like how we rehabilitate and strengthen our ankle after a sprain, we too, can rehabilitate and strengthen our vestibular system to improve our motion sensitivity!

But let’s back this up, and start with…

What is motion sensitivity?

There are two main types of motion sensitivity. One is considered visually induced motion sensitivity in which you experience symptoms due to complex visual environments. Do you ever find yourself feeling sick at the grocery store as you scan the aisle for that one type of flour you need? Does scrolling on your phone too quickly make you feel loopy? If so, this may be the type of motion sensitivity you have.

The second type is the one we mostly think about when we think of motion sensitivity, and that’s why it’s called true motion sickness in which symptoms are caused by passive motion. Passive motion means that you are not actively moving but something is moving you i.e. being in a car or boat.

What are some common symptoms of motion sensitivity?

After sharing my experiences with friends, I’ve discovered that everyone experiences motion sensitivity quite differently, so this list of symptoms is definitely not all-encompassing. Personally, I get a weird background headache, followed by a woozy feeling in my head almost like I’m floating. Despite my earlier experiences of nausea and vomiting, I rarely feel sick to the stomach now unless I’m on a tiny boat with very choppy waves. On the flip side, many of my friends have described nausea as their main symptom. Other common symptoms include fatigue, imbalance, increased sweating, disorientation, palor (aka looking quite pale), excessive production of saliva, and burping.

So you’re probably thinking great, I definitely get motion sensitivity, but why does this have to happen to me?? Do you ever watch your kid reading in the backseat and think man, why can’t I do that?

Why do I get motion sensitivity?

If you’ve been an avid reader of our blog, you will already know that our sense of balance comes from three main sources: the vestibular system, the visual system, and the somatosensory system. (In case you missed it, check out our earlier blog posts on the vestibular system here and here.)

People who get motion sensitivity often rely too much on their visual system, which means their brains can easily be tricked. If you’re sitting in your parked car, and the truck next to you starts moving, your vestibular system is telling your brain that you’re not moving, but your visual system is saying the opposite. If you’re someone who over relies on their visual system, that system will take over, convince the brain that you are indeed moving, and make you feel really sick. This can also be referred to as visual vestibular mismatch, or VVM.

So what can you do about it?

Treatment for motion sensitivity

If you’re a lifetime sufferer of motion sensitivity, you’ve probably already tried Gravol, ginger pills, cracker nibbling, looking straight ahead when the car is moving, etc. etc. But all of these things are only band aid solutions to help you cope. What if you could cure your motion sensitivity?

Just like an ankle sprain, there is no magic wand that can cure you in an instant, but there are many exercises you can do to start training yourself so that you no longer experience motion sensitivity. There are two main elements you will need to work on:

  1. We need to train the brain to stop its over-reliance on the visual system, and to start relying more on the vestibular system instead. How? Take the other two systems away. Stand on your cushy couch, close your eyes, and don’t fall over.

  2. We need to gradually desensitize or habituate the brain so that it can tolerate these icky situations more and more. This means that yes, we do need to trigger those symptoms to train the brain, but only mildly. You should feel only mild symptoms that resolve within 5 minutes. What that may look like totally depends on the individual. For some, that may mean 1 minute in the car as a passenger. For others, it may mean getting on a roller coaster if that’s the only trigger they have.

For more exercises that you can easily incorporate into your everyday life, check out part 2 of our motion sensitivity series where I will be sharing my Top 10 Motion Sensitivity Exercises. Some of them are actually pretty fun and include playing video games or hanging out with your kids, so be sure to check out that post when it goes live!

If you want to get started on your motion sensitivity rehabilitation, give us a call at (778) 630-8800 or book online at ladnervillagephysio.com .


Ask A Physio: Any Tips for Mouse Finger Pain?

AdobeStock_294358654.jpeg

So I don’t know about you, but COVID has certainly pushed me to using my computer a lot more. A. Lot. More. My body is feeling it, too - my neck is stiffer than it was, my hands are tired and my shoulders make a lot of noise after a long session on the computer.

We know that prolonged postures of any kind - standing in one spot, sitting still - aren’t great for anyone. Our bodies are for movement and all too often we get stuck in postures for hours at a time. When that prolonged posture is on the computer, that finger and wrist pain is often directly related to the position of the neck and shoulder as much as it is the wrist and hand.

So what should you do? The best thing you can do is set an alarm for 30 minutes and make a point of moving and stretching your body. If you have two minutes (or less!), this movement and stretching routine can help combat the stiffness and soreness associated with prolonged computer use.

Without further ado, presenting:

Top Ten Exercises for Computer-Related Pain

AdobeStock_151993350.jpeg

1. Shake it out! - I love a good shake - who doesn’t? Sit up straight, take your wrists and hands and give them a good shake, letting your fingers fly.

2. Chin to chest - Something we often forget is how much posture contributes to pain further down the chain. Sit up straight and tuck your chin into your chest, feeling a stretch down the back of your neck. Hold this for 10ish seconds.

3. Ear to shoulder, then a twist - Still sitting up straight, lean your ear to your shoulder and hold it for about 10 seconds. Then twist your head so your nose gets closer to your armpit; hold this for another 10 seconds. Repeat on the other side.

AdobeStock_264162260.jpeg

4. Shoulder rolls - Still sitting up straight (are you sensing a theme yet??), roll your shoulders up to your ears then squeezing them back and down, pushing your shoulder blades as far down your back as you can. Bring your shoulders forward then back up to your ears. Do this 5 times.

5. Wrist stretch - Stretch your right arm in front of you and bend your wrist and fingers back. Use your left hand to pull your right fingers further back, feeling a stretch in your forearm. Hold for 10ish seconds and repeat on the other side.

6. Prayer stretch - Place your hands together in a prayer position in front of your chin. Lower your hands down, keeping your palms together and feeling a stretch in your forearms. Hold for 10ish seconds.

AdobeStock_331129900.jpeg

7. Finger stretch - Place all your finger tips together - think Mr. Burns from the Simpsons - and push your fingers together. Keep your fingers together and pull your palms away from each other. Stretch your thumbs away from your other fingers. Feel a stretch for 10ish seconds.

8. Wrist circles - Draw circles with your wrists! 5 in one direction, 5 in the other.

9. Hand fist and open - Squeeze your hands into tight fists for a few seconds. Then stretch your hands out wide, reaching your fingers out as far as you can for a few seconds. Repeat 5 times.

10. Finish this off with a final shake!

Looking for a print out of this program? Here it is in PDF form, with pictures!

The better you support your body with proper ergonomics (see our previous two ergonomic blogs here and here) and frequent movement breaks, the less likely you’ll suffer from computer related pain. So set that alarm, stretch it out and stay pain free!

As always, if you would like to book an assessment with one of our fabulous physiotherapists or our amazing massage therapist, give us a call at (778) 630-8800 or email us at clinic@ladnervillagephysio.com.

Finally - do you have a burning question one of our physiotherapists can answer? If you’d like to #askaphysio, we would love to answer!